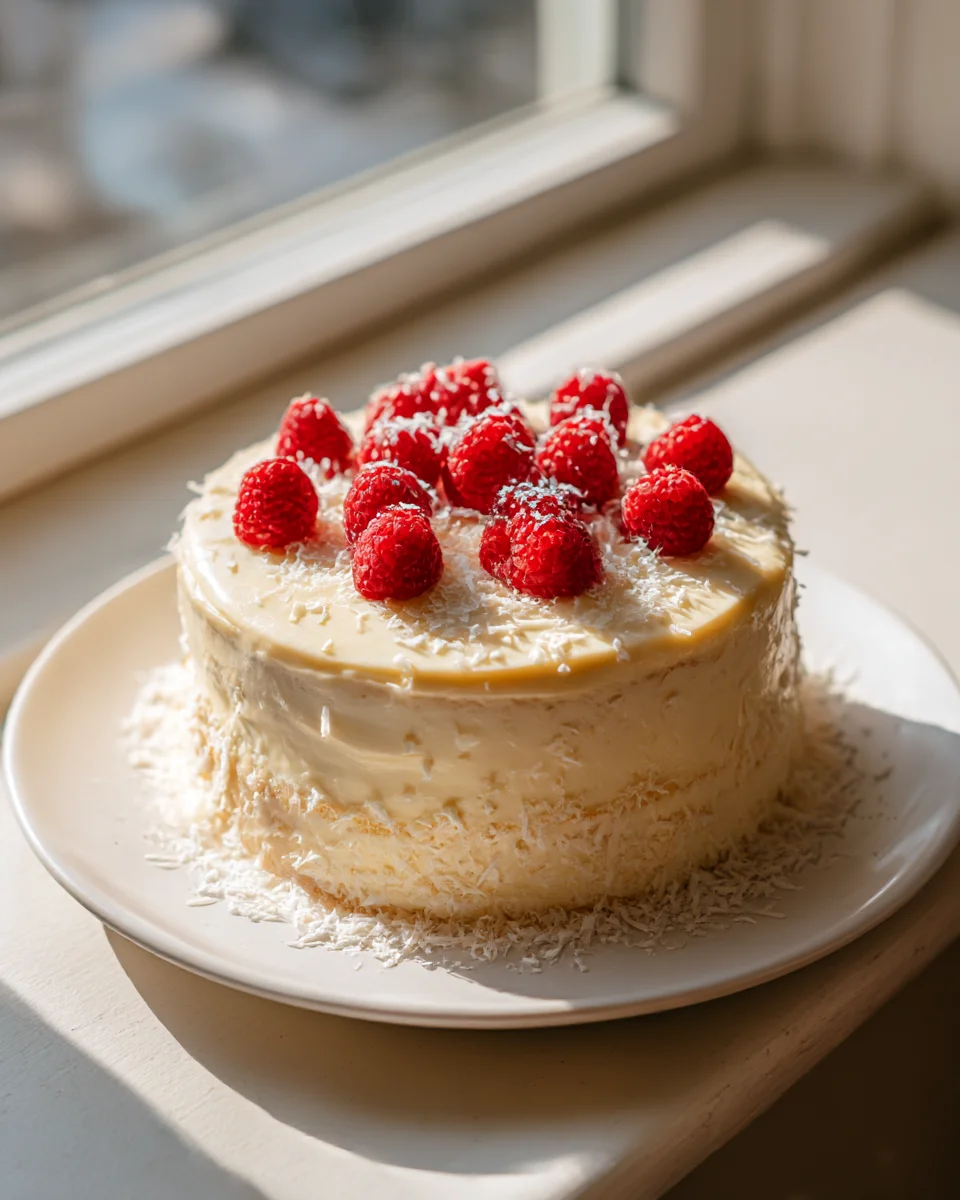
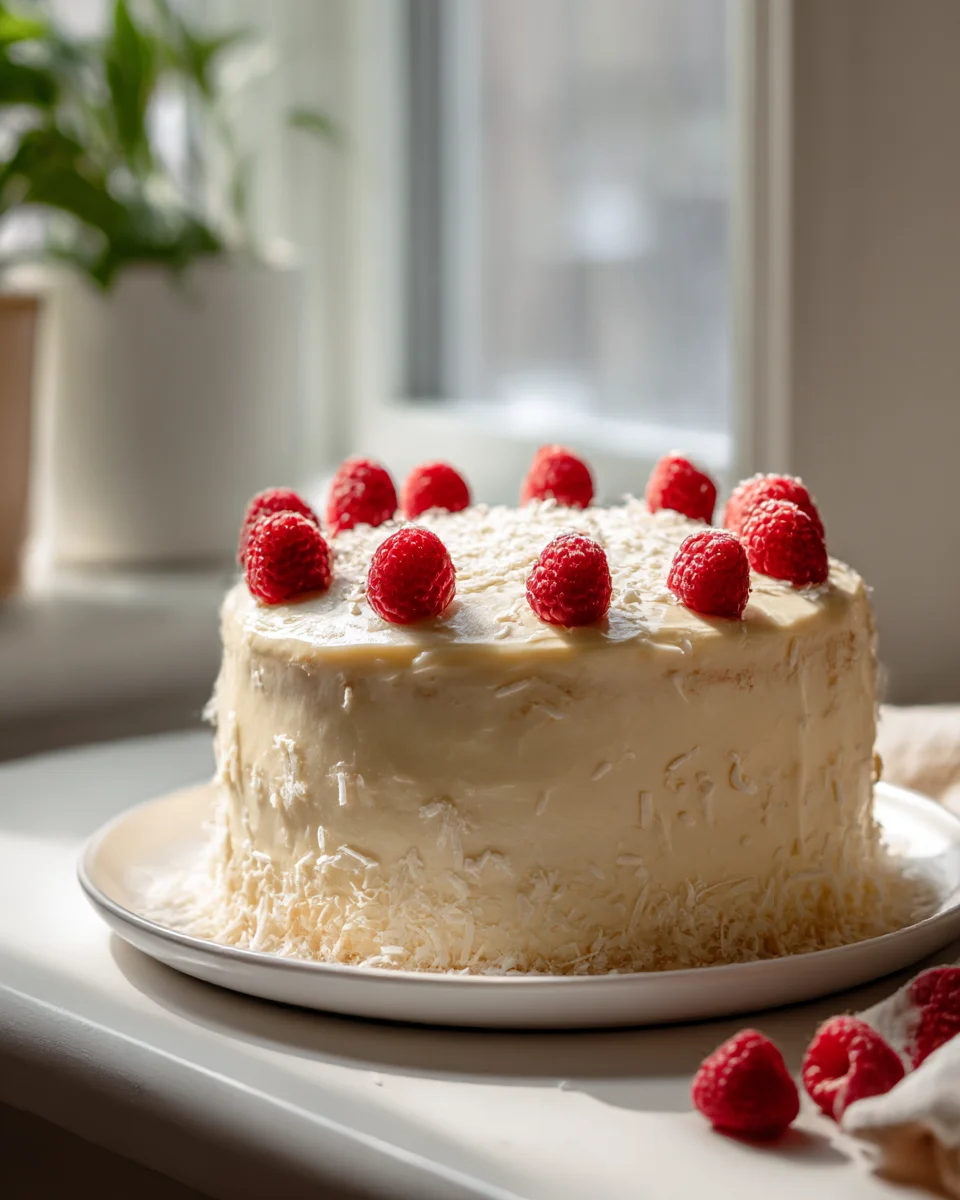
Milky Girl Cake
Have you ever dreamed of a cake so tender, so moist, it practically melts on your tongue in a sweet, milky embrace? Well, my friends, prepare yourselves, because my Milky Girl Cake is here to make that dream a delicious reality! This isn’t just any cake; it’s a truly special dessert that takes a humble sponge and transforms it into an ethereal, creamy delight, all thanks to its unique and generous milky infusion.
What makes this Milky Girl Cake so utterly irresistible, you ask? It’s that perfect balance of a light, airy base soaked in a trio of sweet milks, creating an incredible moistness and an unbelievably rich, yet not-too-heavy, milky flavor. It’s the kind of cake that brings back comforting memories, offers pure dessert bliss, and is guaranteed to be the star of any gathering. You’ll absolutely love how straightforward it is to achieve such a luxurious and impressive result, making you feel like a baking superstar without all the fuss.
In essence, this is a delightful sponge cake, lovingly doused in a sweet, luscious milk bath until every crumb is impossibly tender and juicy. We then crown it with a delicate, cloud-like whipped topping, creating a beautiful contrast in textures. Each spoonful is a symphony of soft, creamy, and sweet perfection – a true hug in cake form that you’ll want to make again and again.
Ingredient Notes
Oh, you’re in for a treat with my special Milky Girl Cake! This isn’t just any cake; it’s a dreamy, moist sponge soaked in a luscious milk mixture and topped with a cloud of whipped cream. Getting the right ingredients makes all the difference for that melt-in-your-mouth experience. Here’s a breakdown of what you’ll need and some handy substitutions.
For the Sponge Cake
- All-Purpose Flour: This is the backbone of our light and airy sponge. I prefer using regular all-purpose flour for a good balance of structure and tenderness. If you want an even finer, more delicate crumb, you can substitute with cake flour. Just remember to use 1 cup plus 2 tablespoons of cake flour for every cup of all-purpose flour.
- Granulated Sugar: Essential for sweetness and also helps keep the cake moist. Don’t skimp here!
- Large Eggs: Room temperature eggs are crucial for volume and a smooth batter. They whip up better and incorporate more air, giving our cake that lovely lift.
- Baking Powder: Our leavening agent! Make sure yours is fresh for the best rise.
- Whole Milk: Adds moisture and richness to the cake batter. While you could use lower-fat milk, whole milk contributes to a softer, more flavorful crumb.
- Vanilla Extract: A classic for a reason, vanilla enhances all the milky flavors. I always opt for pure vanilla extract. If you’re feeling adventurous, a touch of almond extract can be lovely too, or even a non-alcoholic butter extract for an extra rich flavor profile.
For the Milk Soak (The “Milky Girl” Secret!)
This is where the magic truly happens! The combination of these three milks makes our cake incredibly moist and flavorful.
- Sweetened Condensed Milk: This thick, sweet milk is a non-negotiable for that signature sweetness and creamy texture in the soak.
- Evaporated Milk: Adds another layer of milkiness and body without being overly sweet. It helps thin out the condensed milk perfectly.
- Whole Milk (or Heavy Cream): Using whole milk here keeps the soak lighter while still providing a rich dairy flavor. For an even more indulgent soak, you can substitute with heavy cream – it makes the cake unbelievably decadent!
- Vanilla Extract: Again, vanilla ties all these lovely milk flavors together beautifully. You could also add a tiny pinch of ground cinnamon for warmth, or a non-alcoholic rum flavoring if you enjoy that hint of complexity.
For the Whipped Cream Topping
- Heavy Cream (or Heavy Whipping Cream): You need a cream with at least 36% fat content to whip up properly into stiff, fluffy peaks. There’s no real substitute for this if you want true homemade whipped cream!
- Powdered Sugar (Confectioners’ Sugar): Sweetens the cream and helps stabilize it. It dissolves beautifully, leaving no grainy texture.
- Vanilla Extract: A final touch of vanilla ensures the topping complements the cake perfectly.
Step-by-Step Instructions
Let’s get baking! Don’t worry, creating this divine Milky Girl Cake is easier than you think. Just follow these steps, and you’ll have a showstopper in no time.
Step 1: Prepare Your Sponge Cake
- Preheat and Prep: Start by preheating your oven to 350°F (175°C). Lightly grease and flour a 9×13 inch baking pan, or line it with parchment paper for easy removal.
- Dry Ingredients: In a medium bowl, whisk together your 1 ½ cups all-purpose flour, 1 ½ teaspoons baking powder, and ¼ teaspoon salt. Set aside.
- Wet Ingredients (Part 1): In a large bowl, using an electric mixer, beat 6 large eggs (at room temperature) with 1 cup granulated sugar on high speed for about 5-7 minutes. You want the mixture to be pale yellow, thick, and significantly increased in volume. It should fall in a thick ribbon when you lift the beaters.
- Wet Ingredients (Part 2): Reduce mixer speed to low and slowly add ½ cup whole milk and 1 teaspoon vanilla extract to the egg mixture, mixing just until combined.
- Combine: Gently fold the dry ingredients into the wet ingredients in two additions, using a spatula. Be careful not to overmix, as this can make the cake tough. Mix just until no streaks of flour remain.
- Bake: Pour the batter evenly into your prepared baking pan. Bake for 25-30 minutes, or until a wooden skewer inserted into the center comes out clean and the top is lightly golden and springs back when gently touched.
- Cool: Remove the cake from the oven and let it cool completely in the pan on a wire rack. This is crucial before adding the milk soak!
Step 2: Create the Milky Soak
- Whisk Away: While the cake cools, combine 1 (14-ounce) can sweetened condensed milk, 1 (12-ounce) can evaporated milk, and ½ cup whole milk (or heavy cream) in a large bowl. Add 1 teaspoon vanilla extract. Whisk thoroughly until everything is well combined and smooth.
Step 3: Soak and Chill
- Poke Away: Once the cake is completely cool, use a fork or the blunt end of a wooden skewer to poke holes all over the surface of the cake, about ½ inch apart. Don’t be shy – these holes are how the cake soaks up all that delicious milk!
- Pour and Absorb: Slowly and evenly pour the entire milk mixture over the poked cake. You might think it’s too much liquid, but trust me, the cake will drink it all up! Let it sit for 10-15 minutes on the counter to absorb, then cover the pan with plastic wrap.
- Chill Out: Refrigerate the cake for at least 4 hours, or ideally overnight. This chilling time allows the cake to fully absorb the milky goodness and become incredibly moist and flavorful.
Step 4: Prepare the Whipped Cream Topping
- Get Cold: Before you start, place a large mixing bowl and your whisk attachment (if using a stand mixer) or beaters (for a hand mixer) in the freezer for 10-15 minutes. Cold equipment helps the cream whip up faster and firmer.
- Whip It Good: Pour 2 cups cold heavy cream into the chilled bowl. Add ½ cup powdered sugar and 1 teaspoon vanilla extract. Beat on medium-high speed until stiff peaks form. Be careful not to over-whip, or you’ll end up with butter!
Step 5: Assemble and Serve
- Top It Off: Once your cake is thoroughly chilled and soaked, spread the freshly whipped cream evenly over the top.
- Garnish (Optional): For a final flourish, you can dust the top with a pinch of cinnamon, add some fresh berries, or even a few colorful sprinkles.
- Enjoy: Slice and serve your beautiful, milky-sweet creation!
Tips & Suggestions
To make sure your Milky Girl Cake is nothing short of spectacular, here are some of my favorite tips and suggestions:
- Don’t Rush the Cooling: I know it’s tempting, but a warm cake will fall apart and won’t absorb the milk mixture properly. Patience is a virtue here!
- Room Temperature Eggs: Seriously, this makes a huge difference for the sponge. They whip up with more volume, leading to a lighter, airier cake.
- Gentle Folding: When incorporating the dry ingredients into the egg mixture, use a gentle hand and fold, don’t stir vigorously. Overmixing develops gluten, which can make your cake tough.
- Plenty of Pokes: The more holes you poke, the better the milk soak will penetrate. Aim for about ½ inch apart, covering the entire surface.
- Chilling is Key: The long chill time isn’t just for absorption; it also allows the flavors to meld beautifully and gives the cake its signature moist, luscious texture. Don’t skip this step!
- Cold Cream for Whipping: Always use very cold heavy cream and chill your bowl and beaters. This creates the best environment for whipping stable, fluffy cream.
- Get Creative with Toppings: While plain whipped cream is divine, feel free to experiment! Toasted coconut flakes, a sprinkle of cocoa powder, fresh sliced strawberries, or even a drizzle of dulce de leche can elevate your cake.
- Flavour Variations for the Soak: For a different twist, you can infuse your milk soak with a non-alcoholic coffee extract for a mocha milky girl cake, or a touch of cardamom for an exotic aroma.
Storage
Because our Milky Girl Cake is so wonderfully moist and topped with fresh dairy, proper storage is essential to keep it delicious and safe to eat!
- Refrigeration is a Must: Due to the significant amount of dairy in both the soak and the topping, this cake absolutely needs to be stored in the refrigerator. It cannot be left at room temperature for more than an hour or two.
- Airtight is Best: Once the cake is fully assembled, cover the baking pan tightly with plastic wrap or aluminum foil. If you’ve transferred it to a serving platter, use a cake dome or plastic wrap to create an airtight seal. This prevents the cake from drying out and from absorbing any unwanted odors from your fridge.
- Shelf Life: Your Milky Girl Cake will stay fresh and delicious for about 3-4 days when stored properly in the refrigerator. After that, while still safe to eat, the texture might start to change slightly, becoming a bit too soggy or the whipped cream might lose its freshness.
- Serving: Always serve this cake chilled directly from the refrigerator. It’s truly at its best when cold!
- Freezing (Not Recommended): I generally don’t recommend freezing an assembled Milky Girl Cake. The whipped cream topping can change in texture (becoming watery or grainy) upon thawing, and the ultra-moist cake might become overly mushy. It’s best enjoyed fresh!
Final Thoughts
And just like that, you’ve brought the magic of the Milky Girl Cake to life in your own kitchen! I genuinely believe this recipe is an absolute must-try for anyone seeking a dessert that offers pure, unadulterated comfort and incredible flavor. The Milky Girl Cake, with its unique blend of delicate texture and that signature rich, milky sweetness, truly stands out.
It’s more than just a cake; it’s an experience that promises to delight with every single bite. So, go ahead – embrace the joy of baking and treat yourself and your loved ones to this heavenly creation. I promise, once you taste the creamy, dreamy perfection of the Milky Girl Cake, you’ll understand why it’s destined to become a beloved favorite!

Milky Girl Cake: Easy, Creamy & Delicious Recipe!
- Total Time: 1 hour
- Yield: 12 servings 1x
Description
Experience the tender, moist delight of the Milky Girl Cake, a dessert that melts in your mouth with its rich milky flavor. This easy-to-make cake is perfect for any gathering, offering a luxurious treat that everyone will love.
Ingredients
- 1 ½ cups all-purpose flour
- 1 ½ teaspoons baking powder
- ¼ teaspoon salt
- 6 large eggs
- 1 cup granulated sugar
- ½ cup whole milk
- 1 teaspoon vanilla extract
- 1 (14-ounce) can sweetened condensed milk
- 1 (12-ounce) can evaporated milk
- ½ cup whole milk (or heavy cream)
- 2 cups cold heavy cream (or heavy whipping cream)
- ½ cup powdered sugar (confectioners' sugar)
- 1 teaspoon vanilla extract
Instructions
- Preheat your oven to 350°F (175°C). Lightly grease and flour a 9×13 inch baking pan, or line it with parchment paper for easy removal.
- In a medium bowl, whisk together your 1 ½ cups all-purpose flour, 1 ½ teaspoons baking powder, and ¼ teaspoon salt. Set aside.
- In a large bowl, using an electric mixer, beat 6 large eggs (at room temperature) with 1 cup granulated sugar on high speed for about 5-7 minutes until pale yellow and thick.
- Reduce mixer speed to low and slowly add ½ cup whole milk and 1 teaspoon vanilla extract to the egg mixture, mixing just until combined.
- Gently fold the dry ingredients into the wet ingredients in two additions, using a spatula until no streaks of flour remain.
- Pour the batter evenly into your prepared baking pan. Bake for 25-30 minutes, or until a wooden skewer inserted into the center comes out clean.
- Remove the cake from the oven and let it cool completely in the pan on a wire rack.
- While the cake cools, combine 1 (14-ounce) can sweetened condensed milk, 1 (12-ounce) can evaporated milk, and ½ cup whole milk (or heavy cream) in a large bowl. Add 1 teaspoon vanilla extract and whisk until smooth.
- Once the cake is completely cool, use a fork to poke holes all over the surface of the cake, about ½ inch apart.
- Slowly and evenly pour the entire milk mixture over the poked cake. Let it sit for 10-15 minutes to absorb, then cover the pan with plastic wrap.
- Refrigerate the cake for at least 4 hours, or ideally overnight.
- Before you start the whipped cream, place a large mixing bowl and whisk attachment in the freezer for 10-15 minutes.
- Pour 2 cups cold heavy cream into the chilled bowl. Add ½ cup powdered sugar and 1 teaspoon vanilla extract. Beat on medium-high speed until stiff peaks form.
- Once your cake is thoroughly chilled and soaked, spread the freshly whipped cream evenly over the top.
- For a final flourish, dust the top with a pinch of cinnamon or add fresh berries.
- Slice and serve your beautiful, milky-sweet creation!
- Prep Time: 30 mins
- Cook Time: 30 mins
- Category: Dessert
- Method: Baking
- Cuisine: American
Nutrition
- Serving Size: 1 slice
- Calories: 350
- Sugar: 25 g
- Sodium: 150 mg
- Fat: 20 g
- Saturated Fat: 12 g
- Unsaturated Fat: 8 g
- Trans Fat: 0 g
- Carbohydrates: 40 g
- Fiber: 1 g
- Protein: 6 g
- Cholesterol: 100 mg
Keywords: Ensure your eggs are at room temperature for better volume. Be patient while cooling the cake to allow for proper milk absorption.


Leave a Comment