Strawberry Crunch Cheesecake Tacos Recipe
Get ready to have your dessert world rocked, because I am absolutely thrilled to share the Strawberry Crunch Cheesecake Tacos Recipe with you today! This isn’t just another sweet treat; it’s a culinary adventure that takes everything you love about classic desserts and wraps it up in the most fun, unexpected, and utterly delicious package imaginable.
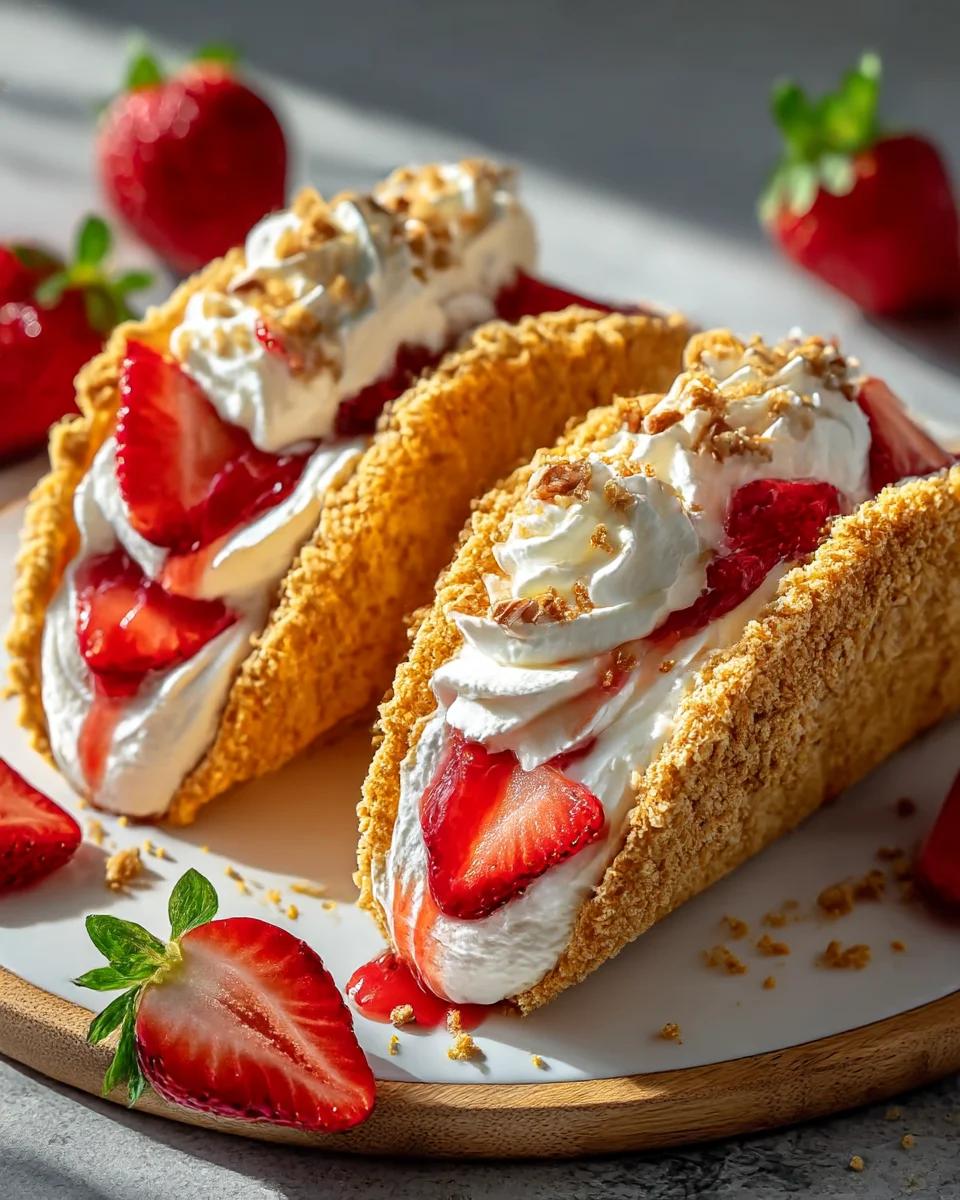
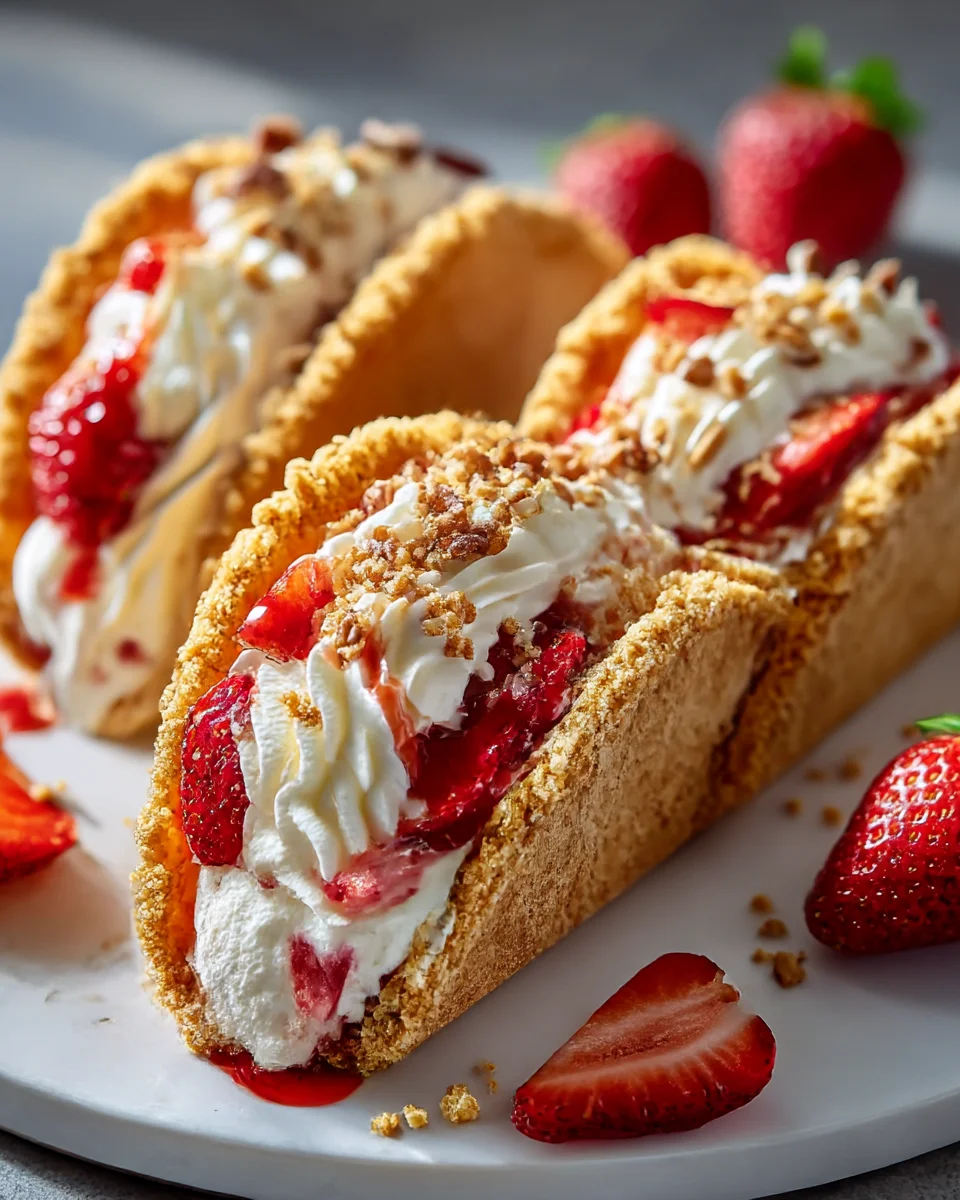
What makes these Strawberry Crunch Cheesecake Tacos truly special is their incredible fusion of flavors and textures. Imagine a crispy, lightly sweetened “taco” shell, cradling a rich, velvety no-bake cheesecake filling that melts in your mouth. But wait, there’s more! We crown this masterpiece with a vibrant, crumbly strawberry crunch topping that delivers a delightful burst of fruity sweetness and an irresistible textural contrast.
You are going to absolutely adore this recipe because it’s a playful twist on familiar favorites that promises to be a showstopper at any gathering. It’s the perfect blend of creamy, crunchy, tangy, and sweet, all presented in a handheld form that makes them incredibly fun to eat. Prepare yourself for compliments and requests for the recipe – these delightful tacos are not just a dessert, they’re an experience!
Ingredient Notes
I’m so excited to share my go-to ingredients for these absolutely delightful Strawberry Crunch Cheesecake Tacos! Getting the right components is key to that perfect balance of creamy, crunchy, and sweet. Here’s what you’ll need and some handy substitutions I’ve discovered along the way.
- For the Dessert Taco Shells: I usually opt for small flour tortillas (taco-sized). They’re easy to bake into a crisp, taco-like shape. If you’re looking for an alternative, you could also use store-bought waffle bowls, gently warmed and carefully reshaped into a taco shell, or even make your own thin crepe-like shells. For a truly unique twist, some folks even use hardened chocolate shells (made by spreading melted chocolate onto a mold).
- For the No-Bake Cheesecake Filling:
- Cream Cheese: Full-fat cream cheese is a must for that rich, tangy cheesecake flavor and perfect texture. Make sure it’s softened to room temperature! If you’re out, mascarpone cheese can work as a luxurious substitute, though it’s a bit less tangy.
- Powdered Sugar: This ensures a super smooth, lump-free filling. Granulated sugar would leave a gritty texture, so stick with powdered.
- Vanilla Extract: Pure vanilla extract brings out all the lovely flavors. A good quality vanilla bean paste can elevate it even further.
- Heavy Cream: Whipped heavy cream is what gives our no-bake cheesecake its light, airy, yet creamy consistency. Make sure it’s very cold for the best whipping results! A pre-made whipped topping can be used in a pinch, but fresh whipped cream offers superior flavor and texture.
- For the Strawberry Crunch Topping: This is where the “crunch” magic happens!
- Golden Oreo Cookies: These vanilla sandwich cookies provide the perfect crumbly base. If you can’t find Golden Oreos, vanilla wafers (like Nilla Wafers) or even plain graham crackers will work beautifully for the base crunch.
- Strawberry Gelatin Powder: This is essential for both the vibrant color and the distinct strawberry flavor of the crunch. You could experiment with raspberry or cherry gelatin for a different fruit profile, but strawberry is classic here.
- Unsalted Butter: Melted butter helps bind the crunch together and gives it a lovely richness. Coconut oil could be a dairy-free alternative if needed.
- Freeze-Dried Strawberries (Optional): For an extra boost of intense strawberry flavor and a more natural color, I sometimes crush some freeze-dried strawberries and mix them into the crunch. Highly recommend!
- For the Strawberry Garnish: Fresh, ripe strawberries, sliced or diced, are perfect for adding a burst of fresh fruitiness and a beautiful presentation. Other fresh berries like raspberries or blueberries would also be delicious.
Step-by-Step Instructions
Alright, let’s get down to the fun part – assembling these incredible Strawberry Crunch Cheesecake Tacos! Follow these steps, and you’ll be enjoying a creamy, crunchy, fruity dessert in no time.
- Prepare Your Dessert Taco Shells:
- Preheat your oven to 375°F (190°C).
- Lightly brush both sides of your small flour tortillas with melted butter or a neutral oil. Sprinkle generously with a mixture of cinnamon sugar (about 1 tablespoon sugar to 1/2 teaspoon cinnamon).
- To shape them into tacos, drape each tortilla over two bars of an oven rack. You can also use aluminum foil crumpled into “taco stands” on a baking sheet.
- Bake for 8-10 minutes, or until golden brown and crisp. Keep a close eye on them, as they can burn quickly! Once baked, carefully remove them from the rack and let them cool completely on a wire rack. They will crisp up further as they cool.
- Make the Strawberry Crunch Topping:
- In a food processor, pulse the Golden Oreo cookies (filling included!) until they form fine crumbs. If you don’t have a food processor, you can place them in a zip-top bag and crush them with a rolling pin.
- In a medium bowl, combine the cookie crumbs with the strawberry gelatin powder and any optional crushed freeze-dried strawberries. Stir well to ensure the gelatin is evenly distributed, giving that uniform pink color.
- Pour in the melted unsalted butter and mix everything together until the crumbs are moist and clump together slightly. Set aside.
- Whip Up the No-Bake Cheesecake Filling:
- In a large bowl, using an electric mixer, beat the softened cream cheese on medium speed until it’s smooth and creamy, about 1-2 minutes. Make sure there are no lumps!
- Gradually add the powdered sugar and vanilla extract, continuing to beat until fully incorporated and the mixture is light and fluffy.
- In a separate, very cold bowl, whip the cold heavy cream on high speed until stiff peaks form. Be careful not to overbeat, or it might curdle!
- Gently fold the whipped cream into the cream cheese mixture in two additions, using a spatula. Fold just until no streaks remain; overmixing can deflate the cream. The filling should be light, airy, and luscious.
- Cover the cheesecake filling and refrigerate for at least 30 minutes to allow it to firm up slightly, which makes it easier to pipe or spoon into the shells.
- Assemble Your Tacos:
- Once your shells are cooled and crisp, and your cheesecake filling is chilled, it’s assembly time!
- Spoon or pipe the cheesecake filling into each dessert taco shell. I find using a piping bag with a large round tip gives a really nice, clean look. Fill them generously, but leave a little room for the toppings.
- Arrange your fresh, sliced or diced strawberries over the cheesecake filling in each taco.
- Now for the crunch! Gently press the strawberry crunch topping onto both sides of the cheesecake filling, ensuring good coverage. You can also sprinkle some over the top for extra visual appeal.
- Carefully transfer the assembled tacos to a serving platter.
- Chill (and Enjoy!): For the best texture and to allow the flavors to meld, I recommend chilling the assembled tacos for another 30 minutes to an hour before serving. This will help the filling set even further and ensure the shells remain crisp.
Tips & Suggestions
To help you nail these Strawberry Crunch Cheesecake Tacos every single time, I’ve gathered some of my favorite tips and suggestions. These little insights can make a big difference in the final result!
- Keep Your Shells Crisp: The key to a great dessert taco is a crisp shell. Make sure your baked tortillas are completely cool before filling them. To prevent them from getting soggy from the cheesecake filling, you can brush the inside of each shell with a thin layer of melted white chocolate or dark chocolate and let it harden. This creates a barrier against moisture, helping the shells stay crisp longer.
- Cheesecake Consistency is Key: Ensure your cream cheese is truly at room temperature. This prevents lumps and ensures a smooth, creamy filling. When folding in the whipped cream, be gentle! Overmixing can deflate the cream, leading to a denser filling rather than the light, airy texture we’re aiming for. Chilling the filling before assembly also helps it firm up and makes it much easier to work with.
- Don’t Be Shy with the Crunch: The strawberry crunch topping is the star of the show! Make plenty and don’t be afraid to press it firmly onto the cheesecake filling. You want that fantastic textural contrast in every bite.
- Make-Ahead Components: You can definitely prepare parts of this recipe in advance! The strawberry crunch topping can be made several days ahead and stored in an airtight container at room temperature. The cheesecake filling can be made a day in advance and kept covered in the refrigerator. I recommend baking the taco shells the day you plan to assemble, or at most, the day before, storing them in an airtight container at room temperature to maintain their crispness.
- Presentation Matters: A little drizzle of strawberry sauce, a dusting of powdered sugar, or a fresh mint sprig can really elevate the look of these tacos, making them even more appealing for guests.
- Flavor Variations: Don’t limit yourself to strawberry! Try a lemon crunch with lemon gelatin and lemon sandwich cookies, or a chocolate crunch using chocolate cookies and a chocolate cheesecake filling. Raspberry or blueberry fruit elements would also be delightful. The possibilities are endless!
- For Easy Filling: A sturdy zip-top bag with the corner snipped off works just as well as a piping bag for filling the shells quickly and cleanly.
Storage
Once you’ve gone to the effort of creating these delicious Strawberry Crunch Cheesecake Tacos, you’ll want to store them properly to maintain their freshness and that delightful crunch!
- Assembled Tacos: It’s best to enjoy these tacos on the day they are assembled for the optimal crispness of the shell. However, if you have leftovers, place them in a single layer in an airtight container. Keep them refrigerated for up to 2 days. The shells may soften slightly over time due to the moisture from the filling, but they will still be incredibly tasty!
- Separated Components: If you’re planning to make them ahead or want to prolong the life of the elements, store the components separately.
- The strawberry crunch topping can be stored in an airtight container at room temperature for up to a week.
- The cheesecake filling will last covered in the refrigerator for up to 3-4 days.
- The baked taco shells should be stored at room temperature in an airtight container. If they lose some crispness, you can briefly warm them in a low oven (around 250°F / 120°C) for 5-7 minutes to crisp them up again, then let them cool completely before filling.
- Freezing: I don’t recommend freezing the assembled tacos, as the texture of both the shells and the cheesecake filling will suffer upon thawing. However, the cheesecake filling itself can be frozen for up to a month in an airtight container; just be sure to thaw it in the refrigerator overnight and give it a quick whisk to restore its smooth consistency before using.
Final Thoughts
And there you have it! I’m so excited for you to try making these incredible treats. I truly believe that the Strawberry Crunch Cheesecake Tacos Recipe isn’t just another dessert; it’s a wonderfully playful and absolutely irresistible creation that brings joy with every single bite. The delightful combination of the crispy, sweet taco shell, the smooth, creamy cheesecake filling, and that vibrant, crunchy strawberry topping is simply unparalleled. This recipe is an absolute must-try because it takes familiar, beloved flavors and transforms them into something innovative and incredibly fun to share. It’s perfect for celebrations, a special weeknight treat, or simply whenever you need a burst of happiness. I just know you’ll fall in love with your very own Strawberry Crunch Cheesecake Tacos Recipe!

Best Strawberry Crunch Cheesecake Tacos Recipe Ever
- Total Time: 40 minutes
- Yield: 12 tacos
Description
Indulge in a delightful twist on dessert with these Strawberry Crunch Cheesecake Tacos, featuring a crispy taco shell filled with rich no-bake cheesecake and topped with a vibrant strawberry crunch. Perfect for any gathering, these fun and delicious tacos are sure to impress!
Ingredients
- Small flour tortillas (taco-sized)
- Melted butter or neutral oil
- Cinnamon sugar (about 1 tablespoon sugar to 1/2 teaspoon cinnamon)
- Cream Cheese (softened to room temperature)
- Powdered Sugar
- Vanilla Extract
- Heavy Cream (very cold)
- Golden Oreo Cookies
- Strawberry Gelatin Powder
- Unsalted Butter (melted)
- Freeze-Dried Strawberries (optional)
- Fresh, ripe strawberries (sliced or diced)
Instructions
- Preheat your oven to 375°F (190°C).
- Lightly brush both sides of your small flour tortillas with melted butter or a neutral oil. Sprinkle generously with a mixture of cinnamon sugar.
- To shape them into tacos, drape each tortilla over two bars of an oven rack or use aluminum foil crumpled into 'taco stands' on a baking sheet.
- Bake for 8-10 minutes, or until golden brown and crisp. Let them cool completely on a wire rack.
- In a food processor, pulse the Golden Oreo cookies until they form fine crumbs.
- In a medium bowl, combine the cookie crumbs with the strawberry gelatin powder and any optional crushed freeze-dried strawberries. Stir well.
- Pour in the melted unsalted butter and mix until the crumbs are moist and clump together slightly. Set aside.
- In a large bowl, using an electric mixer, beat the softened cream cheese until smooth and creamy.
- Gradually add the powdered sugar and vanilla extract, beating until fully incorporated.
- In a separate bowl, whip the cold heavy cream on high speed until stiff peaks form.
- Gently fold the whipped cream into the cream cheese mixture in two additions until no streaks remain.
- Cover the cheesecake filling and refrigerate for at least 30 minutes.
- Once your shells are cooled and crisp, spoon or pipe the cheesecake filling into each dessert taco shell.
- Arrange your fresh, sliced or diced strawberries over the cheesecake filling in each taco.
- Gently press the strawberry crunch topping onto both sides of the cheesecake filling.
- Carefully transfer the assembled tacos to a serving platter.
- Chill the assembled tacos for another 30 minutes to an hour before serving.
- Prep Time: 30 mins
- Cook Time: 10 mins
- Category: Dessert
- Method: Baking
- Cuisine: American
Nutrition
- Serving Size: 1 taco
- Calories: 250
- Sugar: 15 g
- Sodium: 150 mg
- Fat: 12 g
- Saturated Fat: 7 g
- Unsaturated Fat: 3 g
- Trans Fat: 0 g
- Carbohydrates: 30 g
- Fiber: 1 g
- Protein: 3 g
- Cholesterol: 30 mg
Keywords: Ensure your cream cheese is at room temperature for a smooth filling. For extra crispness, brush the inside of each shell with melted chocolate before filling. The strawberry crunch topping can be made ahead and stored in an airtight container.

Leave a Comment