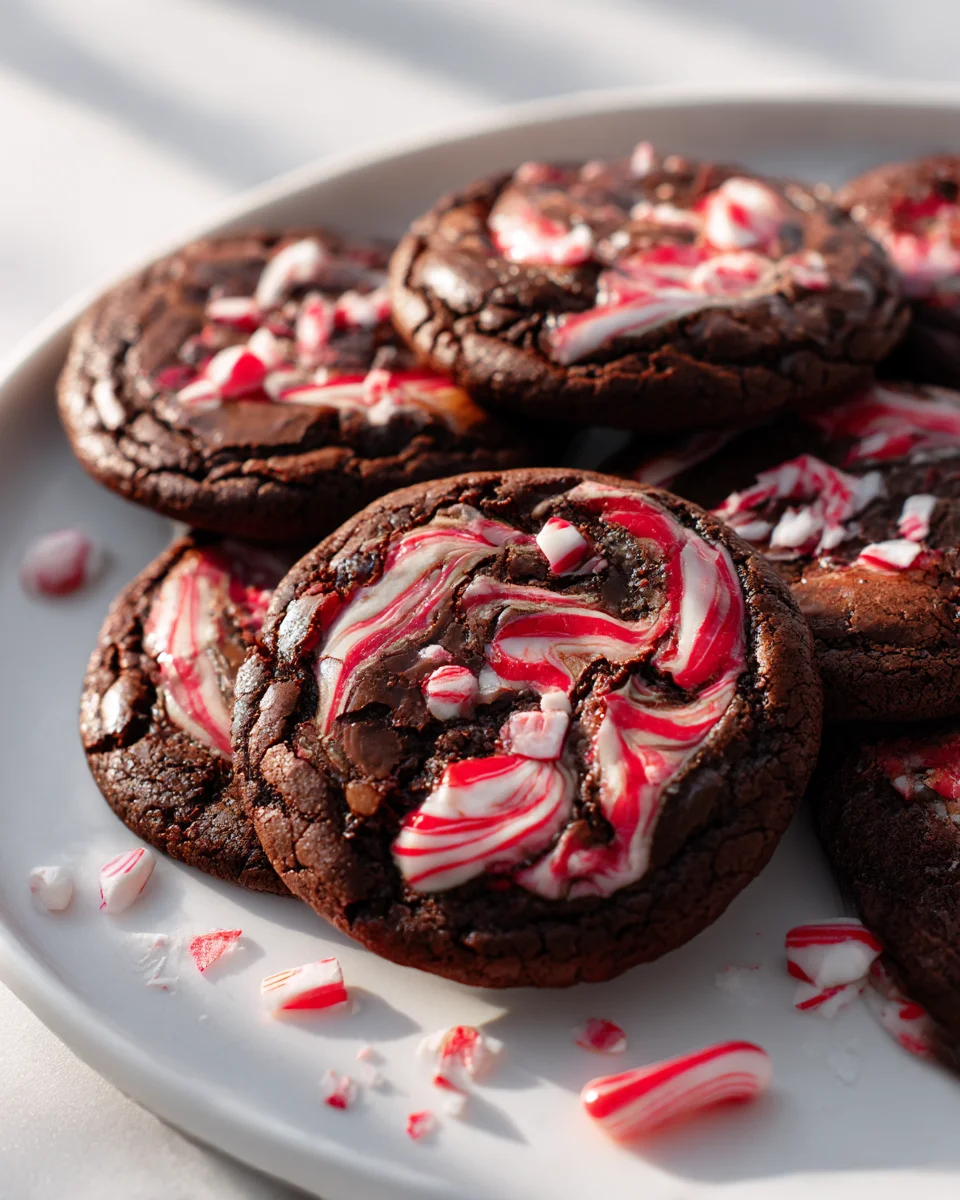
Fudgy Peppermint Swirl Brownie Cookies
Oh my goodness, get ready to fall head over heels for these Fudgy Peppermint Swirl Brownie Cookies! I’m so excited to share this recipe with you because it’s truly something special. Forget choosing between a gooey brownie and a delightful cookie – with this recipe, you get the absolute best of both worlds. We’re talking about a cookie that delivers all the rich, dense, and intensely chocolatey fudginess you crave from a perfect brownie, but in a wonderfully chewy, handheld cookie form.
What truly makes these shine, beyond that incredible texture, is the vibrant and refreshing peppermint swirl. It’s not just for looks (though it does create a beautiful, festive marble effect!); it infuses every bite with a cool, minty zing that perfectly complements the deep chocolate flavor. You are going to absolutely love how these cookies combine the comforting familiarity of a brownie with a festive twist that makes them utterly irresistible. They’re perfect for holiday gatherings, a cozy night in, or simply when you need a little bit of magic in your day. Imagine biting into a crisp edge, followed by a soft, fudgy center bursting with chocolate and a refreshing hint of mint – pure bliss, I tell you!
Ingredient Notes
Creating these fudgy peppermint swirl brownie cookies is a joy, and using the right ingredients really makes all the difference for that perfect texture and flavor. Here’s a rundown of what I find works best and some handy substitutions.
- Unsalted Butter: I always reach for unsalted butter because it gives me full control over the salt content in the cookies. You’ll melt this down with your sugar and chocolate, creating that foundational richness. If you only have salted butter, simply reduce the added salt in the recipe by about a quarter teaspoon. For a dairy-free option, good quality vegan butter sticks work wonderfully here.
- Granulated Sugar: This provides sweetness and helps create that wonderful fudgy chew. While I primarily use granulated sugar for this recipe, a mix of half granulated and half light brown sugar can add an extra layer of moisture and a slightly chewier texture, if you like.
- Eggs: Large eggs are essential for structure, richness, and binding the dough together. They contribute significantly to the fudgy texture. For an egg-free alternative, you can try using flax eggs (1 tablespoon ground flaxseed meal mixed with 3 tablespoons water per egg, let sit for 5 minutes to thicken), though the texture might be slightly different.
- Vanilla Extract: Pure vanilla extract complements the chocolate beautifully without overpowering it. Don’t skip it!
- Unsweetened Cocoa Powder: For that deep, dark brownie color and intense chocolate flavor, I highly recommend using Dutch-process cocoa powder. It’s less acidic than natural cocoa and gives a smoother, richer taste and darker crumb. If you only have natural cocoa, the cookies will still be delicious, but perhaps a bit lighter in color and with a slightly sharper chocolate note.
- All-Purpose Flour: Just a small amount of all-purpose flour is needed to bind everything without making the cookies cakey. Too much flour will lead to dry, tough cookies, so measure carefully! For a gluten-free version, a 1:1 gluten-free baking blend that contains xanthan gum should work well.
- Salt: A pinch of salt brightens all the flavors, balancing the sweetness and intensifying the chocolate.
- Semi-Sweet or Dark Chocolate: This is where a lot of the fudginess comes from. I love using a good quality semi-sweet or dark chocolate bar, chopped, for melting, but chocolate chips (especially good quality baking chips) work perfectly too. The better the chocolate, the better your cookies will taste!
- White Chocolate: For the swirl, good quality white chocolate chips or a chopped white chocolate bar is key. It needs to melt smoothly to create a beautiful, vibrant swirl. Compound white chocolate (candy melts) can also be used if you prefer, as they melt very easily.
- Heavy Cream: A touch of heavy cream creates a luscious, pipeable consistency for the white chocolate peppermint swirl. Full-fat coconut milk (the thick cream from the top of a can) can be a great dairy-free substitute if you’re avoiding dairy.
- Peppermint Extract: This is the star of the show for that festive flavor! Ensure you’re using pure peppermint extract, and if you prefer to avoid alcohol, many brands offer alcohol-free versions. Start with a little and add more to taste, as potency can vary.
- Red Food Coloring: Gel food coloring is my go-to for vibrant, true colors without adding excess liquid. Just a tiny drop will give you that striking peppermint swirl effect.
- Crushed Candy Canes (Optional): For an extra festive touch and a bit of crunch, crushed candy canes sprinkled on top just after baking or cooling are wonderful.
Step-by-Step Instructions
Get ready to bake some seriously delicious fudgy peppermint swirl brownie cookies! Here’s how I make them, step by step.
- Prepare Your Oven and Baking Sheets: First things first, I preheat my oven to 350°F (175°C). Then, I line two large baking sheets with parchment paper or silicone baking mats. This makes cleanup a breeze and prevents sticking.
- Melt the Butter and Sugar: In a medium microwave-safe bowl or a saucepan over low heat, I combine the unsalted butter and granulated sugar. I heat it gently, stirring occasionally, until the butter is fully melted and the sugar has largely dissolved. This usually takes about 1-2 minutes in the microwave or a few minutes on the stovetop. It will look slightly glossy.
- Add the Chocolate: I immediately add the semi-sweet or dark chocolate (chopped or chips) to the hot butter-sugar mixture. I let it sit for a minute or two to start melting, then stir until the chocolate is completely smooth and glossy. This forms the incredibly rich base of our brownie cookies. Let this mixture cool slightly for about 5 minutes.
- Whisk in Wet Ingredients: Once the chocolate mixture has cooled a bit (it shouldn’t be too hot to touch), I whisk in the eggs one at a time, incorporating each fully before adding the next. This creates a wonderfully emulsified base. Then, I stir in the vanilla extract. The mixture should be thick and glossy.
- Combine Dry Ingredients: In a separate small bowl, I whisk together the all-purpose flour, unsweetened cocoa powder, and salt. It’s important to make sure there are no lumps in the cocoa powder.
- Fold Dry into Wet: I gently fold the dry ingredient mixture into the wet chocolate mixture until just combined. Be careful not to overmix; overmixing can lead to tougher cookies. A few streaks of flour are okay, they’ll disappear during baking.
- Chill the Dough (Optional but Recommended): For easier scooping and to prevent the cookies from spreading too much, I recommend chilling the dough for at least 30 minutes in the refrigerator. If I’m in a rush, I skip this, but chilling definitely makes a difference in texture and handling.
- Make the Peppermint Swirl: While the dough chills, I prepare the peppermint swirl. In a small microwave-safe bowl, I combine the white chocolate chips and heavy cream. I microwave on 50% power in 30-second intervals, stirring well after each, until the white chocolate is completely melted and smooth. Then, I stir in the peppermint extract and a tiny drop of red food coloring until I get my desired vibrant pink hue. I transfer this mixture to a small piping bag or a Ziploc bag with a tiny corner snipped off.
- Scoop and Swirl: I use a cookie scoop (about 1.5 tablespoons) to drop mounds of the brownie cookie dough onto the prepared baking sheets, spacing them about 2 inches apart. Then, I take my piping bag of peppermint swirl, and on top of each cookie dough ball, I pipe a small dollop or a swirl pattern. Using a toothpick or the tip of a knife, I gently swirl the white chocolate into the brownie dough, creating that beautiful marbled effect.
- Bake the Cookies: I bake the cookies for 10-12 minutes, or until the edges are set but the centers still look slightly soft and fudgy. They will continue to set up as they cool. Overbaking will result in drier cookies, so keep an eye on them!
- Cool and Finish: Once baked, I let the cookies cool on the baking sheets for about 5 minutes before carefully transferring them to a wire rack to cool completely. If I’m adding crushed candy canes, I sprinkle them on top while the cookies are still warm and gooey, or after they’ve cooled if I want a firmer topping.
Tips & Suggestions
Making these fudgy peppermint swirl brownie cookies is incredibly satisfying, and I’ve picked up a few tricks along the way to ensure they turn out perfect every time. Here are my go-to tips:
- Don’t Overbake for Ultimate Fudginess: This is perhaps the most critical tip for any brownie-style cookie! You want the edges to be just set and the centers to still look slightly underbaked when you pull them from the oven. They will continue to cook on the hot baking sheet and firm up as they cool, leaving you with that irresistible fudgy center. Overbaking is the quickest way to dry out your cookies.
- Quality Chocolate Makes a Difference: Since chocolate is a primary flavor here, using good quality unsweetened cocoa powder and semi-sweet or dark chocolate for the brownie base, along with a nice white chocolate for the swirl, will elevate the taste significantly. It really does come through in the final product.
- Achieving a Perfect Swirl: For a beautiful marble effect, don’t over-swirl the peppermint mixture. A few gentle passes with a toothpick or a small knife through the dollop of white chocolate on top of the cookie dough is all you need. If you mix too much, the colors will blend entirely, and you’ll lose that striking swirl.
- Adjust Peppermint to Your Liking: Peppermint extract can be quite potent! I recommend starting with a smaller amount (e.g., ¼ teaspoon) in your white chocolate swirl and then adding a tiny bit more if you prefer a stronger mint flavor. You can always add more, but you can’t take it away!
- Chill Your Dough: While optional if you’re in a hurry, I highly recommend chilling the brownie cookie dough for at least 30 minutes, or even an hour. This helps prevent the cookies from spreading too much in the oven, giving them a thicker, chewier texture. It also makes the dough much easier to handle and scoop.
- Room Temperature Eggs: I find that using room temperature eggs helps them incorporate more smoothly into the butter and sugar mixture, leading to a more consistent and fudgy dough. If you forget, you can quickly bring cold eggs to room temperature by placing them in a bowl of warm (not hot) water for 5-10 minutes.
- Cookie Scoop for Uniformity: A 1.5 to 2-tablespoon cookie scoop is your best friend here. It ensures all your cookies are roughly the same size, which means they’ll bake evenly. Plus, it makes the scooping process much tidier and quicker!
- Adding Crushed Candy Canes: If you’re planning to sprinkle crushed candy canes on top, do it while the cookies are still warm from the oven. The warmth will slightly melt the candy canes onto the cookie, helping them adhere better. Alternatively, you can add them after cooling for a crunchier topping that won’t melt.
- Don’t Be Afraid of Mess: Swirling can get a little messy, and that’s perfectly fine! Embrace the creative process. The rustic look of the swirls is part of their charm.
Storage
These fudgy peppermint swirl brownie cookies are absolutely divine fresh, but knowing how to store them properly means you can enjoy them for longer!
- Room Temperature: Once completely cooled, I store these cookies in an airtight container at room temperature. They will stay wonderfully fudgy and fresh for up to 3-4 days. I sometimes layer them with parchment paper to prevent them from sticking together, especially if they’re very soft.
- Refrigeration: If you want to extend their life a bit, you can store them in an airtight container in the refrigerator for up to a week. The texture will become firmer when cold, but they’re still delicious! I often let them come back to room temperature for about 15-20 minutes before serving, or give them a quick 10-second zap in the microwave for a warm, gooey treat.
- Freezing Baked Cookies: These cookies freeze beautifully! Once they are completely cooled, I place them in a single layer on a baking sheet and freeze until solid (this prevents them from sticking together). Then, I transfer the frozen cookies to a freezer-safe airtight container or heavy-duty freezer bag. They’ll keep well in the freezer for up to 2-3 months.
- Thawing Frozen Cookies: To enjoy frozen cookies, simply take them out of the freezer and let them thaw at room temperature for an hour or two. For an extra treat, you can warm them briefly in the microwave or a low oven after thawing.
- Freezing Dough Balls: If I want freshly baked cookies on demand, I’ll scoop the dough and swirl with the peppermint mixture as instructed, then freeze the individual dough balls on a parchment-lined baking sheet until firm. Once firm, I transfer them to a freezer-safe bag or container. When I’m ready to bake, I just place the frozen dough balls on a baking sheet and bake them straight from frozen, adding an extra 2-4 minutes to the baking time.

Final Thoughts
Well, there you have it! We’ve journeyed through creating these incredible Fudgy Peppermint Swirl Brownie Cookies. I truly believe this recipe is an absolute must-try because it masterfully combines the intense chocolate richness and decadent chewiness of a classic fudgy brownie with the convenience and delightful bite of a cookie. The vibrant, cool swirl of peppermint isn’t just for show; it adds that perfect touch of festive magic and a refreshing burst of flavor that elevates these from a simple treat to something truly extraordinary. They’re visually stunning, fill your kitchen with an amazing aroma, and taste absolutely divine. Trust me, these Fudgy Peppermint Swirl Brownie Cookies are more than just a dessert; they’re a memorable experience that will have everyone asking for the recipe. Go ahead, treat yourself and your loved ones to this delightful confection – you won’t regret it!

Decadent Fudgy Peppermint Swirl Brownie Cookies
- Total Time: 27 minutes
- Yield: 24 cookies 1x
Description
Get ready to indulge in these Fudgy Peppermint Swirl Brownie Cookies that combine the rich, dense fudginess of brownies with the delightful texture of cookies. The refreshing peppermint swirl adds a festive touch that makes them perfect for any occasion.
Ingredients
- 1 cup Unsalted Butter
- 1 cup Granulated Sugar
- 4 Large Eggs
- 2 teaspoons Vanilla Extract
- 1 cup Unsweetened Cocoa Powder
- 1 cup All-Purpose Flour
- 1/2 teaspoon Salt
- 8 ounces Semi-Sweet or Dark Chocolate, chopped
- 1 cup White Chocolate Chips
- 1/4 cup Heavy Cream
- 1 teaspoon Peppermint Extract
- Red Food Coloring, to taste
- Crushed Candy Canes (Optional)
Instructions
- Preheat your oven to 350°F (175°C) and line two large baking sheets with parchment paper or silicone baking mats.
- In a medium microwave-safe bowl or a saucepan over low heat, combine the unsalted butter and granulated sugar. Heat gently, stirring occasionally, until the butter is fully melted and the sugar has largely dissolved.
- Add the semi-sweet or dark chocolate to the hot butter-sugar mixture. Let it sit for a minute or two to start melting, then stir until the chocolate is completely smooth and glossy. Let this mixture cool slightly for about 5 minutes.
- Once the chocolate mixture has cooled a bit, whisk in the eggs one at a time, incorporating each fully before adding the next. Stir in the vanilla extract.
- In a separate small bowl, whisk together the all-purpose flour, unsweetened cocoa powder, and salt.
- Gently fold the dry ingredient mixture into the wet chocolate mixture until just combined. Be careful not to overmix.
- For easier scooping and to prevent the cookies from spreading too much, chill the dough for at least 30 minutes in the refrigerator.
- While the dough chills, prepare the peppermint swirl by combining the white chocolate chips and heavy cream in a small microwave-safe bowl. Microwave on 50% power in 30-second intervals, stirring well after each, until the white chocolate is completely melted and smooth. Stir in the peppermint extract and a tiny drop of red food coloring.
- Use a cookie scoop to drop mounds of the brownie cookie dough onto the prepared baking sheets, spacing them about 2 inches apart. Pipe a small dollop or swirl pattern of the peppermint mixture on top of each cookie dough ball and gently swirl it into the brownie dough.
- Bake the cookies for 10-12 minutes, or until the edges are set but the centers still look slightly soft and fudgy.
- Let the cookies cool on the baking sheets for about 5 minutes before transferring them to a wire rack to cool completely. If adding crushed candy canes, sprinkle them on top while the cookies are still warm.
- Prep Time: 15 mins
- Cook Time: 12 mins
- Category: Dessert
- Method: Baking
- Cuisine: American
Nutrition
- Serving Size: 1 cookie
- Calories: 150
- Sugar: 12 g
- Sodium: 50 mg
- Fat: 8 g
- Saturated Fat: 5 g
- Unsaturated Fat: 3 g
- Trans Fat: 0 g
- Carbohydrates: 18 g
- Fiber: 1 g
- Protein: 2 g
- Cholesterol: 40 mg
Keywords: Don't overbake for ultimate fudginess. Use good quality chocolate for the best flavor. Chill your dough for better texture and handling.

Leave a Comment