Handmade Sub Roll Recipe
Oh, I am so incredibly excited to share this recipe with you today! The Handmade Sub Roll Recipe isn’t just a guide to baking bread; it’s your ticket to sandwich nirvana. Honestly, there’s nothing quite like biting into a sub where the roll itself is a masterpiece – crusty on the outside, wonderfully soft and chewy on the inside, strong enough to hold all your favorite fillings without falling apart, but tender enough to make every bite a delight. And let me tell you, when you make these yourself, you’ll wonder why you ever settled for store-bought.
What makes this particular sub roll recipe so special? Well, it’s the perfect balance of texture and flavor, designed to elevate any sandwich you dream up. We’re talking about a roll that has that ideal structure for piling high with thinly sliced roast beef, melty cheese, crisp lettuce, and juicy tomatoes. Readers will absolutely adore this recipe because it unlocks a whole new level of homemade deliciousness. Imagine the pride of serving up a truly epic sub, knowing that even the foundation – the bread! – was crafted by your own hands. It’s a game-changer for lunch, dinner, or even a picnic.
In a nutshell, this recipe guides you through creating beautiful, sturdy, and incredibly flavorful rolls that are the absolute ideal canvas for any sub. Forget flimsy bread; we’re going for substantial, satisfying rolls that make your sandwich dreams come true. Get ready to impress yourself and everyone else!
Ingredient Notes
Making delicious handmade sub rolls starts with understanding your ingredients. While the list might seem simple, each component plays a crucial role in achieving that perfect chewy interior and crisp crust we all love. Here’s what I use and some notes on substitutions:
- Bread Flour: This is my absolute go-to for handmade sub rolls. Its higher protein content (compared to all-purpose flour) is essential for developing strong gluten, which gives your sub rolls their characteristic chewiness and structure. This strength helps them hold up beautifully to all your favorite fillings.
- Active Dry Yeast: My preferred yeast for its reliability. You’ll need to activate it in warm water before combining with other ingredients. If you have instant yeast, you can skip the activation step and mix it directly with the dry ingredients, though I still prefer to let it proof slightly just to ensure it’s active.
- Warm Water: Crucial for activating your yeast. The ideal temperature is between 105-115°F (40-46°C). Too cold, and the yeast won’t activate; too hot, and you’ll kill it.
- Granulated Sugar: This isn’t just for sweetness! A little sugar feeds the yeast, helping it become active and providing energy for a good rise. It also contributes to the beautiful golden-brown crust of your handmade sub rolls.
- Salt: Essential for flavor! Don’t skip it. Salt also helps to control the yeast activity, ensuring your dough doesn’t rise too quickly and develops better flavor.
- Olive Oil: I love using a good quality olive oil in my sub rolls. It adds a wonderful subtle flavor, helps tenderize the crumb, and contributes to a softer interior and a more pliable crust. You could substitute with another neutral oil like vegetable oil or even melted unsalted butter if you prefer, but olive oil is classic for this type of roll.
- Egg Wash (Optional): A simple egg wash (one egg whisked with a tablespoon of water) brushed on before baking gives your handmade sub rolls a beautiful golden sheen and helps any toppings like sesame seeds adhere better.
Step-by-Step Instructions
Crafting your own handmade sub rolls is a deeply satisfying process. Follow these steps, and you’ll be enjoying fresh, chewy rolls in no time!
- Activate the Yeast: In a large bowl, combine the warm water and granulated sugar. Sprinkle the active dry yeast over the top. Let it sit for 5-10 minutes until it becomes foamy and fragrant. This tells you your yeast is alive and ready to work! If it doesn’t foam, your yeast might be old, or the water temperature was off.
- Combine Ingredients: To the yeast mixture, add the olive oil and salt. Gradually add the bread flour, one cup at a time, mixing with a wooden spoon or a stand mixer with a dough hook until a shaggy dough forms.
- Knead the Dough: Turn the dough out onto a lightly floured surface. Knead for 8-10 minutes until the dough is smooth, elastic, and no longer sticky. If you’re using a stand mixer, knead on medium speed for about 6-8 minutes. The dough should pass the “windowpane test”—you should be able to stretch a small piece thin enough to see light through it without tearing.
- First Rise (Bulk Fermentation): Lightly oil a clean bowl. Place the dough in the bowl, turning it once to coat the entire surface with oil. Cover the bowl tightly with plastic wrap or a clean kitchen towel. Let it rise in a warm, draft-free place for 1 to 1.5 hours, or until it has doubled in size.
- Punch Down and Divide: Gently punch down the risen dough to release the air. Turn it out onto a lightly floured surface. Divide the dough into equal portions, typically 4-6 for standard sub rolls, depending on your desired size. I usually aim for about 4-5 ounces (115-140 grams) per roll.
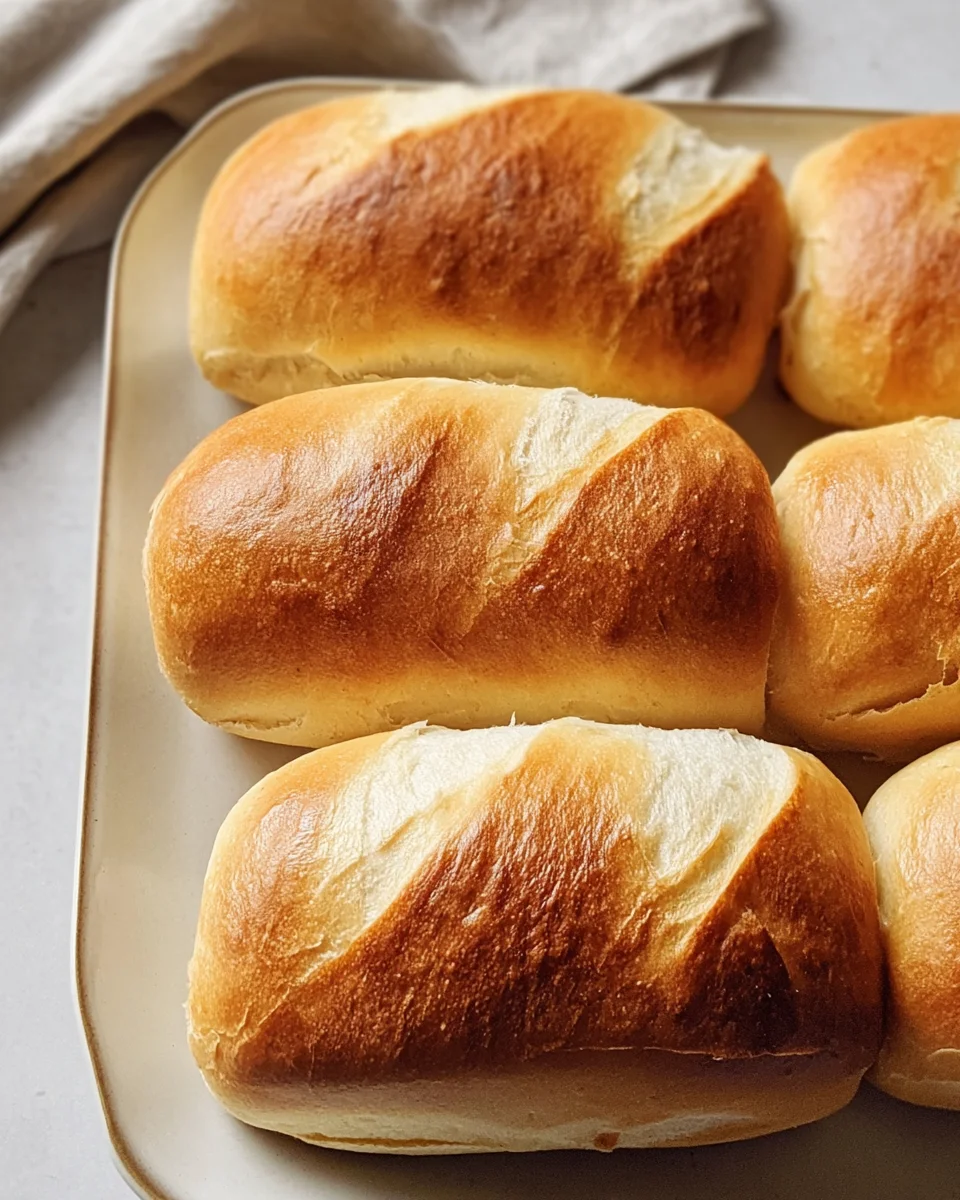
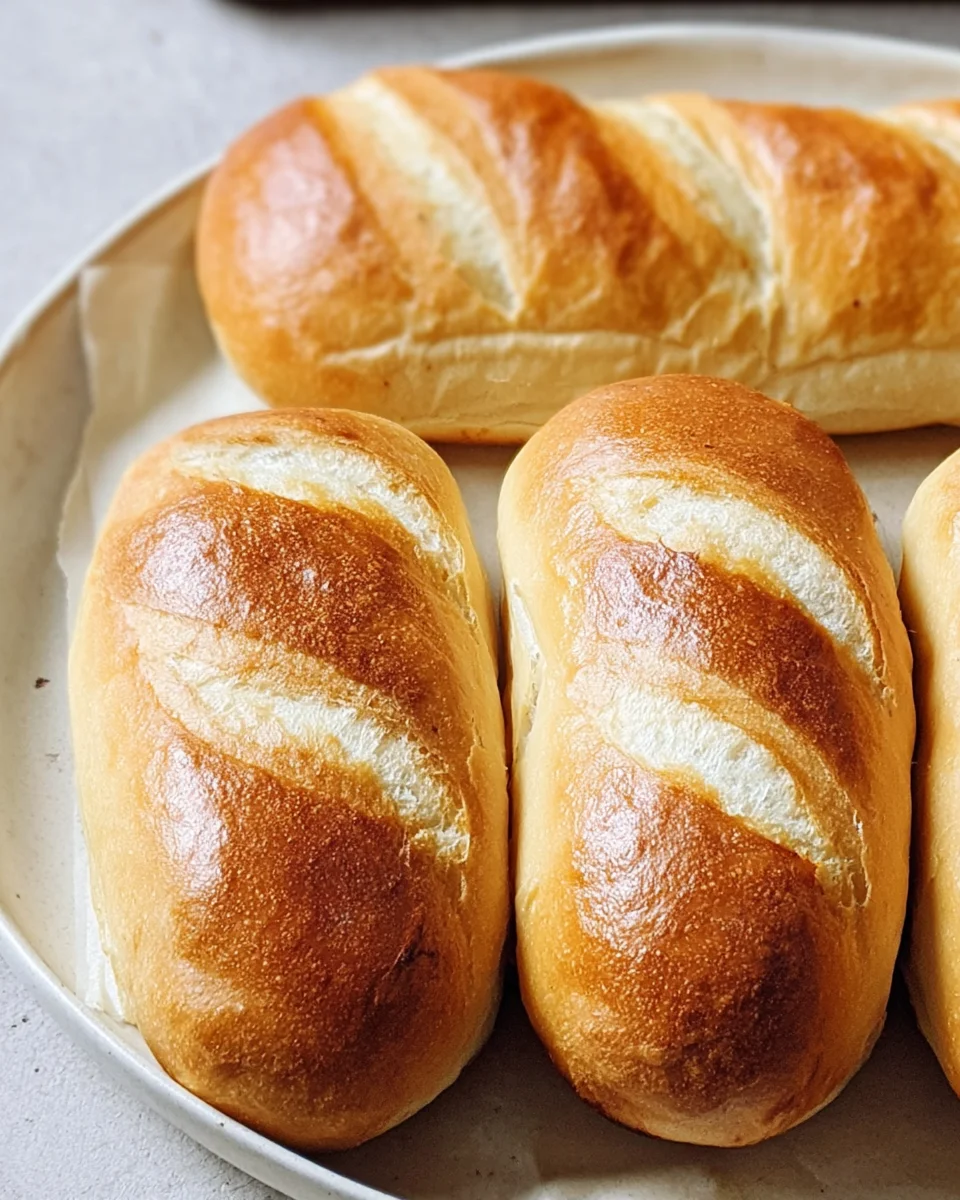
- Shape the Sub Rolls: This is where the magic happens for handmade sub rolls! Take one portion of dough and gently flatten it into a rectangle. Fold the long edges into the center, overlapping slightly, and then roll the dough tightly from one end to the other, creating a log. Pinch the seam closed firmly. Gently taper the ends by rolling them between your hands. The goal is to create tension on the surface of the dough, which helps it hold its shape during baking. Place the shaped rolls, seam-side down, on a baking sheet lined with parchment paper, leaving plenty of space between them.
- Second Rise (Proofing): Loosely cover the shaped rolls with plastic wrap or a kitchen towel. Let them rise again in a warm spot for 45-60 minutes, or until they are puffy and have almost doubled in size. They should feel light and springy when gently poked.
- Preheat Oven & Prepare for Baking: While the rolls are proofing, preheat your oven to 400°F (200°C). If you have a baking stone or steel, place it in the oven to preheat. For a crispier crust, I like to place a metal pan on the bottom rack of the oven.
- Score and Bake: If using, brush the rolls gently with egg wash. With a very sharp knife, lame, or razor blade, make 3-4 diagonal slashes across the top of each sub roll. Carefully pour about a cup of hot water into the hot metal pan on the bottom rack (creating steam!). Quickly close the oven door. Bake for 18-25 minutes, or until the rolls are deeply golden brown and sound hollow when tapped on the bottom.
- Cool: Transfer the baked handmade sub rolls to a wire rack to cool completely before slicing and filling. This is important for the interior texture to set properly.
Tips & Suggestions
Making great handmade sub rolls is an art, and a few key tips can elevate your baking from good to truly outstanding:
- Don’t Over-Flour During Kneading: It’s tempting to keep adding flour when the dough is sticky, but resist! A slightly tacky dough is perfectly normal and will result in a more tender crumb. Too much flour makes the dough stiff and the rolls dry. Only use enough flour on your work surface to prevent sticking.
- Master the Shaping: This is perhaps the most critical step for beautiful sub rolls. The goal is to create surface tension. As you roll the dough into a log, ensure it’s tight and the seam is pinched securely. This tension helps the rolls hold their elongated shape and gives them that characteristic tall, rounded profile. Practice makes perfect!
- Introduce Steam for a Crispy Crust: Authentic handmade sub rolls often have a wonderfully crisp, chewy crust. You can achieve this by creating steam in your oven during the initial baking phase. As mentioned in the instructions, placing a pan of hot water on the bottom rack works well. Alternatively, you can spritz the inside of the oven with water from a clean spray bottle a few times during the first 5-10 minutes of baking.
- Use a Baking Stone or Steel: If you have one, preheat a baking stone or steel in your oven. Placing your sub rolls directly on a hot surface helps create a burst of steam and a super crisp bottom crust.
- Don’t Rush the Cooling: While it’s tempting to tear into a warm sub roll, letting them cool completely on a wire rack allows the internal structure to set properly. Cutting into them too soon can make them gummy.
- Consider Toppings: For extra flavor and texture, brush your shaped rolls with an egg wash before baking and sprinkle with sesame seeds, poppy seeds, or even a little garlic powder for a savory twist.
- Perfect Pairings: Once your handmade sub rolls are ready, they’re perfect for anything! I love them filled with thinly sliced beef, provolone cheese, and roasted peppers, or a classic Italian cold cut medley with crisp lettuce and a tangy vinaigrette. They also make incredible garlic bread!
Storage
Once you’ve put in the effort to make these delicious handmade sub rolls, you’ll want to store them properly to maintain their freshness:
- Room Temperature: For immediate enjoyment, your sub rolls are best eaten the day they are baked. However, they will keep well at room temperature for 1-2 days. Store them in an airtight container or a large zip-top bag to prevent them from drying out.
- Freezing for Longer Storage: If you’ve baked a big batch or want to enjoy fresh sub rolls whenever you like, freezing is an excellent option.
- To Freeze Whole Rolls: Once the rolls are completely cooled, wrap each individual roll tightly in plastic wrap, then place them in a freezer-safe bag or container. They can be frozen for up to 2-3 months.
- To Freeze Sliced Rolls: If you plan to make sandwiches frequently, you can slice the rolls horizontally almost all the way through (leaving a hinge) before wrapping and freezing. This makes them easier to separate and fill once thawed.
- Thawing and Reheating:
- From Frozen: Remove the frozen sub rolls from their wrapping. You can thaw them overnight in the refrigerator or at room temperature for a few hours.
- To Refresh/Reheat: For that “just baked” taste and texture, preheat your oven to 350°F (175°C). Lightly spritz the thawed or room-temperature rolls with water and bake for 5-10 minutes, or until the crust is crisp again and the interior is warm. If baking from frozen, you might need an extra 5-10 minutes.
Final Thoughts
There’s something incredibly satisfying about creating the foundation of a fantastic meal with your own hands, and that’s precisely what you’ll experience with the Handmade Sub Roll Recipe. Forget those flimsy, store-bought options that crumble under the weight of your favorite fillings. This recipe delivers a roll that’s perfectly crisp on the outside, wonderfully soft and chewy on the inside, and robust enough to hold generous amounts of deliciousness, whether it’s thinly sliced beef, fresh veggies, or whatever your heart desires.
I truly believe the Handmade Sub Roll Recipe is a game-changer for anyone who loves a good sandwich. It might seem like a small detail, but a truly great sub starts with the bread, and these rolls are nothing short of exceptional. They transform an everyday lunch into something truly special and memorable. So, roll up your sleeves, embrace the joy of baking, and get ready to enjoy the best homemade sub rolls you’ve ever tasted. You won’t regret making this recipe a staple in your kitchen!

Easy Handmade Sub Roll Recipe – Perfect for Your Sandwiches!
- Total Time: 40 minutes
- Yield: 4-6 rolls
Description
This Handmade Sub Roll Recipe guides you to create crusty, soft, and chewy rolls that are perfect for any sandwich. Elevate your lunch or dinner with these delicious homemade rolls that hold all your favorite fillings without falling apart.
Ingredients
- Bread Flour
- Active Dry Yeast
- Warm Water
- Granulated Sugar
- Salt
- Olive Oil
- Egg Wash (Optional)
Instructions
- Activate the Yeast: In a large bowl, combine the warm water and granulated sugar. Sprinkle the active dry yeast over the top. Let it sit for 5-10 minutes until it becomes foamy and fragrant.
- Combine Ingredients: To the yeast mixture, add the olive oil and salt. Gradually add the bread flour, one cup at a time, mixing with a wooden spoon or a stand mixer with a dough hook until a shaggy dough forms.
- Knead the Dough: Turn the dough out onto a lightly floured surface. Knead for 8-10 minutes until the dough is smooth, elastic, and no longer sticky.
- First Rise (Bulk Fermentation): Lightly oil a clean bowl. Place the dough in the bowl, turning it once to coat the entire surface with oil. Cover the bowl tightly with plastic wrap or a clean kitchen towel. Let it rise in a warm, draft-free place for 1 to 1.5 hours, or until it has doubled in size.
- Punch Down and Divide: Gently punch down the risen dough to release the air. Turn it out onto a lightly floured surface. Divide the dough into equal portions, typically 4-6 for standard sub rolls.
- Shape the Sub Rolls: Take one portion of dough and gently flatten it into a rectangle. Fold the long edges into the center, overlapping slightly, and then roll the dough tightly from one end to the other, creating a log. Pinch the seam closed firmly.
- Second Rise (Proofing): Loosely cover the shaped rolls with plastic wrap or a kitchen towel. Let them rise again in a warm spot for 45-60 minutes, or until they are puffy and have almost doubled in size.
- Preheat Oven & Prepare for Baking: Preheat your oven to 400°F (200°C). If you have a baking stone or steel, place it in the oven to preheat.
- Score and Bake: If using, brush the rolls gently with egg wash. Make 3-4 diagonal slashes across the top of each sub roll. Carefully pour about a cup of hot water into the hot metal pan on the bottom rack. Bake for 18-25 minutes, or until the rolls are deeply golden brown.
- Cool: Transfer the baked handmade sub rolls to a wire rack to cool completely before slicing and filling.
- Prep Time: 15 mins
- Cook Time: 25 mins
- Category: Baking
- Method: Baking
- Cuisine: American
Nutrition
- Serving Size: 1 roll
- Calories: 150
- Sugar: 1 g
- Sodium: 200 mg
- Fat: 3 g
- Saturated Fat: 0.5 g
- Unsaturated Fat: 2 g
- Trans Fat: 0 g
- Carbohydrates: 28 g
- Fiber: 1 g
- Protein: 5 g
- Cholesterol: 20 mg
Keywords: Don't over-flour during kneading, master the shaping for surface tension, and consider using steam for a crispy crust. Let the rolls cool completely before slicing to avoid a gummy texture.


Leave a Comment