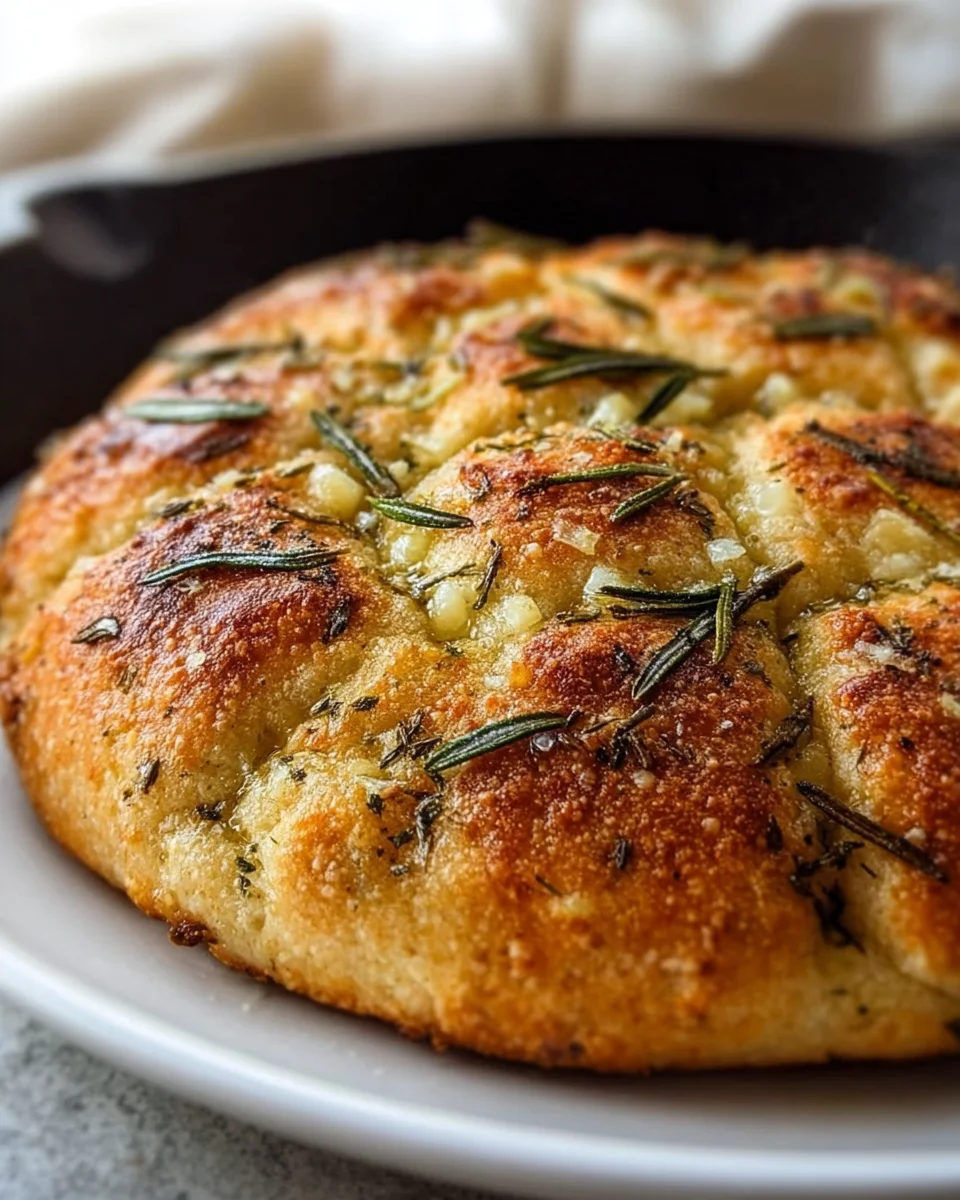
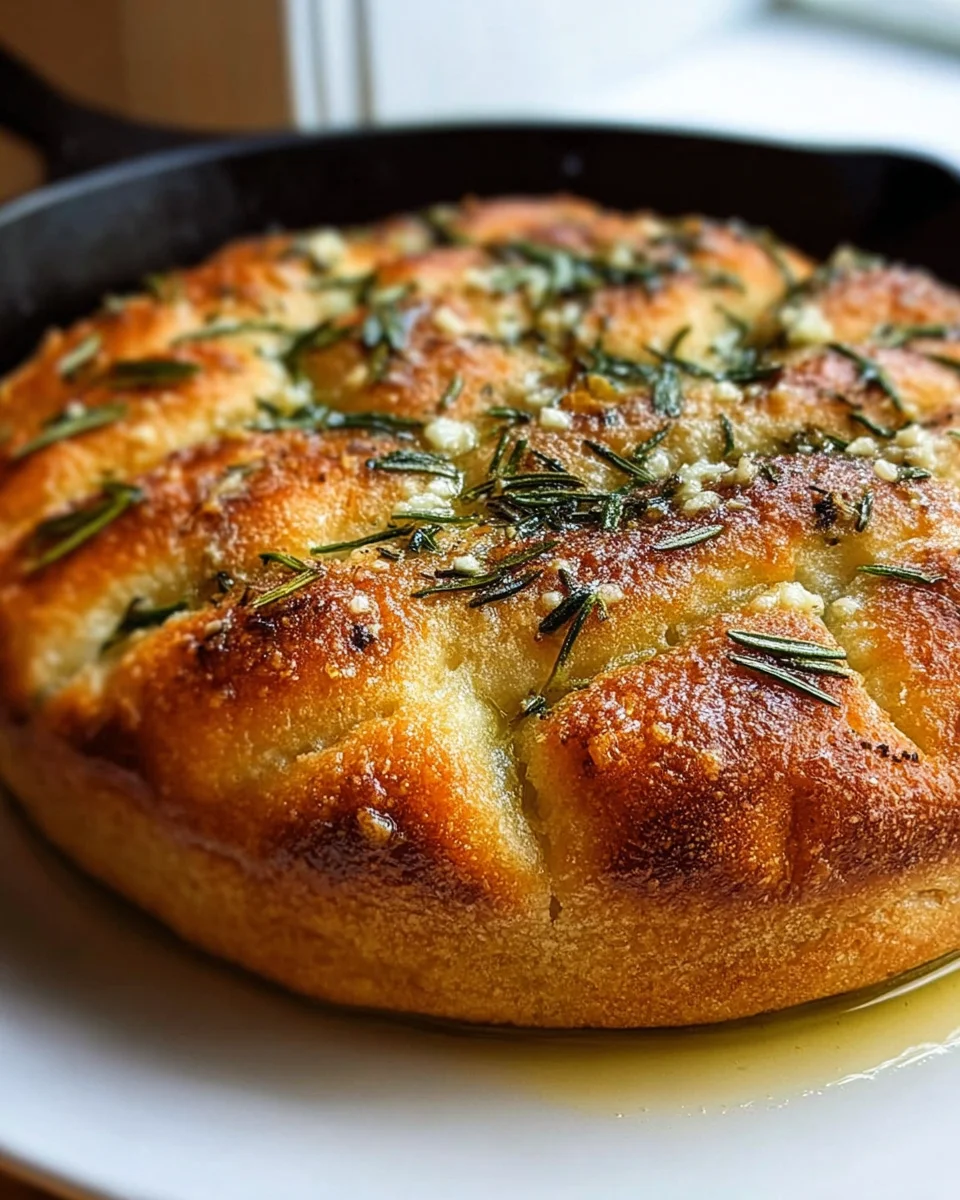
Rustic Garlic Rosemary Skillet Bread Recipe
Oh, my goodness, are you ready for a treat? Because I am absolutely bursting to share my latest obsession with you: this incredible Rustic Garlic Rosemary Skillet Bread. There’s just something so undeniably comforting and utterly irresistible about a warm, homemade loaf, and this one, my friends, takes the cake – or should I say, the bread! What makes it truly special, you ask? Well, it’s the perfect harmony of robust garlic and aromatic fresh rosemary, baked right into a golden-crusted, tender-crumbed masterpiece, all in one handy skillet. You’re going to adore how easy it is to bring that amazing bakery aroma into your own kitchen, and trust me, the taste is even better. This isn’t just any bread; it’s a wonderfully rustic, flavorful pull-apart delight that begs to be torn into, dipped into your favorite soup or stew (or alongside a hearty beef dish!), or simply savored on its own. Get ready for a baking experience that’s as rewarding as it is delicious!
Ingredient Notes
There’s something incredibly satisfying about baking your own bread, and this Rustic Garlic Rosemary Skillet Bread is no exception. The beauty of this recipe lies in its simplicity and the quality of a few key ingredients. I’ve found that using fresh, good-quality components truly makes all the difference in achieving that irresistible aroma and flavor profile we’re aiming for.
- All-Purpose Flour: This is my go-to for a reliably soft yet rustic crumb. You’ll want about 3 to 3½ cups. While all-purpose flour works wonderfully, if you’re looking for a slightly chewier texture, you could substitute up to half of it with bread flour. For a heartier loaf with more depth, a small amount of whole wheat flour (say, half a cup) can be integrated, though it might make the dough a little stiffer.
- Active Dry Yeast: Crucial for that beautiful rise. I always use active dry yeast, which needs to be proofed first. If you have instant yeast, you can skip the proofing step and just mix it directly with your dry ingredients, but I still recommend blooming it for a few minutes in warm water just to ensure it’s active and ready to work its magic.
- Warm Water: The lifeblood of your yeast! Aim for water between 105-115°F (40-46°C). Too hot, and you’ll kill the yeast; too cold, and it won’t activate properly. This temperature range helps the yeast wake up and start feasting on the sugar.
- Granulated Sugar: A pinch of sugar isn’t just for sweetness; it’s food for the yeast, helping it activate and get a head start on fermentation. Don’t worry, your bread won’t taste sweet!
- Olive Oil: This is a star ingredient, providing richness to the dough, helping create a golden, crisp crust, and serving as the aromatic base for our garlic and rosemary in the skillet. Use a good extra virgin olive oil for the best flavor. If you find yourself without olive oil, a neutral-flavored oil like avocado or grapeseed could work in a pinch for the dough, but for the skillet, olive oil truly is king for that authentic Mediterranean flavor.
- Fresh Garlic: Minced fresh garlic is non-negotiable for this recipe’s robust flavor. I usually use about 4-5 cloves, but honestly, you can adjust to your garlic-loving heart’s content! If you absolutely can’t get fresh, a teaspoon of garlic powder can be used in the dough, but I would still try to include fresh in the skillet for that aromatic punch.
- Fresh Rosemary: The other half of our aromatic duo. Fresh rosemary, finely chopped, infuses the bread with its distinctive, slightly piney fragrance. Dried rosemary can be used (about a third of the amount of fresh), but the flavor and aroma won’t be as vibrant. I really encourage you to seek out fresh for this one. Other fresh herbs like thyme or oregano could be interesting variations, but for a true “Rosemary Skillet Bread,” fresh rosemary is key.
- Salt: Kosher or sea salt is what I prefer for both the dough and for sprinkling on top. It enhances all the other flavors and is vital for controlling yeast activity.
Key Substitutions to Consider:
- Herbs: While fresh rosemary is paramount for this specific recipe, if you’re experimenting, fresh thyme or oregano could offer different aromatic profiles.
- Garlic: If fresh garlic is truly unavailable, 1 teaspoon of garlic powder can be substituted for every 3 cloves of fresh garlic in the dough. However, for the skillet, I strongly advise finding fresh garlic if at all possible to get that rich, roasted flavor.
- Flour: As mentioned, bread flour can add chewiness, and a small amount of whole wheat flour can add depth, but all-purpose flour is excellent for a balanced texture.
Step-by-Step Instructions
Baking this skillet bread is a joyful process, and I promise you, the aroma filling your kitchen will be worth every step!
- Activate the Yeast: In a large bowl or the bowl of your stand mixer, combine the warm water (105-115°F / 40-46°C) and granulated sugar. Sprinkle the active dry yeast over the water. Give it a gentle stir and let it sit for 5-10 minutes until it looks foamy and fragrant. This tells you your yeast is alive and ready to work!
- Combine Dry Ingredients: In a separate medium bowl, whisk together 3 cups of the all-purpose flour and the salt.
- Mix the Dough: Once your yeast is foamy, add about 2 tablespoons of olive oil to the yeast mixture. Gradually add the flour mixture to the wet ingredients, mixing with a wooden spoon or a dough hook on low speed until a shaggy dough forms.
- Knead the Dough: Turn the dough out onto a lightly floured surface. Knead for 8-10 minutes by hand, or 5-7 minutes with a stand mixer on medium-low speed, until the dough is smooth, elastic, and no longer sticky. It should spring back when lightly poked. If it’s too sticky, add the remaining ½ cup of flour, a tablespoon at a time, until it reaches the desired consistency.
- First Rise (Bulk Fermentation): Lightly grease a large clean bowl with a teaspoon of olive oil. Place the dough in the bowl, turning it once to coat. Cover the bowl tightly with plastic wrap or a clean kitchen towel. Let it rise in a warm, draft-free place for 1 to 1½ hours, or until it has doubled in size. This is where all the wonderful flavors start to develop!
- Prepare the Skillet: While the dough is on its first rise, generously drizzle 2-3 tablespoons of olive oil into a 10-inch cast iron skillet (or an oven-safe heavy-bottomed pan). Sprinkle the minced garlic and chopped fresh rosemary evenly over the bottom of the skillet.
- Shape and Place Dough: Once the dough has doubled, gently punch it down to release the air. Transfer the dough to the prepared skillet. Gently stretch and press the dough to evenly cover the bottom of the skillet, creating a rustic, round shape. Use your fingertips to create deep dimples all over the surface of the dough – this helps hold the olive oil and creates those beautiful pockets.
- Second Rise (Proofing): Cover the skillet loosely with plastic wrap or a kitchen towel. Let the dough rise again in a warm place for another 30-45 minutes, or until it looks puffy and has nearly doubled again.
- Preheat Oven: About 15 minutes before the second rise is complete, preheat your oven to 400°F (200°C).
- Bake the Bread: Uncover the skillet and carefully transfer it to the preheated oven. Bake for 25-35 minutes, or until the bread is deeply golden brown on top and sounds hollow when tapped on the bottom. The crust should be wonderfully crisp.
- Cool and Serve: Once baked, carefully remove the skillet from the oven. If desired, you can brush the top of the hot bread with a little extra olive oil for an even richer crust. Let the bread cool in the skillet for about 5-10 minutes before carefully transferring it to a wire rack to cool slightly further. This bread is best served warm, torn into rustic pieces, and dipped in good olive oil.
Tips & Suggestions
Making bread is an art and a science, and a few little tricks can elevate your Rustic Garlic Rosemary Skillet Bread from good to absolutely phenomenal. I’ve learned these through plenty of baking adventures!
- Water Temperature is Key: I can’t stress this enough – ensure your water is in that sweet spot of 105-115°F (40-46°C). Invest in a kitchen thermometer if you don’t have one. It’s a small investment that makes a huge difference in yeast activation. Too hot will kill the yeast, too cold won’t wake it up.
- Don’t Rush the Rise: Patience is a virtue in bread making. Allow your dough ample time to rise in a warm, draft-free spot. A slow, steady rise builds better flavor and texture. If your kitchen is cool, try placing the covered bowl in a slightly warm (but turned off) oven, or near a sunny window.
- The Power of the Skillet: A cast iron skillet is truly ideal for this recipe. Its ability to retain and distribute heat evenly creates an incredibly crisp, golden-brown bottom crust that’s just divine. If you don’t have cast iron, any heavy, oven-safe skillet will work, but monitor the cooking time and crust development closely.
- Dimple with Confidence: Don’t be shy when dimpling the dough with your fingertips! Those indentations are crucial for two reasons: they prevent the bread from puffing up into a giant dome, and more importantly, they create little pools for the garlic, rosemary, and olive oil to nestle into, infusing every bite with flavor.
- For an Extra Crispy Crust: If you love an extra-crisp crust, consider placing a shallow pan of hot water on the bottom rack of your oven during the first 10-15 minutes of baking. The steam helps create a beautiful, crackly crust. You can also brush the top of the dough with a little extra olive oil just before baking.
- Serving Suggestions: This bread is incredibly versatile! I love serving it warm, torn into chunks, alongside a hearty bowl of beef stew or a creamy tomato soup. It’s also fantastic for dipping into good quality olive oil, a balsamic reduction, or a vibrant pesto. It makes an excellent accompaniment to a cheese board or as a rustic side for any Italian-inspired meal.
- Flavor Variations: Feel free to experiment! While garlic and rosemary are a classic pairing, consider adding a sprinkle of red pepper flakes for a subtle kick, a handful of grated Parmesan cheese, sun-dried tomatoes (finely chopped), or even some pitted and chopped Kalamata olives to the dough or on top before the second rise.
Storage
While this Rustic Garlic Rosemary Skillet Bread is truly at its best consumed fresh and warm, I understand sometimes you might have leftovers (though that’s a rare occurrence in my house!). Here’s how I typically store it:
- Room Temperature: If you plan to eat the bread within 1-2 days, store it in an airtight container or a large, sealable plastic bag at room temperature. A bread box also works wonderfully. I find that storing it this way helps maintain its softness and prevents it from drying out too quickly. However, the crust will soften over time.
- Refrigeration: I generally advise against refrigerating homemade bread. The cool, dry air of the refrigerator tends to stale bread much faster than leaving it at room temperature. It can make the bread dense and chewy, losing that lovely rustic texture.
- Freezing for Longer Storage: This is my preferred method if I have extra bread and want to save it for later. Once the bread has completely cooled, wrap it tightly in plastic wrap, then an additional layer of aluminum foil, or place it in a freezer-safe bag. It can be stored in the freezer for up to 2-3 months.
- Thawing and Reheating:
- From Frozen: To thaw, simply remove the bread from the freezer and let it sit at room temperature for a few hours, still wrapped, until fully thawed.
- Reheating for Best Results: For the best experience, especially if you want to revive that wonderful crust, I recommend reheating the bread in the oven. Preheat your oven to 350°F (175°C). Place the bread directly on the oven rack (or on a baking sheet if you prefer) and bake for about 10-15 minutes, or until warmed through and the crust has crisped up again. If you’re reheating just a slice, a toaster oven works beautifully.
Final Thoughts
I truly hope you’re feeling inspired to bring the magic of this Rustic Garlic Rosemary Skillet Bread Recipe into your kitchen! There’s a unique satisfaction that comes from creating something so wonderfully aromatic and delicious with your own hands, especially when it’s as simple and rewarding as this bread. The crisp, golden crust from the skillet combined with the irresistible fragrance of fresh rosemary and savory garlic transforms everyday ingredients into an extraordinary experience. This isn’t just a recipe; it’s an invitation to fill your home with warmth, an amazing aroma, and the kind of comforting food that brings smiles to every face. Trust me, once you pull this gorgeous Rustic Garlic Rosemary Skillet Bread Recipe from the heat, you’ll understand why it’s an absolute must-try. Enjoy every single homemade, rustic bite!

Flavorful Rustic Garlic Rosemary Skillet Bread Recipe
- Total Time: 45 minutes
- Yield: 8 servings 1x
Description
This Rustic Garlic Rosemary Skillet Bread is a warm, homemade loaf that combines the robust flavors of garlic and fresh rosemary. It’s an irresistible pull-apart delight perfect for dipping or savoring on its own.
Ingredients
- 3 to 3½ cups All-Purpose Flour
- 2 tablespoons Olive Oil (plus extra for greasing and brushing)
- 1 teaspoon Kosher or Sea Salt
- 1 packet Active Dry Yeast
- 1 cup Warm Water (between 105-115°F / 40-46°C)
- 1 tablespoon Granulated Sugar
- 4–5 cloves Fresh Garlic (minced)
- Fresh Rosemary (finely chopped)
Instructions
- In a large bowl or the bowl of your stand mixer, combine the warm water and granulated sugar. Sprinkle the active dry yeast over the water. Give it a gentle stir and let it sit for 5-10 minutes until it looks foamy and fragrant.
- In a separate medium bowl, whisk together 3 cups of the all-purpose flour and the salt.
- Once your yeast is foamy, add about 2 tablespoons of olive oil to the yeast mixture. Gradually add the flour mixture to the wet ingredients, mixing with a wooden spoon or a dough hook on low speed until a shaggy dough forms.
- Turn the dough out onto a lightly floured surface. Knead for 8-10 minutes by hand, or 5-7 minutes with a stand mixer on medium-low speed, until the dough is smooth, elastic, and no longer sticky.
- Lightly grease a large clean bowl with a teaspoon of olive oil. Place the dough in the bowl, turning it once to coat. Cover the bowl tightly with plastic wrap or a clean kitchen towel. Let it rise in a warm, draft-free place for 1 to 1½ hours, or until it has doubled in size.
- While the dough is on its first rise, generously drizzle 2-3 tablespoons of olive oil into a 10-inch cast iron skillet. Sprinkle the minced garlic and chopped fresh rosemary evenly over the bottom of the skillet.
- Once the dough has doubled, gently punch it down to release the air. Transfer the dough to the prepared skillet. Gently stretch and press the dough to evenly cover the bottom of the skillet, creating a rustic, round shape.
- Cover the skillet loosely with plastic wrap or a kitchen towel. Let the dough rise again in a warm place for another 30-45 minutes, or until it looks puffy and has nearly doubled again.
- About 15 minutes before the second rise is complete, preheat your oven to 400°F (200°C).
- Uncover the skillet and carefully transfer it to the preheated oven. Bake for 25-35 minutes, or until the bread is deeply golden brown on top and sounds hollow when tapped on the bottom.
- Once baked, carefully remove the skillet from the oven. Let the bread cool in the skillet for about 5-10 minutes before carefully transferring it to a wire rack to cool slightly further.
- Prep Time: 15 mins
- Cook Time: 30 mins
- Category: Bread
- Method: Baking
- Cuisine: Mediterranean
Nutrition
- Serving Size: 1 slice
- Calories: 200
- Sugar: 1 g
- Sodium: 200 mg
- Fat: 5 g
- Saturated Fat: 1 g
- Unsaturated Fat: 4 g
- Trans Fat: 0 g
- Carbohydrates: 35 g
- Fiber: 1 g
- Protein: 5 g
- Cholesterol: 0 mg
Keywords: Ensure your water temperature is between 105-115°F for optimal yeast activation. Allow your dough ample time to rise for better flavor and texture. A cast iron skillet is ideal for a crisp crust.

Leave a Comment