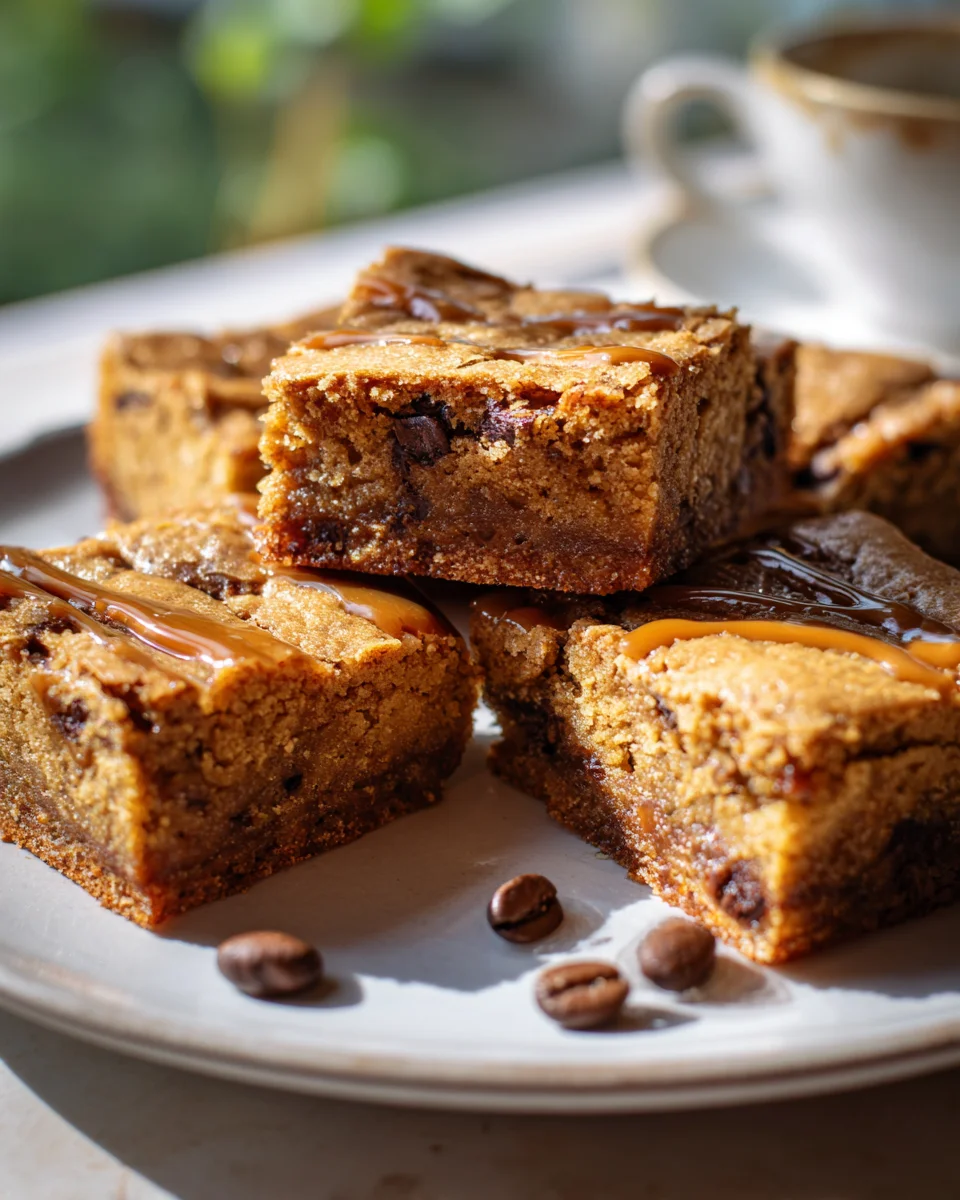
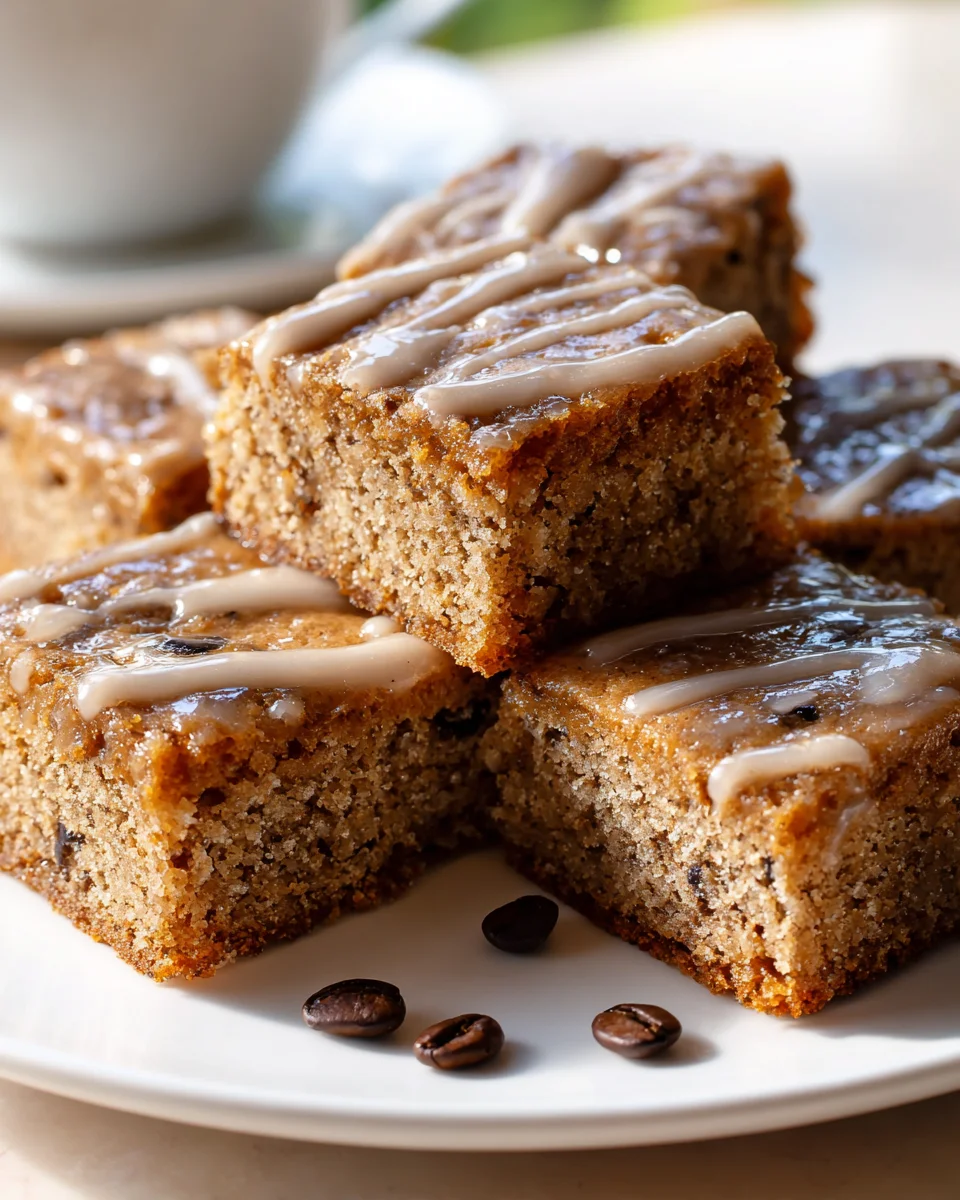
Chewy Brown Butter Coffee Cookie Bars With Glaze
Oh my goodness, let me tell you about these incredible Chewy Brown Butter Coffee Cookie Bars With Glaze! If you’re anything like me, you appreciate a dessert that offers more than just sweetness – you want depth, character, and an irresistible chew. And that, my friends, is exactly what we have here. These aren’t just any cookie bars; they are a symphony of flavors and textures designed to utterly delight your taste buds.
What makes them truly special? It all starts with the magic of brown butter. That golden, nutty elixir takes the humble butter flavor to an entirely new, sophisticated level, adding an incredible richness that you just can’t get any other way. Then, we infuse that glorious brown butter base with the comforting, slightly bitter notes of coffee. Don’t worry, it’s not overpowering; instead, the coffee works its magic by enhancing the chocolate and caramel undertones, creating a remarkably balanced and complex flavor profile that will have you reaching for just one more.
You’ll absolutely love how unbelievably chewy these bars are – a texture that’s pure cookie perfection, yet in the convenient, sliceable form of a bar. And to top it all off, a simple, sweet glaze adds a final touch of elegance and a lovely sheen. Imagine sinking your teeth into a square that’s dense, moist, packed with those incredible browned butter and coffee notes, all finished with a delicate sweet glaze. They’re perfect for sharing at a gathering, bringing a smile to a friend’s face, or simply treating yourself with a hot cup of coffee or your favorite non-alcoholic beverage. Get ready to fall in love with your new go-to cookie bar recipe!
Welcome to my kitchen! Today, I’m so excited to share one of my absolute favorite bar recipes: these Chewy Brown Butter Coffee Cookie Bars with a delightful Glaze. They’re a game-changer if you love coffee, cookies, and that incredibly rich, nutty flavor of brown butter. These bars are incredibly chewy, packed with deep coffee notes, and topped with a sweet glaze that makes them utterly irresistible. Let’s get baking!
Ingredient Notes
Creating these incredibly chewy and flavorful cookie bars relies on a few key ingredients, each playing a crucial role in the final taste and texture. I’ve carefully selected these components to deliver that perfect balance of coffee, brown butter, and sweetness.
- Unsalted Butter: This is the star of the show for browning. Using unsalted butter allows you to control the salt content in your recipe. Browning the butter is non-negotiable here; it transforms ordinary butter into a nutty, aromatic liquid gold that infuses the entire bar with an unparalleled depth of flavor. If you only have salted butter, you can use it but reduce the added salt in the recipe by about ¼ teaspoon.
- Brown Sugar (Light or Dark): Brown sugar is critical for chewiness and moisture. The molasses content gives these bars their signature soft, chewy texture and a lovely caramel-like undertone. I prefer light brown sugar for a balanced flavor, but dark brown sugar will yield an even richer, chewier bar with a more pronounced molasses taste.
- Granulated Sugar: A touch of granulated sugar helps with spread, crisp edges, and overall sweetness. It works in conjunction with brown sugar to create the perfect texture.
- Large Eggs: Eggs act as a binder, adding moisture and richness. They also contribute to the structure and help achieve that perfectly chewy consistency. Make sure your eggs are at room temperature for better emulsification with the other ingredients.
- Vanilla Extract: A classic flavor enhancer! Pure vanilla extract complements both the brown butter and coffee flavors beautifully, adding warmth and depth. Don’t skimp on good quality vanilla.
- Instant Espresso Powder or Instant Coffee Granules: This is where the coffee magic happens! Instant espresso powder is my top choice because it dissolves easily and provides a much more intense coffee flavor without adding extra liquid, which could throw off the cookie bar’s texture. Instant coffee granules will also work, but you might need to use a slightly larger amount for a similar strength of flavor, and ensure they are finely crushed if they are chunky.
- All-Purpose Flour: The structural backbone of our bars. Make sure to measure it correctly, either by weight (recommended) or by using the spoon-and-level method to avoid dense or dry bars.
- Baking Soda: This leavening agent reacts with the acidic brown sugar to help the bars rise slightly and contribute to their chewy texture.
- Salt: Essential for balancing the sweetness and enhancing all the other flavors. Don’t skip it!
- Chocolate Chips or Chunks (Optional): While optional, I highly recommend adding semi-sweet or dark chocolate chips. The rich chocolate pairs incredibly well with the coffee and brown butter. You could also try milk chocolate, white chocolate, or even a mix!
- For the Glaze: Powdered sugar (for smoothness), milk or cream (to adjust consistency), instant espresso powder (for a coffee glaze, optional), and a touch of vanilla extract.
Step-by-Step Instructions
Getting these Chewy Brown Butter Coffee Cookie Bars just right is a delightful process, and I’m here to walk you through each step. Precision here will lead to the most amazing results!
- Prepare Your Pan: First things first, preheat your oven to 350°F (175°C). Line a 9×13-inch baking pan with parchment paper, leaving an overhang on the sides. This parchment sling is absolutely crucial for easy lifting and cutting of your cooled bars later. Lightly grease the parchment paper for extra assurance.
- Brown the Butter: This is where the magic begins! In a light-colored saucepan, melt your unsalted butter over medium heat. Keep a close eye on it. The butter will melt, then foam, and you’ll start to see tiny golden-brown flecks forming at the bottom. Swirl the pan occasionally. Continue cooking until the butter smells wonderfully nutty and the flecks are a deep amber. This usually takes about 5-8 minutes. Immediately pour the browned butter into a large heatproof bowl, scraping all those precious brown bits into the bowl. Let it cool for about 10-15 minutes until it’s warm but not hot; you don’t want to scramble the eggs in the next step.
- Combine Sugars and Butter: To the slightly cooled brown butter, add both the brown sugar and granulated sugar. Whisk vigorously for about 1-2 minutes until the mixture is well combined and slightly lighter in color. This vigorous mixing helps create a beautiful, chewy texture.
- Add Wet Ingredients: Add the eggs one at a time, whisking well after each addition until fully incorporated. Then, stir in the vanilla extract and your instant espresso powder (or instant coffee granules). Make sure the coffee powder dissolves completely into the mixture for an even flavor distribution. The mixture should look smooth and slightly glossy.
- Whisk Dry Ingredients: In a separate medium bowl, whisk together the all-purpose flour, baking soda, and salt. Whisking ensures these ingredients are evenly distributed, preventing pockets of leavening or salt in your bars.
- Combine Wet and Dry: Gradually add the dry ingredient mixture to the wet mixture. Mix with a spatula or wooden spoon until just combined. The absolute key here is to not overmix! Overmixing will develop the gluten too much, leading to tough, dense bars instead of wonderfully chewy ones. Stop mixing as soon as you see no more streaks of dry flour.
- Fold in Chocolate (Optional): If you’re using chocolate chips or chunks, gently fold them into the dough until evenly distributed.
- Spread and Bake: Transfer the dough into your prepared 9×13-inch pan. Use an offset spatula or the back of a spoon to spread the dough evenly into the corners. It might be a little sticky, but persist! Bake for 22-28 minutes, or until the edges are lightly golden brown and set, but the center still looks slightly soft and gooey. A toothpick inserted into the center should come out with moist crumbs, not wet batter. Remember, slight underbaking is key to chewiness.
- Cool Completely: Remove the pan from the oven and place it on a wire rack to cool completely. This is critical before glazing! If you try to glaze warm bars, the glaze will melt right off. Patience is a virtue here.
- Make the Glaze: Once the bars are fully cooled, whisk together the powdered sugar, milk (or cream), instant espresso powder (if using for a coffee glaze), and vanilla extract in a small bowl until smooth. Adjust the consistency by adding more milk a tiny bit at a time for a thinner glaze, or more powdered sugar for a thicker one. You want a consistency that drizzles easily but isn’t too runny.
- Glaze and Set: Pour or drizzle the glaze evenly over the cooled bars. Let the glaze set for at least 30 minutes, or until firm to the touch, before cutting.
- Cut and Serve: Once the glaze is set, use the parchment paper overhangs to lift the entire slab of bars out of the pan. Place it on a cutting board and slice into your desired bar sizes. Now, enjoy your magnificent Chewy Brown Butter Coffee Cookie Bars!
Tips & Suggestions
I’ve made these Chewy Brown Butter Coffee Cookie Bars countless times, and along the way, I’ve picked up some tricks that I want to share with you. These tips will help you achieve perfection every single time!
- Don’t Rush the Brown Butter: I cannot stress this enough! Browning the butter is where a significant portion of the flavor comes from. Take your time, use a light-colored pan so you can see the color change, and scrape all those precious browned bits into your mixing bowl. Those little flecks are packed with nutty goodness.
- Cool the Brown Butter Appropriately: After browning, make sure to let the butter cool to warm, not hot. If it’s too hot when you add the eggs, you risk cooking them, leading to a lumpy dough. A quick cool-down in the fridge (checking every few minutes) can speed this up if you’re in a hurry.
- Measure Flour Correctly: For baking, especially for cookies and bars, accuracy matters. Too much flour will result in dry, dense bars. I highly recommend using a kitchen scale to measure your flour by weight (1 cup all-purpose flour is typically 120-125 grams). If you don’t have a scale, use the spoon-and-level method: spoon flour into your measuring cup, then level it off with a straight edge. Don’t pack it or scoop directly from the bag.
- Do Not Overmix the Dough: This is a golden rule for chewy baked goods! Once you add the dry ingredients to the wet, mix only until no streaks of dry flour remain. Overmixing develops the gluten, which makes your bars tough and cakey rather than wonderfully chewy.
- Don’t Overbake for Chewy Results: For truly chewy bars, it’s better to slightly underbake than overbake. The edges should be set and lightly golden, but the center should still look a little soft and potentially even slightly underdone. The bars will continue to cook and set as they cool in the pan.
- Parchment Paper is Your Best Friend: Lining your baking pan with parchment paper, allowing for an overhang, is non-negotiable for bars. It makes lifting the entire slab out of the pan effortless, allowing for clean, neat cuts.
- Enhance the Coffee Flavor: If you’re a serious coffee lover, you can slightly increase the amount of instant espresso powder in both the bars and the glaze. For an extra boost, a tiny pinch of ground cinnamon can also complement the coffee beautifully.
- Optional Mix-ins: While they’re fantastic as is, feel free to get creative! Add a sprinkle of flaky sea salt on top after glazing for a salty-sweet contrast. Toffee bits, chopped pecans or walnuts, or even white chocolate chips could be folded into the dough for different flavor and texture profiles.
- Chill the Dough (Optional): If you have extra time, chilling the dough for 30 minutes to an hour (or even overnight) can deepen the flavors and create a slightly chewier bar. This allows the flour to fully hydrate and the flavors to meld, but it’s not strictly necessary for a delicious outcome.
Storage
You’ve put in the effort to bake these incredible Chewy Brown Butter Coffee Cookie Bars, and now you want to make sure they stay fresh and delicious for as long as possible. Here’s how I recommend storing them to maintain that perfect chewy texture and delightful flavor.
- Room Temperature: Once the glaze has fully set, cut the bars into individual portions. Store them in an airtight container at room temperature for up to 3-4 days. To maintain their chewiness and prevent them from drying out, I often place a slice of plain bread or half a tortilla in the container with the bars. The bread will dry out, but it helps keep the bars soft and moist.
- Refrigeration: If you live in a warm climate or want to extend their freshness a bit longer, you can store the bars in an airtight container in the refrigerator for up to a week. However, be aware that refrigeration can sometimes alter the texture, making them slightly firmer. If you find them too firm, let them come to room temperature for about 15-30 minutes before enjoying.
- Freezing for Longer Storage: These bars freeze exceptionally well! To freeze, ensure the glaze is completely set. Cut the bars into individual squares. Place them in a single layer on a baking sheet and freeze for about an hour until firm. This prevents them from sticking together. Once firm, transfer the frozen bars to a freezer-safe airtight container or a heavy-duty freezer bag. You can also layer them with parchment paper in between to prevent sticking. They will stay fresh in the freezer for up to 2-3 months.
- Thawing Frozen Bars: When you’re ready to enjoy a frozen bar, simply take it out of the freezer and let it thaw at room temperature for about 30-60 minutes. They will soften beautifully and retain much of their original chewy texture.
- Keeping Them Chewy: The key to keeping these bars chewy is to store them in an airtight container, away from air exposure. If you notice them starting to dry out, a quick zap in the microwave for 10-15 seconds can bring back some of that wonderful softness and warmth.
Final Thoughts
And there you have it! I truly believe that once you’ve tried these Chewy Brown Butter Coffee Cookie Bars With Glaze, you’ll understand why I’m so excited about them. They’re not just another cookie bar; they’re a symphony of flavors and textures that truly stand out.
The rich, nutty depth from the brown butter perfectly complements the invigorating essence of coffee, all wrapped up in an irresistibly chewy texture. And that sweet, delicate glaze? It’s the perfect finishing touch, elevating each bite into a moment of pure bliss. I promise you, these Chewy Brown Butter Coffee Cookie Bars With Glaze are destined to become a new favorite in your baking repertoire, offering a sophisticated twist on a classic treat.
So go ahead, preheat your oven and get ready to experience a truly special dessert. I can’t wait for you to taste the magic!

Chewy Brown Butter Coffee Cookie Bars: Chewy & Glazed Perfection
- Total Time: 43 minutes
- Yield: 12 servings 1x
Description
Indulge in these Chewy Brown Butter Coffee Cookie Bars that combine rich coffee flavors with a delightful glaze. Perfectly chewy and utterly irresistible, they are a must-try for any dessert lover!
Ingredients
- 1 cup Unsalted Butter
- 1 cup Brown Sugar (Light or Dark)
- 1/2 cup Granulated Sugar
- 2 Large Eggs
- 2 teaspoons Vanilla Extract
- 2 tablespoons Instant Espresso Powder or Instant Coffee Granules
- 2 cups All-Purpose Flour
- 1 teaspoon Baking Soda
- 1/2 teaspoon Salt
- 1 cup Chocolate Chips or Chunks (Optional)
- For the Glaze: 1 cup Powdered Sugar
- 2–4 tablespoons Milk or Cream
- 1 tablespoon Instant Espresso Powder (optional)
- 1/2 teaspoon Vanilla Extract
Instructions
- Preheat your oven to 350°F (175°C). Line a 9×13-inch baking pan with parchment paper, leaving an overhang on the sides. Lightly grease the parchment paper.
- In a light-colored saucepan, melt your unsalted butter over medium heat. Continue cooking until the butter smells nutty and has deep amber flecks, about 5-8 minutes. Pour the browned butter into a large heatproof bowl and let it cool for 10-15 minutes.
- To the slightly cooled brown butter, add both the brown sugar and granulated sugar. Whisk vigorously for about 1-2 minutes until well combined and slightly lighter in color.
- Add the eggs one at a time, whisking well after each addition. Stir in the vanilla extract and instant espresso powder until fully incorporated.
- In a separate bowl, whisk together the all-purpose flour, baking soda, and salt.
- Gradually add the dry mixture to the wet mixture, mixing until just combined. Avoid overmixing.
- If using, gently fold in the chocolate chips or chunks.
- Transfer the dough into the prepared pan and spread it evenly. Bake for 22-28 minutes until the edges are golden brown and the center is slightly soft.
- Remove from the oven and let cool completely on a wire rack.
- Once cooled, whisk together the powdered sugar, milk (or cream), instant espresso powder (if using), and vanilla extract until smooth. Adjust the consistency as needed.
- Pour or drizzle the glaze evenly over the cooled bars. Let the glaze set for at least 30 minutes before cutting.
- Use the parchment overhang to lift the bars out of the pan and cut into desired sizes.
- Prep Time: 15 mins
- Cook Time: 28 mins
- Category: Dessert
- Method: Baking
- Cuisine: American
Nutrition
- Serving Size: 1 bar
- Calories: 250
- Sugar: 20 g
- Sodium: 150 mg
- Fat: 12 g
- Saturated Fat: 7 g
- Unsaturated Fat: 4 g
- Trans Fat: 0 g
- Carbohydrates: 32 g
- Fiber: 1 g
- Protein: 3 g
- Cholesterol: 50 mg
Keywords: Ensure to brown the butter properly for maximum flavor. Measure flour accurately to avoid dense bars, and consider chilling the dough for enhanced flavor.
Leave a Comment