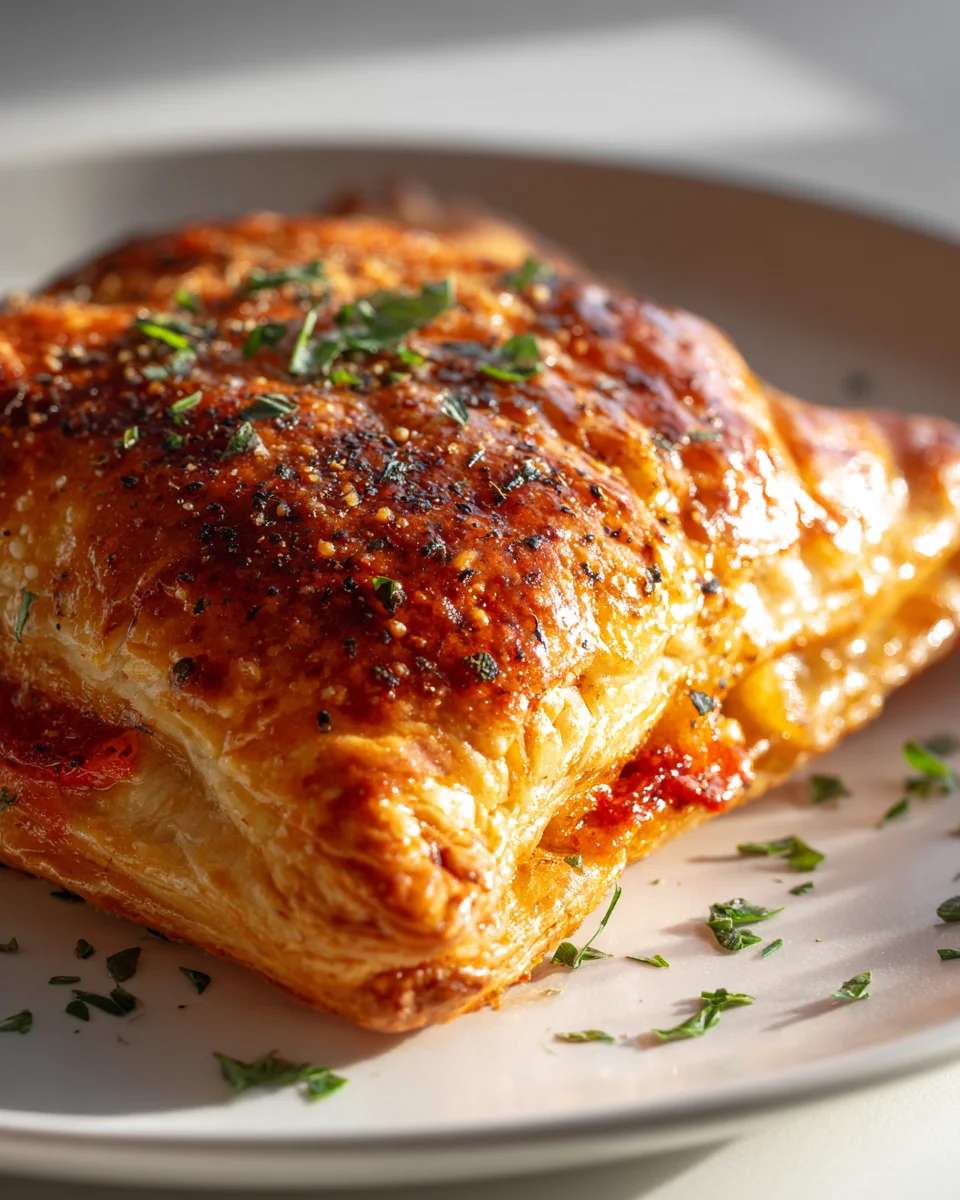
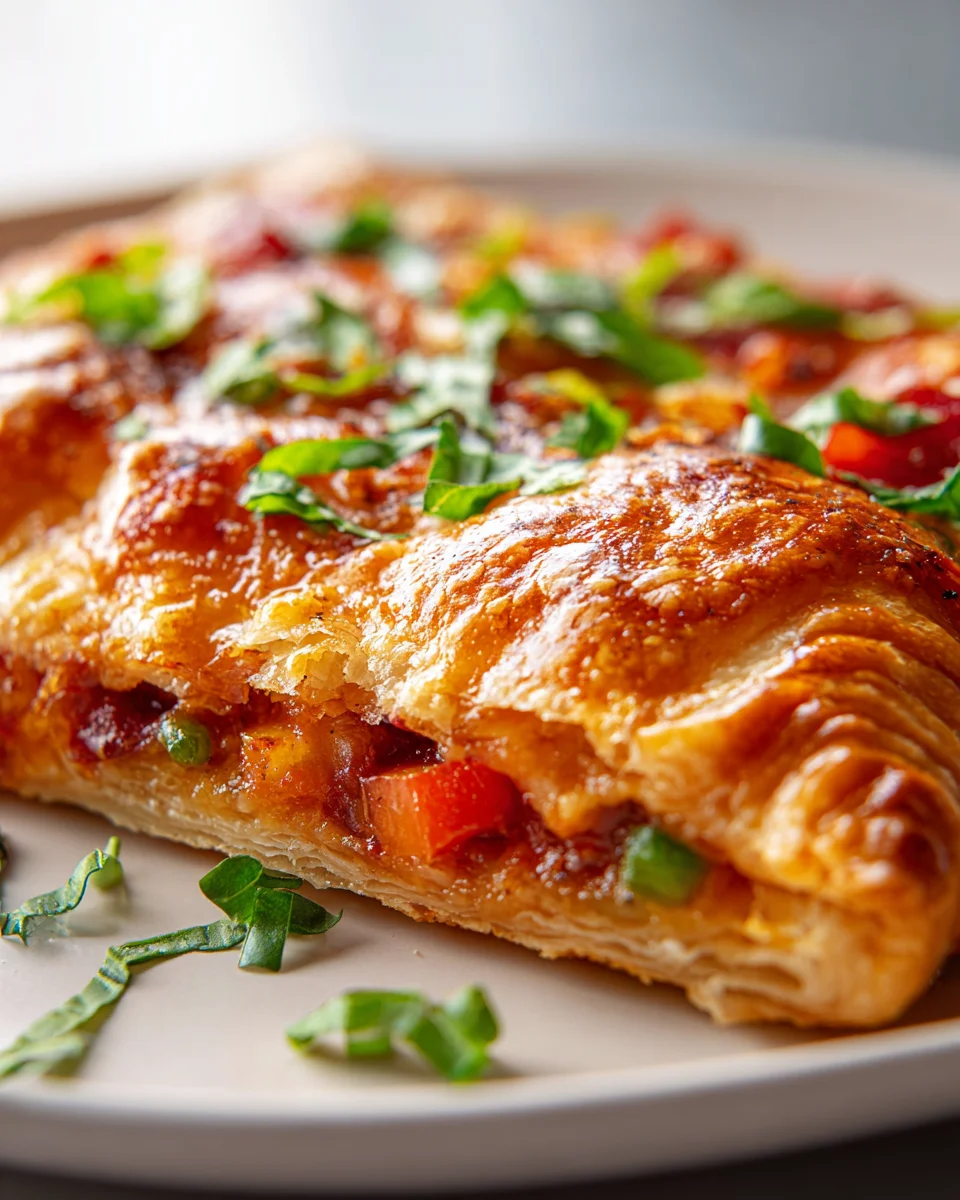
Puff Pastry Pizza Hot Pockets With Flaky Crust
Oh boy, do I have a treat for you today! I’m so excited to share my recipe for Puff Pastry Pizza Hot Pockets With Flaky Crust. Forget everything you thought you knew about hot pockets because these are on a whole different level. What makes them so incredibly special, you ask? It’s all about that glorious crust! We’re ditching the usual dough for store-bought puff pastry, which bakes up into the most beautifully golden, buttery, and unbelievably flaky pockets you can imagine. Seriously, it’s a game-changer!
You are going to absolutely love these! Imagine biting into a perfectly crisp exterior, then hitting that warm, gooey, cheesy pizza filling inside – it’s pure heaven. These are essentially individual-sized, portable pizza pockets made with ready-to-use puff pastry. We fill them with your favorite pizza sauce, plenty of mozzarella, and delicious toppings like savory beef pepperoni or your choice of veggies, then bake them until they’re puffed and golden. They’re incredibly customizable, meaning you can load them up with all your go-to pizza ingredients. I find them perfect for a quick and satisfying lunch, a fun dinner, an easy snack for the kids (and adults!), or even a fantastic party appetizer. They’re handheld, less messy than a slice of pizza, and offer that satisfying crunch with every bite. So, get ready to elevate your pizza game with these delicious, portable parcels of joy!
Ingredient Notes
Creating these delightful Puff Pastry Pizza Hot Pockets with their undeniably flaky crust starts with a few key ingredients. Each component plays a vital role in achieving that perfect balance of crispy exterior and savory, gooey interior. Here’s what you’ll need and some thoughts on substitutions:
- Puff Pastry: This is the star of our show! I always opt for good quality, store-bought frozen puff pastry sheets. They are incredibly convenient and deliver that signature airy, flaky texture that makes these hot pockets so special. Make sure to thaw it properly in the refrigerator overnight or at room temperature for about 30-40 minutes until it’s pliable but still cool. Do not try to rush thawing in the microwave, as it can make the pastry tough or sticky.
- Pizza Sauce: Your favorite marinara or pizza sauce is perfect here. I typically use a good quality store-bought brand for convenience, but if you have a homemade sauce you love, by all means, use it! Just ensure it’s not too watery, as excess moisture can make your pastry soggy. A thicker sauce works best.
- Shredded Mozzarella Cheese: Mozzarella is classic for its incredible melt and stretch. I prefer low-moisture, part-skim shredded mozzarella. You can also mix in a little shredded provolone or a sprinkle of Parmesan for added depth of flavor. Fresh mozzarella can be a bit too wet for this application, so I’d stick to the shredded variety.
- Your Favorite Pizza Fillings: This is where you can truly make these hot pockets your own!
- Beef Pepperoni: I love the slight spice and saltiness beef pepperoni brings. Slice it thinly or use mini pepperonis for better distribution.
- Cooked Crumbled Beef Sausage: If you enjoy a heartier bite, fully cooked and drained crumbled beef sausage is a fantastic addition. Make sure to cook it beforehand and drain off any grease to prevent a greasy hot pocket.
- Veggies: Finely diced bell peppers, onions, mushrooms, or black olives work wonderfully. A critical tip here is to pre-cook any high-moisture vegetables (like mushrooms and onions) until softened and any excess water has evaporated. This prevents your hot pockets from becoming watery and keeps the crust crisp. Let them cool before mixing with other ingredients.
- Herbs & Spices: A pinch of Italian seasoning, garlic powder, or a dash of red pepper flakes can really elevate the flavor profile.
- Egg (for egg wash): A simple egg wash (one egg whisked with a tablespoon of water) is essential for achieving that beautiful golden-brown, shiny, and extra-flaky crust. It also helps seal the edges securely.
Step-by-Step Instructions
Let’s get those flaky, cheesy hot pockets assembled! This process is straightforward, but a few key steps ensure perfection.
- Prepare Your Puff Pastry: First things first, ensure your puff pastry is properly thawed but still cold. Unwrap one sheet of puff pastry and gently unfold it onto a lightly floured surface or a piece of parchment paper. If your pastry is folded, gently press out the creases. I find it easiest to work with one sheet at a time, keeping the other refrigerated until needed.
- Cut the Pastry: Using a sharp knife or a pizza cutter, carefully cut each puff pastry sheet into 4 equal rectangles. For more generous hot pockets, you can cut each sheet into 2 larger rectangles. The size depends on how big you want your hot pockets to be.
- Prepare Your Filling: In a medium bowl, combine your pizza sauce, shredded mozzarella cheese, and all your desired fillings (beef pepperoni, cooked crumbled beef sausage, pre-cooked veggies, etc.). Give it a good mix. Remember, don’t overfill with sauce; the mixture should be cohesive, not soupy.
- Assemble the Hot Pockets: Lay your pastry rectangles flat. Take a spoonful (about 2-3 tablespoons, depending on pastry size) of the filling mixture and place it onto one half of each pastry rectangle, leaving a small border (about ½ inch) around the edges. This border is crucial for sealing.
- Moisten and Fold: Lightly dampen the edges of the pastry around the filling with a little water or a tiny bit of your egg wash. This helps create a good seal. Carefully fold the empty half of the pastry over the filling, aligning the edges to form a pocket shape.
- Seal the Edges: Press firmly along the edges of the folded pastry with your fingertips to seal. Then, take a fork and crimp all around the sealed edges. This not only creates a lovely decorative pattern but also provides a strong, secure seal to prevent any cheesy leakage during baking.
- Egg Wash and Vent: Place the assembled hot pockets onto a baking sheet lined with parchment paper. In a small bowl, whisk together one egg with a tablespoon of water to create an egg wash. Brush the tops of each hot pocket generously with the egg wash. This will give them that beautiful golden, flaky crust. Before baking, use a sharp knife to cut two or three small slits on the top of each hot pocket. These vents allow steam to escape, preventing the pastry from bursting and ensuring an even, flaky bake.
- Bake to Golden Perfection: Preheat your oven to 400°F (200°C). Bake the hot pockets for 18-22 minutes, or until the pastry is puffed, deeply golden brown, and looks incredibly flaky. Cooking times can vary slightly depending on your oven and the thickness of your hot pockets.
- Cool Slightly and Serve: Once baked, transfer the hot pockets to a wire rack. Allow them to cool for 5-10 minutes before serving. The filling will be extremely hot, and this brief cooling period allows it to set slightly, preventing burns and making them easier to handle.
Tips & Suggestions
To ensure your Puff Pastry Pizza Hot Pockets are the absolute best they can be, with that irresistible flaky crust and perfect filling, here are some of my top tips and suggestions:
- Keep Your Pastry Cold: Puff pastry is easiest to work with when it’s cold. If you find your pastry becoming too warm and sticky during assembly, pop it back into the refrigerator for 10-15 minutes to firm up. This will help maintain its structure and flakiness.
- Don’t Overfill: This is a golden rule! Overfilling will make it difficult to seal your hot pockets, leading to leaks and a messy outcome. A modest amount of filling is all you need to create a delicious pocket without compromising the structural integrity of your flaky crust.
- Pre-Cook Wet Ingredients: As mentioned in the ingredient notes, any vegetables with high water content (like mushrooms, onions, or spinach) should be sautéed beforehand to cook out their moisture. Allow them to cool completely before adding them to your filling mixture. This prevents a soggy pastry bottom.
- Secure Sealing is Key: Take your time with the sealing process. Pressing firmly with your fingers first, then crimping with a fork, creates a robust seal. You can also use a little dab of water or egg wash on the inside edges before folding to help them stick together.
- Proper Venting: Don’t skip the slits on top! These small cuts are crucial for allowing steam to escape, which helps the pastry puff up evenly and prevents it from bursting open during baking, ensuring a beautifully flaky and intact crust.
- Experiment with Fillings: While classic pizza fillings are fantastic, feel free to get creative! Think about other cooked proteins like shredded cooked chicken (BBQ chicken hot pockets?), different cheeses like smoked gouda, or even a pesto base instead of marinara. Just remember the “not too wet” rule.
- Serve with Dipping Sauces: These hot pockets are delicious on their own, but serving them with extra warm marinara sauce, ranch dressing, or a garlic butter dip can take them to the next level!
- For an Extra Crisp Bottom: If you find your bottoms aren’t as crisp as you’d like, try baking them on a preheated pizza stone or a dark-colored baking sheet.
Storage
You’ve made a batch of these glorious Puff Pastry Pizza Hot Pockets, and now you’re wondering how to keep them fresh or enjoy them later. Here’s my advice for storage:
-
Refrigeration:
- Cooked Hot Pockets: Once completely cooled, store any leftover cooked hot pockets in an airtight container in the refrigerator for up to 3-4 days.
- Reheating: For the best results and to restore that lovely flaky crust, reheat them in a preheated oven at 350°F (175°C) for 10-15 minutes, or until heated through and crisp. You can also use an air fryer at 350°F (175°C) for about 5-8 minutes. Microwaving is an option for speed, but it will make the pastry soft and less flaky.
-
Freezing:
- Cooked Hot Pockets (Recommended): Allow the hot pockets to cool completely. Place them in a single layer on a baking sheet and freeze for about 1-2 hours until solid. Once frozen, transfer them to a freezer-safe bag or airtight container. They will keep well in the freezer for up to 2-3 months.
- To Reheat from Frozen: You can reheat them directly from frozen. Place them on a baking sheet in a preheated oven at 375°F (190°C) for 20-25 minutes, or until hot throughout and the crust is flaky again. An air fryer also works great here – 10-15 minutes at 350°F (175°C).
- Uncooked Hot Pockets: If you want to prepare them ahead for future baking, assemble the hot pockets (up to the egg wash step). Place them on a baking sheet lined with parchment paper and freeze until solid (about 2 hours). Once frozen, transfer them to a freezer-safe bag or container, separating layers with parchment paper to prevent sticking. They can be stored for up to 1 month.
- To Bake from Frozen: When ready to bake, place the frozen uncooked hot pockets on a parchment-lined baking sheet, brush with egg wash, and cut your vents. Bake in a preheated oven at 400°F (200°C) for 25-35 minutes, or until deeply golden brown and puffed. You might need to add a few extra minutes compared to fresh.
- Cooked Hot Pockets (Recommended): Allow the hot pockets to cool completely. Place them in a single layer on a baking sheet and freeze for about 1-2 hours until solid. Once frozen, transfer them to a freezer-safe bag or airtight container. They will keep well in the freezer for up to 2-3 months.
Final Thoughts
I truly hope you’ve enjoyed following along with this recipe! There’s something incredibly satisfying about creating delicious, comforting food right in your own kitchen. And when it comes to quick, satisfying meals or snacks, my Puff Pastry Pizza Hot Pockets With Flaky Crust truly stand out.
What makes these so special? It’s that irresistible combination of a golden, impossibly flaky crust that shatters with every bite, perfectly encasing a warm, savory pizza filling. Forget soggy crusts or bland fillings – these hot pockets deliver on both texture and taste. They’re wonderfully adaptable too; whether you’re loading them with your favorite cheeses, savory beef crumbles, or a medley of vegetables, they always turn out fantastic. They’re the ideal grab-and-go meal for busy days, a fantastic addition to lunchboxes, or a delightful appetizer for any gathering.
So, if you’re looking for a recipe that brings joy to your table, offers incredible flavor, and boasts that coveted flaky texture, then trust me, these Puff Pastry Pizza Hot Pockets With Flaky Crust are an absolute must-try. I just know you’re going to love them as much as I do!

Quick & Easy Puff Pastry Pizza Hot Pockets – Flaky Crust
- Total Time: 37 minutes
- Yield: 4 servings
Description
These Puff Pastry Pizza Hot Pockets feature a golden, flaky crust and a warm, cheesy filling that makes them a perfect snack or meal. Customize them with your favorite pizza toppings for a delicious handheld treat!
Ingredients
- Puff Pastry
- Pizza Sauce
- Shredded Mozzarella Cheese
- Beef Pepperoni
- Cooked Crumbled Beef Sausage
- Finely diced bell peppers
- Onions
- Mushrooms
- Black olives
- Italian seasoning
- Garlic powder
- Red pepper flakes
- Egg (for egg wash)
Instructions
- Prepare Your Puff Pastry: First things first, ensure your puff pastry is properly thawed but still cold. Unwrap one sheet of puff pastry and gently unfold it onto a lightly floured surface or a piece of parchment paper. If your pastry is folded, gently press out the creases. I find it easiest to work with one sheet at a time, keeping the other refrigerated until needed.
- Cut the Pastry: Using a sharp knife or a pizza cutter, carefully cut each puff pastry sheet into 4 equal rectangles. For more generous hot pockets, you can cut each sheet into 2 larger rectangles. The size depends on how big you want your hot pockets to be.
- Prepare Your Filling: In a medium bowl, combine your pizza sauce, shredded mozzarella cheese, and all your desired fillings (beef pepperoni, cooked crumbled beef sausage, pre-cooked veggies, etc.). Give it a good mix. Remember, don't overfill with sauce; the mixture should be cohesive, not soupy.
- Assemble the Hot Pockets: Lay your pastry rectangles flat. Take a spoonful (about 2-3 tablespoons, depending on pastry size) of the filling mixture and place it onto one half of each pastry rectangle, leaving a small border (about ½ inch) around the edges. This border is crucial for sealing.
- Moisten and Fold: Lightly dampen the edges of the pastry around the filling with a little water or a tiny bit of your egg wash. This helps create a good seal. Carefully fold the empty half of the pastry over the filling, aligning the edges to form a pocket shape.
- Seal the Edges: Press firmly along the edges of the folded pastry with your fingertips to seal. Then, take a fork and crimp all around the sealed edges. This not only creates a lovely decorative pattern but also provides a strong, secure seal to prevent any cheesy leakage during baking.
- Egg Wash and Vent: Place the assembled hot pockets onto a baking sheet lined with parchment paper. In a small bowl, whisk together one egg with a tablespoon of water to create an egg wash. Brush the tops of each hot pocket generously with the egg wash. Before baking, use a sharp knife to cut two or three small slits on the top of each hot pocket.
- Bake to Golden Perfection: Preheat your oven to 400°F (200°C). Bake the hot pockets for 18-22 minutes, or until the pastry is puffed, deeply golden brown, and looks incredibly flaky.
- Cool Slightly and Serve: Once baked, transfer the hot pockets to a wire rack. Allow them to cool for 5-10 minutes before serving.
- Prep Time: 15 mins
- Cook Time: 22 mins
- Category: Snack
- Method: Baking
- Cuisine: Italian
Nutrition
- Serving Size: 1 hot pocket
- Calories: 300
- Sugar: 2 g
- Sodium: 450 mg
- Fat: 18 g
- Saturated Fat: 8 g
- Unsaturated Fat: 8 g
- Trans Fat: 0 g
- Carbohydrates: 28 g
- Fiber: 1 g
- Protein: 10 g
- Cholesterol: 70 mg
Keywords: Keep your pastry cold for easier handling, don't overfill to prevent leaks, and pre-cook any high-moisture vegetables to avoid sogginess. Ensure proper sealing and venting for the best results.


Leave a Comment