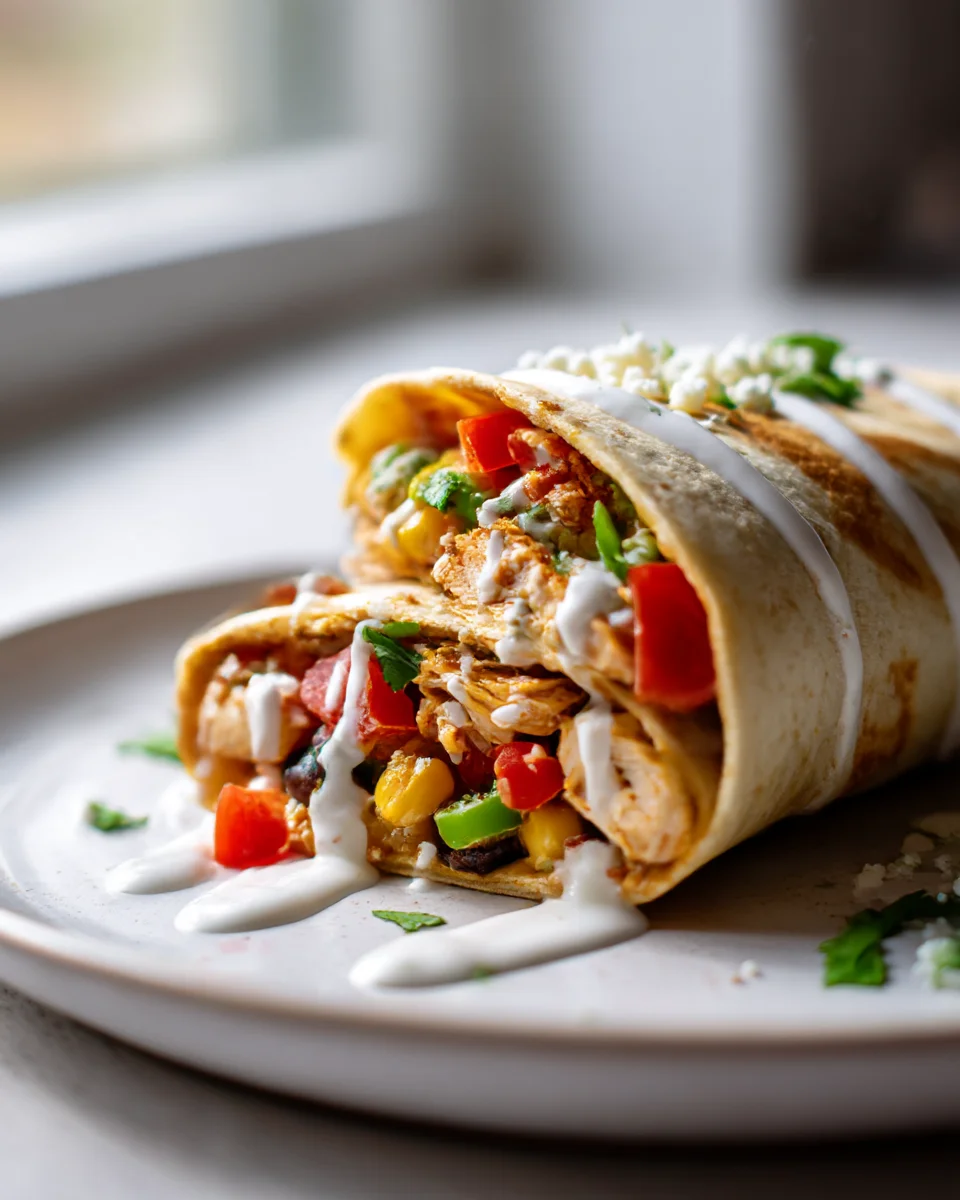
Southwest Chicken Wrap
Oh boy, do I have a treat for you today! Get ready to fall head over heels for my go-to, absolutely irresistible Southwest Chicken Wrap. This isn’t just any wrap; it’s a vibrant explosion of flavors and textures that will transport your taste buds straight to the heart of the Southwest with every single bite.
What makes this wrap so special, you ask? It’s the perfect harmony of tender, seasoned chicken, crisp fresh veggies, and an unbelievably creamy, zesty, and just-a-little-spicy homemade Southwest dressing, all nestled in a warm tortilla. It’s the kind of meal that feels both wholesome and incredibly indulgent at the same time.
You, my friend, are going to absolutely love this recipe because it’s ridiculously quick to throw together, making it perfect for a speedy weeknight dinner or a satisfying lunch that you’ll actually look forward to. It’s also incredibly versatile – feel free to add your favorite fixings like black beans, corn, or even some avocado slices. In a nutshell, we’re talking about juicy chicken, fresh lettuce, ripe tomatoes, and that incredible dressing, all bundled up for a handheld feast that’s packed with sunshine and flavor!
Ingredient Notes
Creating the perfect Southwest Chicken Wrap begins with selecting the right ingredients. I find that starting with quality components really makes a difference in flavor and texture. Here’s what I typically use, along with some great substitutions if you want to mix things up a bit!
- Chicken: For convenience, I often use pre-cooked shredded chicken, like a rotisserie chicken. It’s such a time-saver! If you prefer, you can grill or pan-fry chicken breasts or thighs seasoned with Southwest spices (cumin, chili powder, paprika, garlic powder) and then shred them. For a different protein, sliced grilled beef or even seasoned ground beef makes a fantastic alternative. You could also use grilled turkey for a leaner option, or even a plant-based chicken substitute for a vegetarian twist.
- Tortillas: Large flour tortillas are my go-to for these wraps because they’re flexible and hold a lot of filling without tearing. Whole wheat tortillas are a great healthier option, and if you’re looking for gluten-free, there are many excellent gluten-free tortillas available now. For a super light, low-carb version, large lettuce leaves (like butter lettuce or romaine) work wonderfully as wraps.
- Black Beans & Corn: These two are non-negotiables for that authentic Southwest flavor! I always use canned black beans, rinsed and drained thoroughly, and canned or frozen corn (thawed if frozen). If you’re not a fan of black beans, pinto beans are a suitable substitute. Fresh roasted corn would also elevate the flavor significantly if you have the time.
- Cheese: Shredded Monterey Jack or a Mexican blend cheese melts beautifully and adds a creamy, salty kick. Pepper Jack cheese is fantastic if you like a bit of heat! Cheddar cheese is always a classic, widely available choice. For dairy-free options, there are several good shredded dairy-free cheeses on the market that melt nicely.
- Lettuce & Tomatoes: Crisp shredded romaine lettuce adds a refreshing crunch, and diced ripe tomatoes bring a lovely fresh sweetness. Iceberg lettuce also works well for crunch. Feel free to add other fresh veggies like diced bell peppers (red, yellow, or green) or finely chopped red onion for extra flavor and texture.
- Sauce: This is where a lot of the magic happens! My favorite is a creamy chipotle ranch dressing – either store-bought or a quick homemade version by mixing ranch with a little adobo sauce from canned chipotle peppers. An avocado-lime crema, a simple salsa, or even just a squeeze of fresh lime juice can brighten everything up. If you’re avoiding dairy, a zesty vinaigrette or a non-dairy creamy dressing will work beautifully.
- Optional Add-ins: Don’t forget the avocado! Sliced or mashed avocado adds a wonderful creaminess. A sprinkle of fresh cilantro chopped is a must for me, and a squeeze of lime juice always brightens the flavors. If you like it spicy, a few slices of jalapeño or a dash of your favorite hot sauce can really kick things up.
Step-by-Step Instructions
Assembling these Southwest Chicken Wraps is super easy once you have all your ingredients prepped. It’s less about cooking intricate components and more about layering flavors harmoniously. Here’s how I put mine together:
- Prepare Your Chicken: If you’re using raw chicken, season your chicken breasts or thighs generously with Southwest spices (think chili powder, cumin, paprika, garlic powder, onion powder, and a pinch of salt and pepper). Grill, pan-fry, or bake until cooked through and then shred or dice it. If using pre-cooked rotisserie chicken, simply shred it. Make sure your chicken is cooled slightly before assembling so it doesn’t wilt your greens.
- Gather & Prep Other Fillings: Rinse and thoroughly drain your canned black beans and corn. Dice your tomatoes and any other fresh vegetables like bell peppers or red onion you plan to include. Shred your lettuce and cheese. Have your desired sauce ready to go. This “mise en place” (everything in its place) approach makes the assembly process smooth and enjoyable.
- Warm Your Tortillas (Optional but Recommended): This step is a game-changer! Gently warming your flour tortillas makes them much more pliable and easier to roll without cracking. You can do this quickly in a dry skillet over medium heat for about 15-20 seconds per side, in the microwave for 15-20 seconds, or wrapped in foil in a warm oven. Just be careful not to overheat them, or they can become brittle.
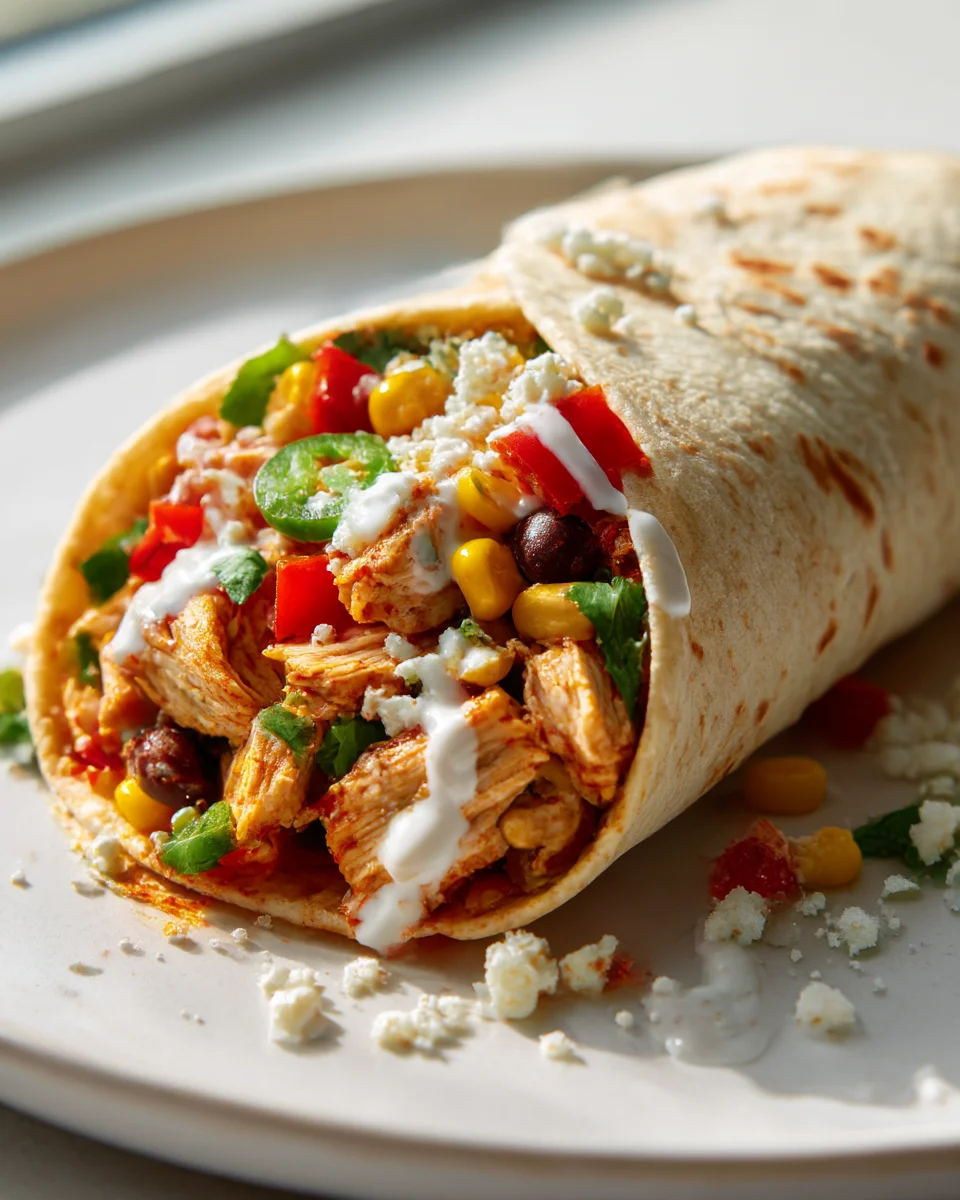
- Assemble Your Wrap: Lay a warmed tortilla flat on a clean surface. I like to spread a generous layer of my chosen sauce (like chipotle ranch or avocado crema) down the center of the tortilla, leaving about an inch or two border all around. This prevents too much sauce from escaping when you roll it, but also ensures every bite has flavor.
- Layer the Fillings: Next, I evenly layer my prepared chicken over the sauce. Then, I add the black beans and corn. After that, sprinkle a good amount of shredded cheese. Finally, I top it with the crisp shredded lettuce and diced tomatoes. If you’re adding avocado slices or fresh cilantro, now’s the time to include them. Try not to overfill, as this makes rolling difficult. You want a good amount, but still manageable!
- Fold and Roll: This is the crucial part for a sturdy wrap! First, fold in the two opposite sides of the tortilla (the left and right sides, about 1-2 inches each) over the filling. Then, starting from the bottom edge closest to you, tightly roll the tortilla upwards, tucking in the filling as you go. Keep it firm and snug. A tight roll ensures all the delicious fillings stay inside when you eat it.
- Serve Immediately: You can slice your wrap in half diagonally for an appealing presentation, or simply enjoy it whole. These wraps are best enjoyed fresh when the ingredients are crisp and the tortilla is still soft.
Tips & Suggestions
Making Southwest Chicken Wraps is a fantastic way to enjoy a delicious, customizable meal. Over time, I’ve picked up a few tricks that make them even better and more convenient!
- Don’t Overfill: This is probably my top tip! It’s tempting to load up on all the delicious fillings, but an overstuffed wrap is difficult to roll and messy to eat. Aim for a good amount, but ensure you can still comfortably fold and roll your tortilla.
- Meal Prep Like a Pro: These wraps are excellent for meal prep. You can cook and shred your chicken, rinse beans and corn, chop veggies, and make your sauce all ahead of time. Store each component separately in airtight containers in the fridge. When it’s mealtime, just warm your tortilla, assemble, and enjoy a fresh wrap in minutes! This also helps prevent the wrap from getting soggy.
- Customization is Key: Feel free to experiment with different veggies. Sautéed bell peppers and onions add a wonderful depth of flavor. A sprinkle of crumbled cooked beef bacon (following my substitution guidelines) can add a smoky, salty crunch. For extra heat, add thinly sliced jalapeños or a dash of your favorite hot sauce.
- Try Different Sauces: While chipotle ranch is a classic, don’t be afraid to try other creamy dressings like a creamy cilantro-lime dressing, a simple avocado crema, or even a spicy BBQ sauce for a different flavor profile. The sauce truly brings all the flavors together.
- Secure Your Wrap: If you’re packing these for lunch or find them a bit loose, you can wrap them tightly in parchment paper or aluminum foil. This helps hold everything together and makes them easier to eat on the go.
- Serve with Sides: A side of tortilla chips with salsa or guacamole is the perfect companion to these wraps. A simple green salad or some fresh fruit also makes for a refreshing addition.
Storage
When it comes to storing your Southwest Chicken Wraps, my best advice is to enjoy them as fresh as possible. The crispness of the lettuce and the softness of the tortilla are at their peak right after assembly.
- Assembled Wraps: If you absolutely must store an assembled wrap, I recommend doing so for no more than 12-24 hours in the refrigerator. Wrap it tightly in plastic wrap or foil to prevent it from drying out. The biggest challenge here is preventing the tortilla from becoming soggy due to moisture from the lettuce, tomatoes, and sauce. Placing the sauce only on one side of the tortilla and keeping other watery ingredients away from direct contact with the tortilla can help, but it’s not foolproof.
- Storing Components Separately: This is by far the best method for meal prepping and maximizing freshness.
- Cooked Chicken: Store cooked and shredded chicken in an airtight container in the refrigerator for up to 3-4 days. It can also be frozen for up to 2-3 months.
- Beans & Corn: Drained black beans and corn can be stored together in an airtight container in the fridge for up to 3-4 days.
- Chopped Veggies: Keep shredded lettuce, diced tomatoes, and other chopped vegetables in separate airtight containers. Lettuce will stay crisp for 2-3 days, while tomatoes are best used within 1-2 days after dicing.
- Sauce: Your homemade or store-bought sauce can be kept in a sealed container in the refrigerator for 3-5 days, depending on the ingredients.
- Freezing: I generally don’t recommend freezing assembled Southwest Chicken Wraps. The lettuce and tomatoes will become watery and lose their texture upon thawing, and the tortilla can become gummy. However, cooked chicken and sometimes the black bean and corn mixture (without fresh veggies) can be frozen separately for future use, making your next wrap assembly even quicker.
- Reheating: These wraps are typically enjoyed cold or at room temperature. If you’ve stored components separately, you only need to rewarm the chicken if you prefer it warm before assembling your fresh wrap. Do not reheat an assembled wrap, as the fresh ingredients will suffer.
Final Thoughts
And there you have it! I truly hope you give this Southwest Chicken Wrap a try. It’s more than just a meal; it’s a burst of vibrant, zesty flavor wrapped up in pure convenience. The perfect blend of tender chicken, hearty ingredients, and that irresistible Southwestern kick makes it an absolute winner for any occasion. Whether you need a speedy lunch, a satisfying dinner, or a fresh meal prep option, this Southwest Chicken Wrap delivers on all fronts. Trust me, once you experience the delicious simplicity and robust taste of this wrap, it’ll quickly become a cherished favorite in your kitchen. It’s fresh, flavorful, and fantastically easy to love!

Easy Southwest Chicken Wraps: Spicy & Fresh Meal Recipe
- Total Time: 30 minutes
- Yield: 4 servings
Description
Experience a burst of vibrant flavors with these Easy Southwest Chicken Wraps, featuring tender chicken, fresh veggies, and a creamy dressing. Perfect for a quick weeknight dinner or a satisfying lunch!
Ingredients
- Pre-cooked shredded chicken (like rotisserie chicken)
- Chicken breasts or thighs (for grilling or pan-frying)
- Southwest spices (cumin, chili powder, paprika, garlic powder)
- Large flour tortillas
- Whole wheat tortillas (optional)
- Gluten-free tortillas (optional)
- Large lettuce leaves (like butter lettuce or romaine, for low-carb version)
- Canned black beans (rinsed and drained)
- Canned or frozen corn (thawed if frozen)
- Pinto beans (optional substitute for black beans)
- Fresh roasted corn (optional)
- Shredded Monterey Jack cheese
- Mexican blend cheese
- Pepper Jack cheese (optional for heat)
- Cheddar cheese
- Dairy-free shredded cheese (optional)
- Crisp shredded romaine lettuce
- Diced ripe tomatoes
- Iceberg lettuce (optional)
- Diced bell peppers (red, yellow, or green, optional)
- Finely chopped red onion (optional)
- Creamy chipotle ranch dressing
- Homemade ranch dressing with adobo sauce (optional)
- Avocado-lime crema (optional)
- Simple salsa (optional)
- Fresh lime juice (optional)
- Zesty vinaigrette (optional for dairy-free)
- Sliced or mashed avocado (optional add-in)
- Fresh cilantro (chopped, optional add-in)
- Jalapeño slices (optional for spice)
- Hot sauce (optional for spice)
Instructions
- Prepare Your Chicken: If you're using raw chicken, season your chicken breasts or thighs generously with Southwest spices (think chili powder, cumin, paprika, garlic powder, onion powder, and a pinch of salt and pepper). Grill, pan-fry, or bake until cooked through and then shred or dice it. If using pre-cooked rotisserie chicken, simply shred it. Make sure your chicken is cooled slightly before assembling so it doesn’t wilt your greens.
- Gather & Prep Other Fillings: Rinse and thoroughly drain your canned black beans and corn. Dice your tomatoes and any other fresh vegetables like bell peppers or red onion you plan to include. Shred your lettuce and cheese. Have your desired sauce ready to go. This 'mise en place' (everything in its place) approach makes the assembly process smooth and enjoyable.
- Warm Your Tortillas (Optional but Recommended): This step is a game-changer! Gently warming your flour tortillas makes them much more pliable and easier to roll without cracking. You can do this quickly in a dry skillet over medium heat for about 15-20 seconds per side, in the microwave for 15-20 seconds, or wrapped in foil in a warm oven. Just be careful not to overheat them, or they can become brittle.
- Assemble Your Wrap: Lay a warmed tortilla flat on a clean surface. Spread a generous layer of your chosen sauce (like chipotle ranch or avocado crema) down the center of the tortilla, leaving about an inch or two border all around.
- Layer the Fillings: Evenly layer your prepared chicken over the sauce. Then, add the black beans and corn. Sprinkle a good amount of shredded cheese. Finally, top it with the crisp shredded lettuce and diced tomatoes. If you’re adding avocado slices or fresh cilantro, now’s the time to include them. Try not to overfill.
- Fold and Roll: First, fold in the two opposite sides of the tortilla (the left and right sides, about 1-2 inches each) over the filling. Then, starting from the bottom edge closest to you, tightly roll the tortilla upwards, tucking in the filling as you go.
- Serve Immediately: You can slice your wrap in half diagonally for an appealing presentation, or simply enjoy it whole. These wraps are best enjoyed fresh when the ingredients are crisp and the tortilla is still soft.
- Prep Time: 15 mins
- Cook Time: 15 mins
- Category: Lunch/Dinner
- Method: Grilling/Pan-frying
- Cuisine: Southwestern
Nutrition
- Serving Size: 1 wrap
- Calories: 450
- Sugar: 4 g
- Sodium: 800 mg
- Fat: 20 g
- Saturated Fat: 8 g
- Unsaturated Fat: 10 g
- Trans Fat: 0 g
- Carbohydrates: 45 g
- Fiber: 8 g
- Protein: 30 g
- Cholesterol: 70 mg
Keywords: Don't overfill the wraps to make rolling easier. These wraps are excellent for meal prep; store components separately for maximum freshness. Feel free to customize with different veggies and sauces.


Leave a Comment