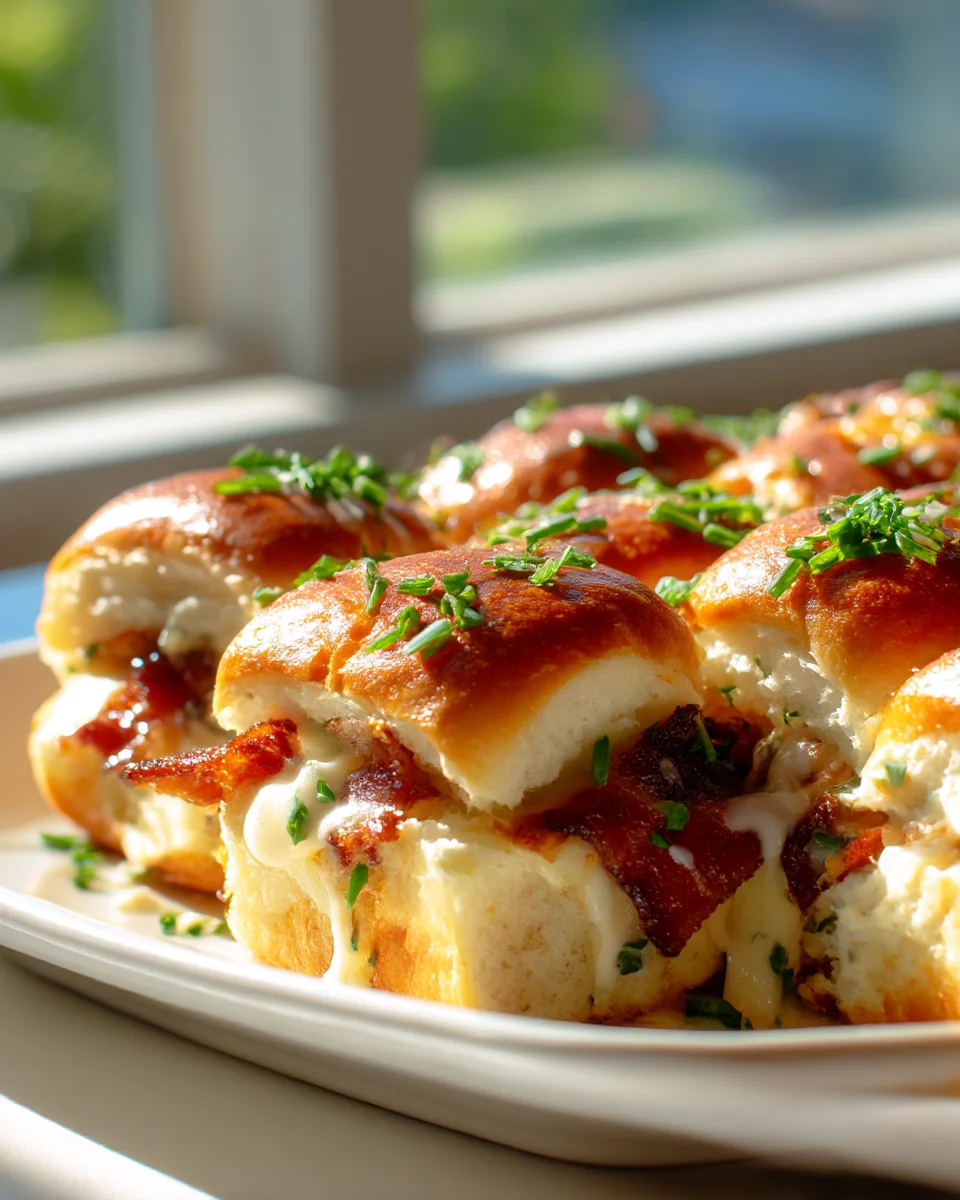
Beef Bacon Ranch Cheese Bread Sliders are here to become your new favorite party snack, game day hero, or just a ridiculously delicious weeknight treat! I’m so excited to share this recipe with you because it takes some of the most beloved flavors – savory beef bacon, tangy ranch, and ooey-gooey cheese – and bakes them into an unbelievably irresistible pull-apart bread. What makes these sliders truly special is how effortlessly they combine comfort food indulgence with the fun, shareable nature of sliders. You’ll love sinking your teeth into these warm, cheesy bundles, each bite packed with that perfect trinity of flavors. Imagine soft rolls generously slathered with creamy ranch, layered with crispy, rich beef bacon, and blanketed in a decadent melt of cheese, all baked together until golden brown and bubbly, ready for everyone to tear off a piece and enjoy!

Ingredient Notes
Crafting the perfect Beef Bacon Ranch Cheese Bread Sliders starts with selecting the right ingredients. Each component plays a vital role in creating that irresistible savory, cheesy, and tangy flavor profile that makes these sliders an absolute hit. Here’s a closer look at what you’ll need and how you can customize them to your liking.
- Slider Buns: I typically reach for a package of 12 Hawaiian sweet rolls. Their slight sweetness perfectly complements the savory fillings, and they hold up wonderfully during baking. If you can’t find Hawaiian rolls, any soft, pull-apart dinner rolls or small brioche buns will work beautifully. The key is to find rolls that come connected, making them easy to slice horizontally into two large slabs.
- Sliced Beef: For a quick and easy slider, pre-cooked, thinly sliced roast beef from the deli is my go-to. You’ll want about a pound. However, don’t feel limited! Leftover cooked beef, such as thinly sliced pot roast, shredded beef brisket, or even thinly sliced steak, would be absolutely incredible here. The goal is a tender, flavorful beef layer that’s easy to eat.
- Beef Bacon: This is where we get that fantastic smoky, crispy texture! I always make sure to use high-quality beef bacon, cooked until perfectly crisp and then crumbled. If you’re not a fan of bacon or want to keep it simple, you could omit it, but it truly adds a wonderful dimension. Alternatively, if you wanted an extra layer of beef, you could use very thinly sliced corned beef or pastrami.
- Cheese: A blend of cheeses works best for optimal flavor and melt. I love using slices of Provolone and Swiss for their creamy melt and savory notes, often adding a sprinkle of shredded sharp cheddar for extra tang. Feel free to experiment! Monterey Jack, Havarti, or even a good quality American cheese would melt wonderfully and taste delicious. The key is using cheeses that melt smoothly to create that gooey, irresistible layer.
- Ranch Flavor: You have a couple of options here! My favorite is a good quality bottled ranch dressing, drizzled generously over the beef. It provides both moisture and that signature tangy, herby flavor. If you prefer a drier slider or want to control the ingredients more, you can sprinkle a tablespoon or two of dry ranch seasoning mix directly over the beef and cheese layers.
- Butter Topping: This magical mixture is what transforms the rolls into golden, garlicky, herby deliciousness. Melted unsalted butter is the base, infused with garlic powder (or finely minced fresh garlic for a bolder flavor) and dried parsley for a touch of color and earthy notes. You could also add a pinch of onion powder or a tiny dash of Worcestershire sauce to the butter for extra savory depth.
Step-by-Step Instructions
Getting these Beef Bacon Ranch Cheese Bread Sliders onto your table is a breeze. Follow these steps for a crowd-pleasing appetizer or a fun family meal that everyone will adore. I find that a little bit of prep makes the assembly super smooth.
- Prepare Your Beef Bacon: Start by cooking your beef bacon until it’s wonderfully crisp. I usually bake it on a foil-lined baking sheet at 400°F (200°C) for 15-20 minutes, or you can fry it in a skillet until it reaches your desired crispiness. Once cooked, transfer it to a plate lined with paper towels to drain any excess fat. Once cool enough to handle, crumble it into small pieces. This can be done ahead of time!
- Preheat and Prep: Preheat your oven to 350°F (175°C). Lightly grease a 9×13-inch baking dish or line it with parchment paper for easier cleanup.
- Slice the Rolls: Take your package of Hawaiian sweet rolls (or chosen slider buns) and, using a large serrated knife, carefully slice the entire block of rolls horizontally in half, creating a top slab and a bottom slab. Keep them connected! Place the bottom slab of rolls into your prepared baking dish.
- Layer the Beef: Arrange a generous layer of your sliced roast beef evenly over the bottom rolls. I like to spread it out so every slider gets a good portion.
- Add the Cheese: Next, layer half of your sliced Provolone or Swiss cheese over the beef. Follow this with a sprinkle of your shredded cheddar, if using. The more cheese, the merrier, in my opinion, for that ultimate gooey factor!
- Ranch and Bacon Time: Drizzle about half of your ranch dressing evenly over the cheese and beef layers. Then, sprinkle all of your crumbled beef bacon over the ranch and cheese. This combination is where the magic happens!
- More Cheese and Beef: Now, layer the remaining sliced beef over the bacon, followed by the rest of your sliced Provolone or Swiss cheese. If you’re using ranch seasoning mix instead of dressing, now would be the time to sprinkle it over the beef and cheese layers.
- Top it Off: Carefully place the top slab of the rolls back over the layered ingredients, ensuring it sits squarely.
- Create the Butter Topping: In a small microwave-safe bowl, melt the unsalted butter. Stir in the garlic powder (or minced garlic) and dried parsley until well combined. This is your flavor powerhouse for the tops of the sliders!
- Brush and Bake: Generously brush the entire top of the rolls with the melted garlic-herb butter mixture. Make sure to get into all the crevices.
- Bake to Perfection: Cover the baking dish tightly with aluminum foil. Bake for 15 minutes. This initial covered bake allows the cheese to melt beautifully and the flavors to meld without the tops burning. After 15 minutes, remove the foil and continue baking for another 5-10 minutes, or until the tops are golden brown and the cheese is bubbly and fully melted. If you like your tops extra golden, you can briefly place them under the broiler for 1-2 minutes, watching carefully to prevent burning.
- Serve Hot: Once out of the oven, let the sliders rest for a minute or two. Then, use a knife to cut along the lines of the rolls to separate them into individual sliders. Serve immediately and watch them disappear!
Tips & Suggestions
These Beef Bacon Ranch Cheese Bread Sliders are already fantastic as is, but here are a few tips and tricks I’ve picked up along the way to make them even better, plus some ideas for making them truly your own!
- Don’t Skimp on the Butter Topping: That garlic-herb butter is critical! It not only helps the buns get beautifully golden and slightly crisp on top, but it also infuses every bite with incredible flavor. Don’t be shy when brushing it on.
- Pre-Cook Your Beef Bacon Crispy: No one likes limp bacon! Make sure your beef bacon is cooked to a nice, crisp texture before crumbling it. This adds a fantastic textural contrast to the soft bread and gooey cheese.
- Cover Then Uncover: Baking the sliders covered initially is a crucial step. It creates a steamy environment that helps the cheese melt perfectly and keeps the bread from drying out. Removing the foil for the last few minutes allows the tops to get that desirable golden-brown finish.
- Make Ahead Option: You can assemble these sliders up to a few hours in advance, right up to the point of brushing with butter. Cover them tightly with plastic wrap and refrigerate. When ready to bake, remove them from the fridge about 30 minutes before baking to come closer to room temperature, then proceed with brushing the butter and baking as directed, adding a few extra minutes to the baking time if needed. I don’t recommend making the butter topping too far ahead, as the garlic flavor is best fresh.
- Serving Suggestions: These sliders are a meal in themselves, but they’re also wonderful alongside a simple green salad, a bowl of tomato soup, or some crunchy potato chips. A small bowl of extra ranch dressing or a tangy dijon dipping sauce on the side never hurts for those who love to dip!
- Amp Up the Flavor:
- Caramelized Onions: A layer of sweet, jammy caramelized onions added over the beef would be absolutely divine and add another layer of savory depth.
- Spice It Up: For a kick, add some thinly sliced pickled jalapeños or a dash of hot sauce to the ranch dressing.
- Different Cheeses: Experiment with smoked gouda or pepper jack for a different flavor profile.
- Veggie Boost: A thin layer of baby spinach or roasted red peppers could be added for color and nutrition, just make sure they’re not too wet.
- Prevent a Soggy Bottom: If you’re using a very wet ranch dressing or particularly juicy beef, place a very thin layer of cheese directly on the bottom buns before adding the beef. This acts as a barrier to prevent the bread from absorbing too much moisture and becoming soggy.
Storage
While these Beef Bacon Ranch Cheese Bread Sliders are definitely best enjoyed fresh and hot right out of the oven, sometimes you might have leftovers, or you want to plan for a future meal. Here’s how I handle storing them.
- Refrigeration: If you have any sliders left over, let them cool completely to room temperature. Once cooled, store them in an airtight container in the refrigerator for up to 2-3 days. Storing them quickly and correctly helps maintain their freshness and prevents them from drying out or absorbing unwanted odors from the fridge.
- Reheating:
- Oven Method (Recommended): This is my preferred method for reheating because it helps crisp up the buns again and melt the cheese beautifully. Preheat your oven to 300°F (150°C). Place the leftover sliders on a baking sheet (you might want to cover them loosely with foil if you’re worried about them drying out). Heat for 10-15 minutes, or until warmed through and the cheese is gooey again.
- Microwave Method: While convenient, microwaving can sometimes make the buns a bit soft or chewy. If you’re in a hurry, place 1-2 sliders on a microwave-safe plate and heat for 30-60 seconds, or until warmed through. Be careful not to overheat, as this can make them tough.
- Freezing: I generally do not recommend freezing assembled and baked Beef Bacon Ranch Cheese Bread Sliders. The texture of the bread can become somewhat soggy and the dairy in the cheese and ranch dressing can separate upon thawing and reheating, which negatively impacts the overall quality. However, you can certainly cook and crumble your beef bacon ahead of time and freeze it in an airtight bag for up to a month, making future slider assembly even quicker!
Final Thoughts
And there you have it! I truly hope you’re as excited as I am to whip up these incredible Beef Bacon Ranch Cheese Bread Sliders. There’s just something magical about the way the savory beef bacon crisps perfectly, harmonizing with the creamy, tangy ranch dressing, all enveloped in gooey melted cheese and nestled in soft, golden bread. It’s an explosion of flavor and texture in every single bite that you simply won’t want to miss!
Whether you’re hosting a game day gathering, need a ridiculously easy and satisfying weeknight meal, or simply craving an irresistible snack, these Beef Bacon Ranch Cheese Bread Sliders are an absolute game-changer. They’re quick to assemble, even quicker to disappear, and guaranteed to bring smiles all around. Trust me, once you try them, you’ll find yourself making them again and again. Go ahead, treat yourself and your loved ones to this unbelievably delicious creation!

Must-Try Beef Bacon Ranch Cheesy Bread Sliders!
- Total Time: 45 minutes
- Yield: 12 sliders 1x
Description
Beef Bacon Ranch Cheese Bread Sliders are a delicious party snack that combines savory beef bacon, tangy ranch, and gooey cheese in a pull-apart bread. Perfect for game day or a weeknight treat, these sliders are sure to be a hit!
Ingredients
- 12 Hawaiian sweet rolls
- 1 pound sliced roast beef
- high-quality beef bacon, cooked and crumbled
- slices of Provolone cheese
- slices of Swiss cheese
- shredded sharp cheddar cheese (optional)
- bottled ranch dressing or dry ranch seasoning mix
- unsalted butter
- garlic powder or minced fresh garlic
- dried parsley
- onion powder (optional)
- Worcestershire sauce (optional)
Instructions
- Prepare Your Beef Bacon: Start by cooking your beef bacon until it's wonderfully crisp. Bake it on a foil-lined baking sheet at 400°F (200°C) for 15-20 minutes, or fry it in a skillet until it reaches your desired crispiness. Transfer it to a plate lined with paper towels to drain any excess fat. Once cool enough to handle, crumble it into small pieces.
- Preheat and Prep: Preheat your oven to 350°F (175°C). Lightly grease a 9×13-inch baking dish or line it with parchment paper for easier cleanup.
- Slice the Rolls: Using a large serrated knife, carefully slice the entire block of Hawaiian sweet rolls horizontally in half, creating a top slab and a bottom slab. Keep them connected! Place the bottom slab of rolls into your prepared baking dish.
- Layer the Beef: Arrange a generous layer of your sliced roast beef evenly over the bottom rolls.
- Add the Cheese: Layer half of your sliced Provolone or Swiss cheese over the beef, followed by a sprinkle of your shredded cheddar, if using.
- Ranch and Bacon Time: Drizzle about half of your ranch dressing evenly over the cheese and beef layers. Then, sprinkle all of your crumbled beef bacon over the ranch and cheese.
- More Cheese and Beef: Layer the remaining sliced beef over the bacon, followed by the rest of your sliced Provolone or Swiss cheese. If using ranch seasoning mix instead of dressing, sprinkle it over the beef and cheese layers.
- Top it Off: Carefully place the top slab of the rolls back over the layered ingredients.
- Create the Butter Topping: In a small microwave-safe bowl, melt the unsalted butter. Stir in the garlic powder (or minced garlic) and dried parsley until well combined.
- Brush and Bake: Generously brush the entire top of the rolls with the melted garlic-herb butter mixture.
- Bake to Perfection: Cover the baking dish tightly with aluminum foil. Bake for 15 minutes. After 15 minutes, remove the foil and continue baking for another 5-10 minutes, or until the tops are golden brown and the cheese is bubbly and fully melted.
- Serve Hot: Let the sliders rest for a minute or two. Then, use a knife to cut along the lines of the rolls to separate them into individual sliders. Serve immediately.
- Prep Time: 15 mins
- Cook Time: 30 mins
- Category: Appetizer
- Method: Baking
- Cuisine: American
Nutrition
- Serving Size: 1 slider
- Calories: 250
- Sugar: 2 g
- Sodium: 800 mg
- Fat: 15 g
- Saturated Fat: 7 g
- Unsaturated Fat: 5 g
- Trans Fat: 0 g
- Carbohydrates: 20 g
- Fiber: 1 g
- Protein: 10 g
- Cholesterol: 40 mg
Keywords: Don't skimp on the butter topping for flavor. Ensure your beef bacon is crispy for the best texture. You can assemble the sliders ahead of time and refrigerate them before baking.


Leave a Comment