Garlic Herb Dutch Oven Bread Recipe
Oh, my goodness, if there’s one smell that instantly makes my kitchen feel like the warmest, coziest place on earth, it’s fresh bread baking. And today, I am so excited to share with you my absolute favorite, the Garlic Herb Dutch Oven Bread Recipe. This isn’t just any bread; it’s a game-changer! What makes this recipe so incredibly special, you ask? Well, we’re talking about a perfectly crusty exterior thanks to the magic of the Dutch oven, giving way to an unbelievably soft, airy, and fragrant interior. Every single bite is bursting with the savory warmth of garlic and a medley of fresh herbs, making it truly irresistible.
I promise you, dear reader, you are going to fall head over heels for this bread. Imagine pulling a gorgeous, golden-brown loaf from your oven, the aroma alone making your mouth water. It’s the kind of bread that elevates any meal, whether you’re serving it alongside a hearty beef stew, dipping it into a rich olive oil, or simply enjoying a warm slice slathered with butter. It looks incredibly impressive, but trust me, it’s surprisingly straightforward to make, even if you’re a beginner baker. This dish is essentially a rustic, artisanal-style loaf, infused deeply with aromatic garlic and your choice of vibrant herbs, all cooked to perfection in the enclosed environment of a Dutch oven to create that coveted crackling crust and tender crumb. Get ready to impress yourself and everyone lucky enough to share a piece!
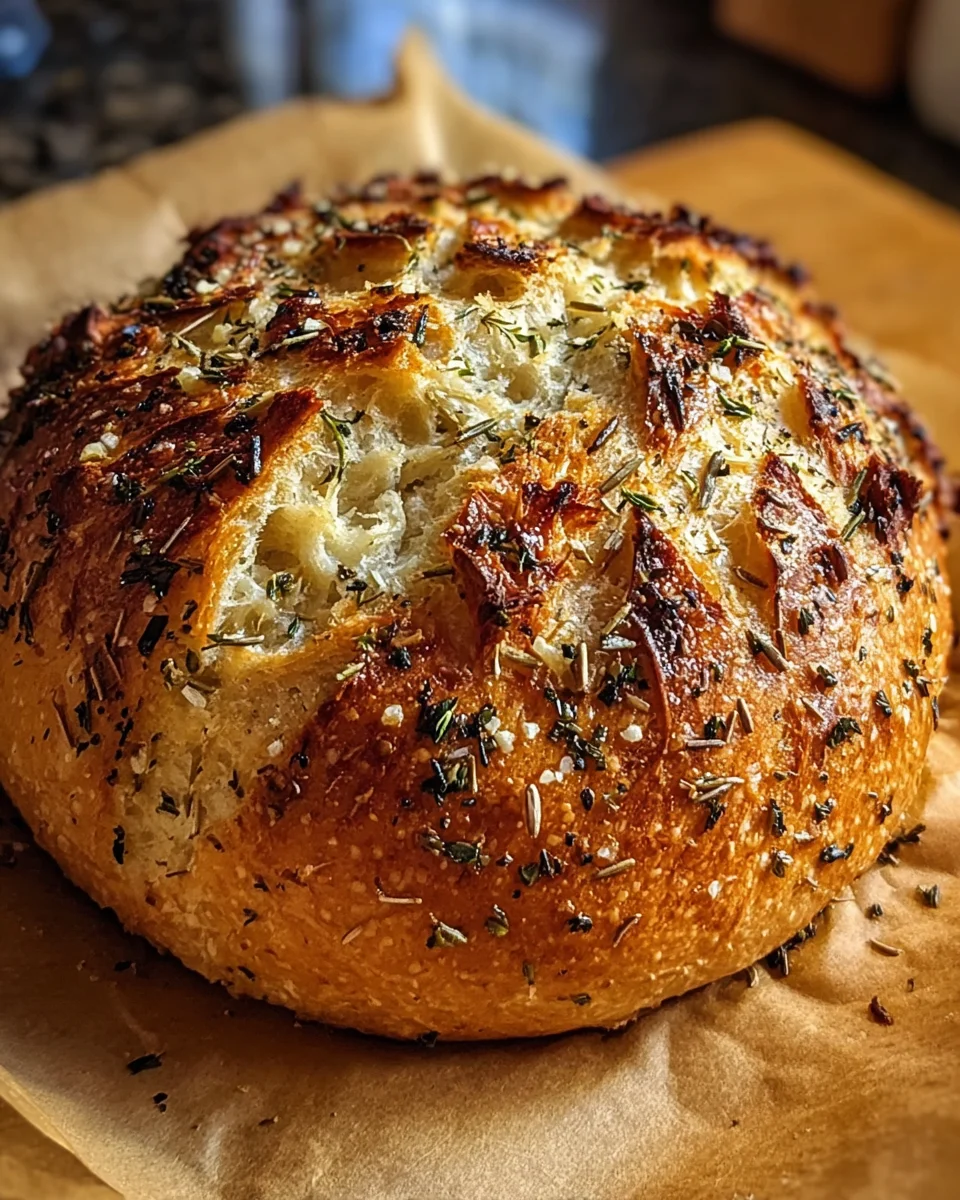
Welcome to my absolute favorite way to make bread at home – the humble yet majestic Dutch oven bread! There’s something truly magical about pulling a perfectly golden, incredibly crusty loaf out of your oven, especially when it’s infused with aromatic garlic and fragrant herbs. This recipe for Garlic Herb Dutch Oven Bread is a staple in my kitchen, and I can’t wait for you to experience the joy of baking it yourself. It’s surprisingly simple, even for beginner bakers, and the results are consistently stunning. Get ready for your kitchen to smell absolutely divine!
Ingredient Notes
Crafting the perfect loaf of Garlic Herb Dutch Oven Bread starts with understanding your ingredients. Each one plays a crucial role in developing that irresistible flavor and texture we’re aiming for.
- All-Purpose Flour: For this recipe, I typically reach for good quality unbleached all-purpose flour. It gives a wonderful balance of chewiness and tenderness to the crumb. You can certainly use bread flour for an even chewier texture, or for a slightly denser, nuttier loaf, substitute up to half of the all-purpose flour with whole wheat flour. Just be aware that whole wheat flour might absorb more water, so you might need a tiny splash more liquid to achieve the right dough consistency.
- Instant Yeast: I love instant yeast because it’s so convenient – you can mix it directly with your dry ingredients without proofing it first. If you only have active dry yeast, no problem! Simply dissolve it in the warm water with a pinch of sugar for about 5-10 minutes until it gets foamy before adding it to your flour. This step confirms your yeast is active and ready to make your bread rise beautifully.
- Warm Water: The temperature of your water is critical. Aim for around 105-115°F (40-46°C). Water that’s too cold won’t activate the yeast, and water that’s too hot can kill it. Think lukewarm, like a comfortable bath. It’s the yeast’s favorite temperature for waking up and getting to work!
- Salt: Don’t underestimate the power of salt in bread. It’s not just for flavor; it also helps control the yeast activity and strengthens the gluten structure. I use fine sea salt, but kosher salt works perfectly too. Just ensure you’re using enough, as bland bread is a sad bread.
- Granulated Sugar: A small amount of sugar acts as food for the yeast, helping it to activate and produce a lovely rise. It also contributes to the beautiful browning of the crust.
- Fresh Garlic: This is where the magic really happens! Freshly minced garlic provides an intense, pungent flavor that permeates the entire loaf. I recommend using at least 4-6 cloves, but feel free to add more if you’re a true garlic lover like me. Avoid pre-minced garlic in a jar if possible, as the flavor isn’t quite the same. If fresh garlic is truly unavailable, a teaspoon of good quality garlic powder can be a last-resort substitute, but the fresh stuff is truly superior here.
- Fresh Herbs: For that vibrant “herb” component, I absolutely adore a combination of fresh rosemary and thyme. Their earthy, slightly piney notes complement the garlic wonderfully. Finely chop about a tablespoon of each. Other fantastic options include fresh oregano, chives, or even a mix of Italian parsley and basil (though basil is best added after baking or towards the very end). If fresh herbs aren’t an option, you can use dried herbs, but remember to use about a third of the amount since dried herbs are more concentrated. So, about a teaspoon total of dried rosemary and thyme would suffice.
- Olive Oil: A drizzle of good quality extra virgin olive oil adds richness, helps tenderize the crumb, and contributes to the overall flavor. It also helps with the crust’s texture.
Step-by-Step Instructions
Let’s get baking! Follow these steps closely, and you’ll be pulling a masterpiece out of your oven in no time.
- Activate the Yeast: In a large mixing bowl, combine the warm water and granulated sugar. Sprinkle the instant yeast over the top. Give it a gentle stir and let it sit for 5-10 minutes. You should see a foamy layer form on the surface, indicating your yeast is alive and active.
- Combine Dry Ingredients: While the yeast is activating, in a separate bowl, whisk together the all-purpose flour and salt.
- Form the Dough: Pour the activated yeast mixture and the olive oil into the bowl with the flour mixture. Using a sturdy spoon or a dough whisk, mix until a shaggy dough forms and no dry streaks of flour remain. This is a no-knead style bread, so you’re not aiming for a perfectly smooth dough.
- Add Garlic and Herbs: Now, add your finely minced fresh garlic and chopped fresh herbs to the dough. Using your hands, gently fold and squish the dough a few times within the bowl to evenly distribute the garlic and herbs. Be careful not to overmix at this stage; just ensure they are well incorporated.
- First Rise (Bulk Fermentation): Cover the bowl tightly with plastic wrap or a clean kitchen towel. Place the bowl in a warm, draft-free spot in your kitchen. Let the dough rise for 1.5 to 2 hours, or until it has roughly doubled in size. The exact time will depend on the temperature of your kitchen.
- Prepare for Baking: About 30 minutes before your dough finishes its first rise, place your empty Dutch oven (with its lid) into your oven. Preheat your oven to a blazing 450°F (232°C). This super high heat is crucial for achieving that amazing, crusty exterior.
- Shape the Dough: Once the dough has risen, lightly flour a clean work surface. Gently turn the dough out onto the floured surface. With floured hands, carefully shape the dough into a round ball. Avoid handling it too much to keep those precious air bubbles intact. You can do a few gentle ‘folds’ by pulling the edges of the dough to the center and pinching them together on the bottom to create surface tension.
- Transfer to Dutch Oven: Carefully remove the super-hot Dutch oven from the oven (use oven mitts!). You can either gently lower the dough directly into the hot pot or, for easier handling, carefully transfer the dough onto a piece of parchment paper and then use the parchment paper to lower the dough into the Dutch oven. This will prevent sticking and make removal a breeze.
- Score the Dough (Optional): If you wish, use a very sharp knife or a bread lame to make a few shallow cuts (about ½ inch deep) on the top of your dough. This helps control where the bread expands and adds a professional touch.
- Bake Covered: Place the lid back on the Dutch oven and carefully return it to the preheated oven. Bake for 30 minutes. Baking covered creates a steamy environment, which is essential for developing a thin, crisp crust.
- Bake Uncovered: After 30 minutes, carefully remove the lid from the Dutch oven. Return the uncovered pot to the oven and continue baking for another 15-20 minutes, or until the crust is a deep golden brown and sounds hollow when tapped on the bottom. An instant-read thermometer inserted into the center should read around 200-210°F (93-99°C).
- Cool Completely: Carefully remove the Dutch oven from the oven. Using oven mitts, lift the bread out of the Dutch oven (using the parchment paper if you used it) and transfer it to a wire cooling rack. This is arguably the hardest step: let the bread cool for at least 1-2 hours before slicing into it. Slicing hot bread can result in a gummy interior and compromises the texture. The cooling process allows the starches to set, giving you that perfect crumb.
Tips & Suggestions
Here are a few extra pointers to ensure your Garlic Herb Dutch Oven Bread turns out perfectly every time and some ideas to take it to the next level!
- Preheat is Key: Don’t skimp on preheating your Dutch oven. A screaming hot pot provides an initial burst of heat that helps the bread spring beautifully and creates that signature crispy crust. Give it at least 30 minutes at the highest temperature your oven can reach, ideally 450°F (232°C).
- Parchment Paper is Your Friend: While not strictly necessary, using parchment paper to lower the dough into the hot Dutch oven and lift it out makes the process much safer and prevents sticking. It’s a small step that makes a big difference.
- Don’t Be Afraid to Experiment with Herbs: While rosemary and thyme are fantastic, feel free to try other combinations. Oregano, chives, sage, or a blend of Italian herbs can all work beautifully. Adjust quantities to your taste.
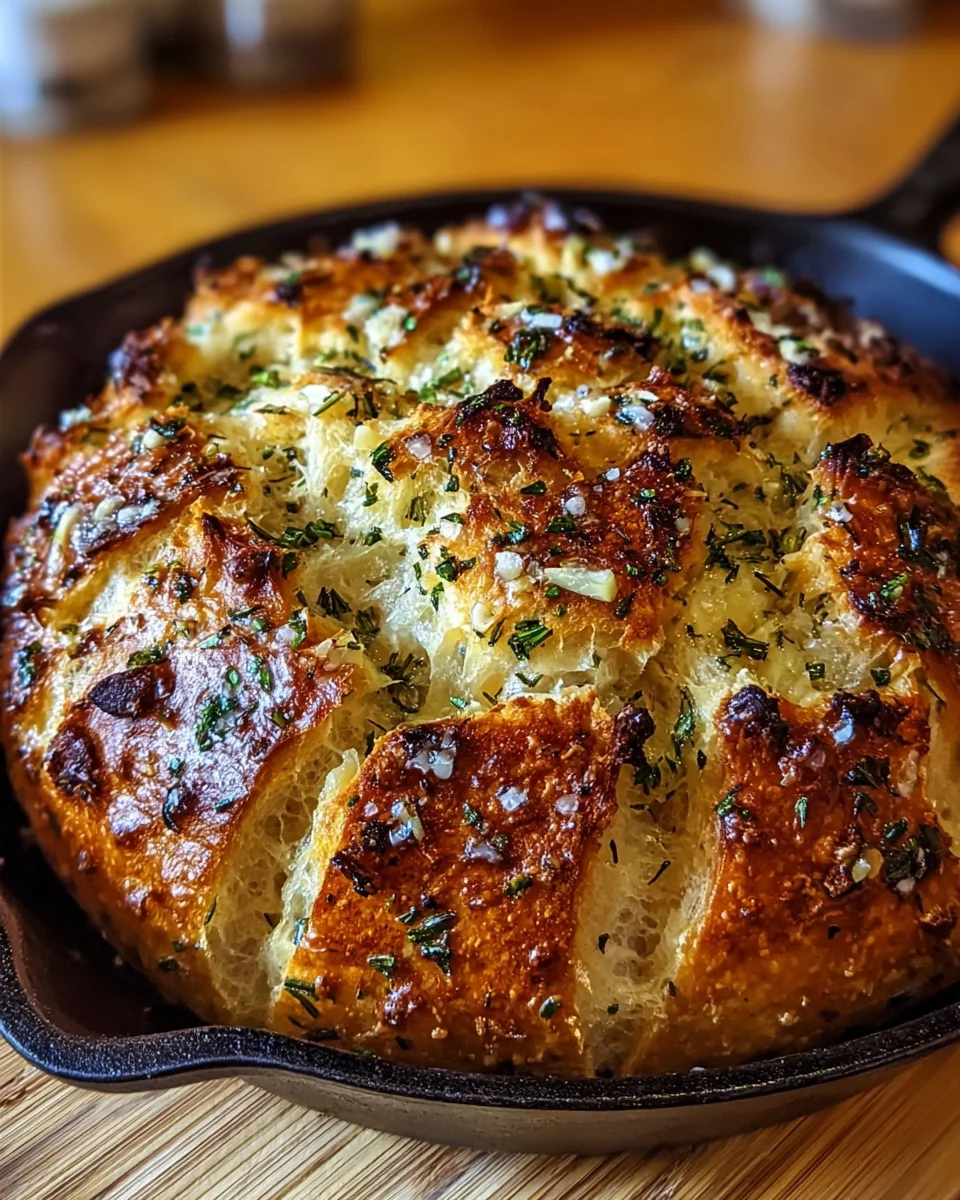
- Consider a Garlic Butter Brush: For an extra layer of garlicky goodness, melt a tablespoon of butter with a small clove of minced garlic and a pinch of dried herbs. Brush this mixture over the warm bread immediately after it comes out of the oven. It adds a glossy finish and intensifies the flavor.
- Serve It Up: This bread is incredible on its own, with a smear of good quality butter, or alongside a hearty beef stew or a fresh, vibrant salad. It’s also perfect for dipping into olive oil with a balsamic glaze.
- Adjusting Moisture: If your dough feels too sticky and unmanageable, add a tablespoon of flour at a time until it’s easier to handle but still quite moist. Conversely, if it seems too stiff, add a teaspoon of warm water until it reaches the right consistency.
Storage
You’ve baked a magnificent loaf; now let’s make sure you can enjoy it for as long as possible!
- Room Temperature: This Garlic Herb Dutch Oven Bread is best enjoyed on the day it’s baked. However, you can store it at room temperature for 2-3 days. Once completely cooled, store the whole or partial loaf in a paper bag (to maintain crustiness) inside a bread box, or wrapped tightly in aluminum foil or plastic wrap. An airtight container can sometimes soften the crust.
- Refrigeration: I generally don’t recommend refrigerating bread, as it tends to dry it out faster and changes the texture. If you absolutely must, ensure it’s in an airtight container for no more than a few days.
- Freezing: This bread freezes beautifully! Once completely cooled, you can freeze the entire loaf or slice it first for convenience. Wrap it tightly in plastic wrap, then an additional layer of aluminum foil or place it in a freezer-safe bag. It will keep well for up to 2-3 months.
- Reheating: For best results when reheating, especially from frozen, a few minutes in a preheated oven is ideal.
- From Room Temperature: Wrap the loaf in foil and heat in a 350°F (175°C) oven for 10-15 minutes, or until warmed through. For a crispier crust, unwrap for the last 5 minutes.
- From Frozen: Let the loaf thaw at room temperature for a few hours, then follow the instructions for reheating from room temperature. Alternatively, you can reheat directly from frozen (wrapped in foil) in a 350°F (175°C) oven for 30-40 minutes, then unwrap and bake for another 5-10 minutes to crisp the crust. Sliced pieces can be toasted directly from frozen.
Final Thoughts
There’s a special kind of magic that happens when you bake bread at home, and with this Garlic Herb Dutch Oven Bread Recipe, that magic is amplified tenfold. I truly believe this recipe is a game-changer for anyone wanting to experience the joy of homemade bread. The unique combination of fragrant garlic and fresh herbs, enveloped in a beautifully rustic loaf achieved effortlessly in a Dutch oven, delivers a taste and texture that’s simply unparalleled. From the irresistible aroma that fills your kitchen to the satisfying crunch of its golden crust and the tender, flavorful crumb within, every aspect of this bread screams perfection. It’s incredibly easy to make, yet yields results that are impressive enough for any dinner party. So, do yourself a favor and give this Garlic Herb Dutch Oven Bread Recipe a try – I promise, it’s a delicious journey your taste buds won’t soon forget!

Easy Garlic Herb Dutch Oven Bread Recipe for Homemade Loaf
- Total Time: 1 hour
- Yield: 1 loaf 1x
Description
This Garlic Herb Dutch Oven Bread is a game-changer, offering a perfectly crusty exterior and a soft, airy interior infused with aromatic garlic and fresh herbs. It’s surprisingly simple to make, even for beginner bakers, and will elevate any meal.
Ingredients
- 3 cups good quality unbleached all-purpose flour
- 1 teaspoon fine sea salt
- 1 teaspoon granulated sugar
- 1 teaspoon instant yeast
- 1 1/2 cups warm water (105-115°F)
- 2 tablespoons good quality extra virgin olive oil
- 4–6 cloves fresh garlic, minced
- 1 tablespoon fresh rosemary, chopped
- 1 tablespoon fresh thyme, chopped
Instructions
- In a large mixing bowl, combine the warm water and granulated sugar. Sprinkle the instant yeast over the top. Give it a gentle stir and let it sit for 5-10 minutes until foamy.
- While the yeast is activating, in a separate bowl, whisk together the all-purpose flour and salt.
- Pour the activated yeast mixture and the olive oil into the bowl with the flour mixture. Mix until a shaggy dough forms and no dry streaks of flour remain.
- Add the finely minced fresh garlic and chopped fresh herbs to the dough. Gently fold and squish the dough a few times to evenly distribute the garlic and herbs.
- Cover the bowl tightly with plastic wrap or a clean kitchen towel. Let the dough rise for 1.5 to 2 hours, or until it has roughly doubled in size.
- About 30 minutes before your dough finishes rising, place your empty Dutch oven (with its lid) into your oven. Preheat your oven to 450°F (232°C).
- Once the dough has risen, lightly flour a clean work surface. Gently turn the dough out onto the floured surface and shape it into a round ball.
- Carefully remove the hot Dutch oven from the oven. Transfer the dough into the Dutch oven, either directly or using parchment paper.
- If desired, score the top of the dough with a sharp knife or bread lame.
- Place the lid back on the Dutch oven and return it to the preheated oven. Bake for 30 minutes.
- After 30 minutes, remove the lid and continue baking for another 15-20 minutes until the crust is golden brown and sounds hollow when tapped.
- Remove the Dutch oven from the oven and transfer the bread to a wire cooling rack. Let it cool for at least 1-2 hours before slicing.
- Prep Time: 15 mins
- Cook Time: 45 mins
- Category: Bread
- Method: Baking
- Cuisine: American
Nutrition
- Serving Size: 1 slice
- Calories: 150
- Sugar: 1 g
- Sodium: 200 mg
- Fat: 3 g
- Saturated Fat: 0.5 g
- Unsaturated Fat: 2 g
- Trans Fat: 0 g
- Carbohydrates: 28 g
- Fiber: 1 g
- Protein: 4 g
- Cholesterol: 0 mg
Keywords: Preheat your Dutch oven for at least 30 minutes for the best results. Experiment with different herbs to customize the flavor. For added richness, brush melted garlic butter over the bread after baking.

Leave a Comment