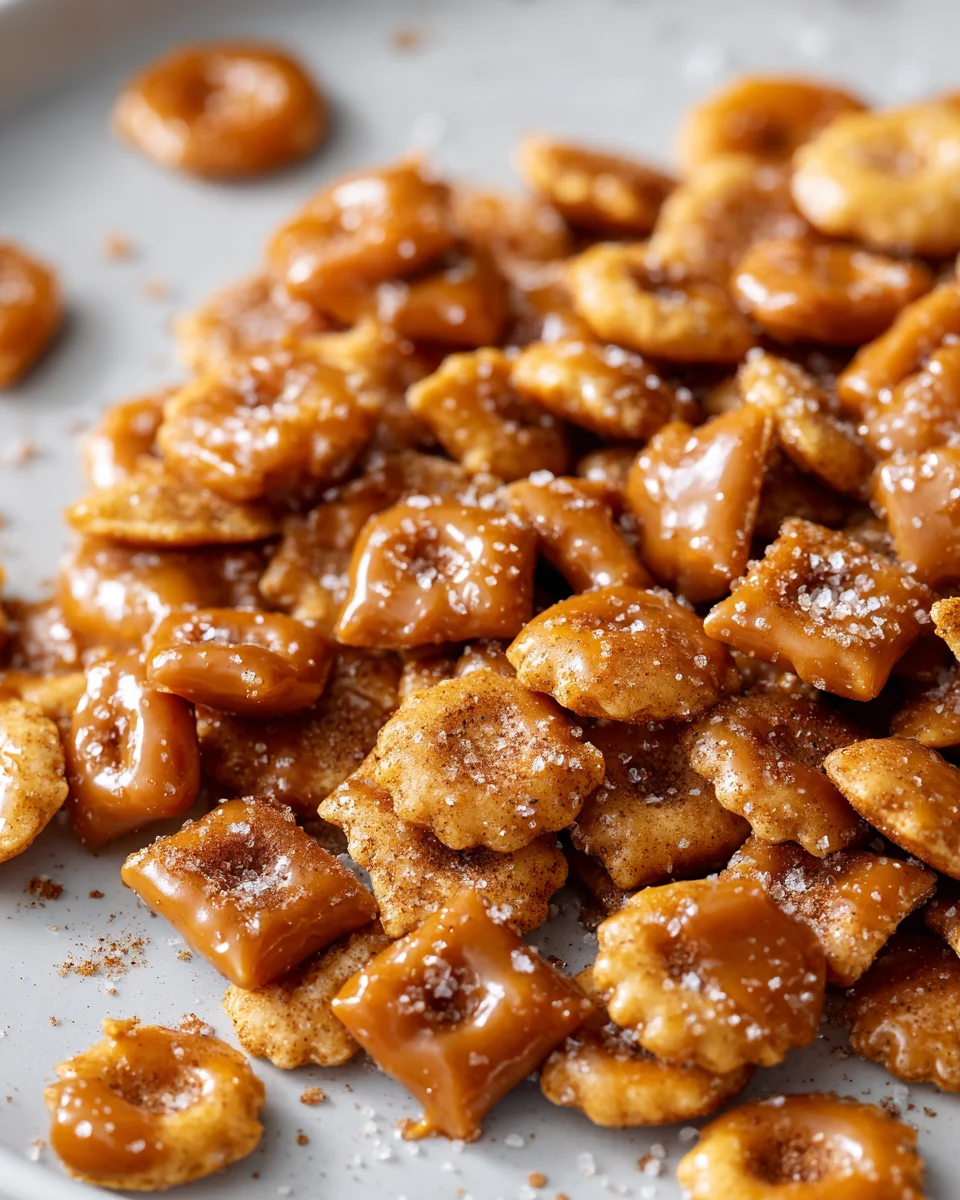
Salted Caramel Cracker Bites
Oh my goodness, where do I even begin with these little gems? If you’re anything like me, you live for that perfect dance between sweet and salty, that moment when your taste buds are just buzzing with happiness. Well, get ready, because these delicious bites are about to become your new obsession.
What makes Salted Caramel Cracker Bites so incredibly special? It’s the sheer genius of combining humble, crispy crackers with a layer of rich, chewy caramel, all finished with a sprinkle of flaky sea salt. It sounds simple, and it is! But the flavor explosion you get from that trifecta of textures and tastes is truly out of this world. You’ll love how ridiculously easy they are to whip up, transforming everyday ingredients into an unbelievably addictive treat that practically begs you to eat just one more…and then one more.
These aren’t just any snack; they’re the ultimate no-fuss dessert or party favor that disappears faster than you can say ‘caramel’. Imagine a crunchy base giving way to a buttery, sweet, and slightly savory caramel topping – it’s a symphony of deliciousness in every single bite. Perfect for holiday platters, casual gatherings, or when you just need a little something special, I promise you, these Salted Caramel Cracker Bites will be a recipe you’ll come back to again and again. Let’s make some magic!

Ingredient Notes
Creating truly irresistible Salted Caramel Cracker Bites begins with understanding the role each ingredient plays. While the list might seem simple, a few key choices make all the difference in achieving that perfect balance of sweet, salty, and crunchy that we all crave.
Crackers
- Saltine Crackers: These are my absolute go-to for this recipe. Their inherent saltiness perfectly complements the sweet caramel, and their delicate crispness transforms into a delightful, slightly chewy base once baked with the caramel. The square shape also makes for neat, uniform bites.
- Substitutions: You can certainly experiment! Ritz crackers offer a buttery, slightly richer base, while Club crackers are another good contender. For a fun twist, I’ve even seen people use graham crackers, which would create more of a s’mores-like vibe rather than the classic salty-sweet. Just be mindful that if your crackers are less salty, you might want to add a tiny pinch more salt to your caramel mixture.
Unsalted Butter
- Why Unsalted?: I always opt for unsalted butter when making caramel. This gives me complete control over the final saltiness of the dish, allowing the flaky sea salt to be the star. The butter provides richness and helps create that smooth, luscious caramel texture.
- Substitutions: If you only have salted butter on hand, that’s fine! Just be sure to reduce the amount of added salt in the caramel mixture, and taste as you go. You can always add more flaky sea salt at the end.
Light Brown Sugar
- For Depth and Chew: Brown sugar is essential here, providing a lovely molasses note that’s more complex than white sugar. It also contributes to the signature chewy texture of the caramel, making it less brittle than a purely white sugar caramel.
- Substitutions: Dark brown sugar will give you an even deeper, more robust molasses flavor and a slightly darker caramel. Granulated white sugar could be used in a pinch, but your caramel will be lighter in color and have a slightly different, perhaps less chewy, texture.
Heavy Cream
- The Secret to Creamy Caramel: This is a non-negotiable for achieving a smooth, pourable, yet rich and creamy caramel. It emulsifies with the butter and sugar, preventing the caramel from becoming too hard or grainy.
- Substitutions: I strongly recommend sticking to heavy cream (sometimes called whipping cream) for the best results. Lighter creams or milk won’t give you the same richness or stability.
Vanilla Extract
- Flavor Enhancer: A splash of vanilla extract at the end brightens and deepens all the other flavors, adding a comforting warmth to the caramel.
- Substitutions: Pure vanilla extract is best. You could experiment with other extracts like almond or maple for a different flavor profile, but vanilla is truly classic here.
Flaky Sea Salt
- The “Salted” Star: This is where the magic truly happens for “Salted Caramel” Cracker Bites! Flaky sea salt (like Maldon) sprinkled over the finished caramel provides bursts of salinity and a wonderful textural contrast that regular table salt just can’t match. It’s the perfect counterpoint to the sweetness.
- Substitutions: If you don’t have flaky sea salt, a good quality coarse kosher salt is the next best option. Avoid fine table salt for the final sprinkle, as it can dissolve too quickly and lack the visual and textural appeal.
Melting Chocolate (Optional)
- For an Extra Layer of Indulgence: While optional, a layer of melted chocolate takes these bites to the next level! Semi-sweet or milk chocolate chips, wafers, or chopped chocolate bars all work beautifully.
- Substitutions: Choose your favorite! Dark chocolate provides a lovely bitter contrast, while white chocolate can add another layer of sweetness and a creamy texture.
Step-by-Step Instructions
Making Salted Caramel Cracker Bites is surprisingly simple, and it’s one of those recipes that looks far more impressive than the effort it requires. Follow these steps for cracker bite perfection!
Step 1: Prepare Your Baking Sheet and Crackers
First things first, let’s get organized. I always start by preheating my oven to 350°F (175°C). Then, grab a large baking sheet (a half-sheet pan works perfectly for a standard batch) and line it completely with aluminum foil or parchment paper. This step is CRUCIAL for easy cleanup, as caramel can be very sticky! Lightly grease the foil or parchment with a little butter or non-stick spray.
Next, arrange your saltine crackers in a single layer on the prepared baking sheet. Try to get them as close together as possible without overlapping. This creates a solid “sheet” of crackers that you’ll break apart later. A standard 13×18 inch baking sheet usually holds about 40-50 saltine squares.
Step 2: Make the Caramel Toffee Base
Now for the star of the show – the caramel! In a medium-sized, heavy-bottomed saucepan (this helps prevent scorching), combine 1 cup (2 sticks) of unsalted butter with 1 cup of light brown sugar. Place the saucepan over medium heat.
Stir the mixture constantly with a whisk or rubber spatula. The butter will melt, and the sugar will dissolve. Bring the mixture to a full, rolling boil. Once it’s boiling, continue to cook for exactly 3 to 5 minutes, stirring continuously. You’ll notice it thicken slightly and become a rich, deep amber color. Don’t walk away during this stage – it can go from perfect to burnt quickly!
Once your timer is up, immediately remove the saucepan from the heat. Carefully stir in 1 teaspoon of vanilla extract. Be cautious, as the mixture will bubble up vigorously when you add the vanilla. Give it a good stir until fully combined.
Step 3: Pour and Bake
Working quickly, pour the hot caramel mixture evenly over the arranged crackers on your baking sheet. Use an offset spatula or the back of a spoon to gently spread the caramel to cover all the crackers if needed. Don’t worry too much about perfection; it will spread further in the oven.
Carefully transfer the baking sheet to your preheated oven. Bake for 8-10 minutes, or until the caramel is bubbly all over and looks slightly darker around the edges of the crackers. Keep an eye on it – you want it bubbly, not burnt.
Step 4: Add Heavy Cream and Set
Once baked, remove the baking sheet from the oven. Immediately drizzle 2 tablespoons of heavy cream over the hot, bubbly caramel. This step helps soften the toffee ever so slightly and adds a wonderful creamy richness. Gently spread the cream with a spatula if it doesn’t distribute on its own.
Now, for the “salted” part! Generously sprinkle flaky sea salt over the entire surface of the caramel-covered crackers. I like to be pretty liberal here; the salt is what truly makes these bites shine.
Step 5: Optional Chocolate Layer
If you’re adding chocolate, this is the time! Immediately sprinkle about 1 to 1 ½ cups of chocolate chips (semi-sweet, milk, or dark – your choice!) evenly over the hot caramel. Let it sit for 3-5 minutes. The residual heat from the caramel will melt the chocolate.
After a few minutes, use an offset spatula to gently spread the melted chocolate evenly over the caramel layer. For an extra flourish, you can sprinkle a few more flaky sea salt flakes or some sprinkles on top of the melted chocolate before it sets.
Step 6: Cool, Chill, and Break Apart
Allow the cracker sheet to cool at room temperature for about 30 minutes, or until it’s no longer piping hot. Then, transfer the entire baking sheet to the refrigerator or freezer for at least 1-2 hours (or until completely firm and hardened). Chilling ensures the caramel and chocolate (if used) set properly, making it easy to break.
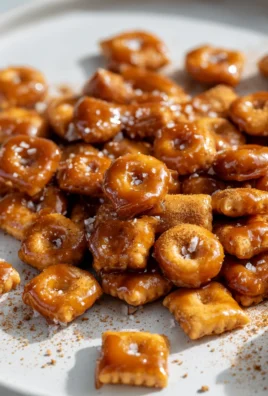
Once completely firm, lift the entire sheet of cracker bites off the baking sheet by grabbing the foil or parchment paper. Gently peel the foil or parchment away from the back. Place the hardened sheet on a cutting board. Using a large, sharp knife, or simply your hands, break or cut the sheet into individual cracker bites. They don’t have to be perfectly uniform; irregular shapes add to their charm!
Tips & Suggestions
Over the years of making these delicious Salted Caramel Cracker Bites, I’ve picked up a few tricks that I love sharing. These tips will help you achieve perfection every time and even inspire you to get creative!
- Don’t Rush the Caramel: While the caramel cooking time is short, resist the urge to crank up the heat. Medium heat allows the sugar to dissolve properly and caramelize evenly without burning. Stirring constantly is key to preventing scorching on the bottom of the pan.
- Heavy-Bottomed Pan is Your Friend: A good quality, heavy-bottomed saucepan distributes heat more evenly, significantly reducing the risk of your caramel burning. This is one of those kitchen essentials that truly makes a difference.
- Pre-Measure Everything: Once that caramel starts boiling, things move fast! Have all your ingredients measured out and ready to go before you even put the saucepan on the stove. This includes your vanilla, heavy cream, and flaky sea salt.
- Embrace the Foil/Parchment: I cannot stress enough how important lining your baking sheet is. Caramel is incredibly sticky, and trying to clean it off a bare pan is a nightmare. Foil or parchment makes cleanup a breeze – just peel and discard!
- The Power of Flaky Sea Salt: This isn’t just for decoration; it’s fundamental to the flavor profile. Don’t skimp on the flaky sea salt! It adds that crucial burst of salinity that cuts through the sweetness and elevates the entire bite. Sprinkle it generously and immediately after adding the heavy cream, while the caramel is still warm enough for it to adhere.
- Get Creative with Toppings: While the classic is just chocolate and sea salt, feel free to customize!
- Nuts: Sprinkle finely chopped pecans, walnuts, or almonds over the melted chocolate layer (or even directly on the caramel before chilling) for added crunch and flavor.
- Sprinkles: A festive touch for holidays or parties.
- Different Chocolates: Mix and match! A drizzle of white chocolate over a dark chocolate layer looks beautiful.
- For a Super Smooth Chocolate Layer: If your kitchen is cool, or if your chocolate chips aren’t melting as easily, you can return the baking sheet to the turned-off, still-warm oven for a minute or two after sprinkling the chocolate chips. This extra warmth will help them melt perfectly for easy spreading.
- Uniform Bites: For cleaner cuts when breaking apart, let the cooled sheet sit at room temperature for 5-10 minutes after chilling. This makes it slightly less brittle, reducing crumbling. A large, sharp chef’s knife can make quick work of cutting them into squares if you prefer a more uniform look over breaking them by hand.
- Double the Batch for Gifting: These cracker bites make fantastic homemade gifts during the holidays or for any occasion. They’re easy to transport and always a hit. Just make sure you have enough crackers and a large enough baking sheet!
Storage
Once you’ve gone to the trouble of making these delightful Salted Caramel Cracker Bites, you’ll want to ensure they stay fresh and delicious for as long as possible. Proper storage is key!
- Air-tight Container is Essential: My number one rule for storing these (or almost any baked good) is an air-tight container. Exposure to air is the enemy of freshness, especially for crispy crackers and chewy caramel. A good sealed container will prevent them from becoming stale or sticky.
- Refrigerator for Best Results: I highly recommend storing your Salted Caramel Cracker Bites in the refrigerator. The cool temperature keeps the caramel from getting too soft or sticky, especially if you’ve added a chocolate layer. It also helps maintain their delightful chewiness. They’ll last beautifully for up to 1-2 weeks when stored in an airtight container in the fridge.
- Room Temperature (with caution): If your kitchen is cool (below 70°F or 21°C) and not too humid, you can store them at room temperature for a few days (3-5 days). However, I find they can get a bit softer and potentially stickier without refrigeration, particularly if they have a chocolate coating. If you notice them getting too soft, pop them in the fridge.
- Layering for Storage: If you’re stacking the cracker bites in your container, I suggest placing small pieces of parchment paper or wax paper between the layers. This prevents them from sticking together, especially if the caramel is slightly soft.
- Freezing for Long-Term Storage: Yes, you can freeze Salted Caramel Cracker Bites! They freeze wonderfully. Arrange the bites in a single layer on a baking sheet and flash freeze them for about an hour until solid. Then, transfer the frozen bites to a freezer-safe, air-tight container or a heavy-duty freezer bag. They’ll keep well for up to 2-3 months.
- Thawing Frozen Bites: To enjoy frozen bites, simply take them out of the freezer and let them sit at room temperature for about 15-30 minutes, or until thawed. Sometimes I even enjoy them straight from the freezer for a super chewy, extra-cold treat!
- Avoiding Moisture: Be mindful of condensation if moving them from the fridge to a warm, humid environment. Keeping them in their sealed container until they reach room temperature can help minimize moisture build-up.
Final Thoughts
And there you have it! I truly hope you’re ready to dive into making these incredible Salted Caramel Cracker Bites. What I love most about them is how they hit every single craving – that perfect balance of sweet and salty, the satisfying crunch of the crackers, and the gooey, rich chewiness of the caramel. They’re unbelievably simple to whip up, making them the ultimate last-minute treat for unexpected guests, a fantastic addition to any potluck, or just a delightful little something to brighten your own day.
Trust me, once you experience the magic of these Salted Caramel Cracker Bites, you’ll understand why they’re destined to become a staple in your recipe collection. They’re proof that sometimes the most extraordinary flavors come from the simplest combinations. So go ahead, treat yourself and your loved ones to this wonderfully addictive snack. You won’t regret it!

Salted Caramel Cracker Bites: Easy No-Bake Treat!
- Total Time: 30 minutes
- Yield: 20 servings 1x
Description
These Salted Caramel Cracker Bites are a delightful combination of sweet and salty flavors, making them the perfect no-bake treat for any occasion. With a crispy cracker base topped with rich caramel and a sprinkle of flaky sea salt, they are sure to become a favorite!
Ingredients
- 40–50 Saltine Crackers
- 1 cup (2 sticks) Unsalted Butter
- 1 cup Light Brown Sugar
- 2 tablespoons Heavy Cream
- 1 teaspoon Vanilla Extract
- Flaky Sea Salt
- 1 to 1 ½ cups Melting Chocolate (Optional)
Instructions
- Preheat your oven to 350°F (175°C) and line a large baking sheet with aluminum foil or parchment paper, lightly greased.
- Arrange the saltine crackers in a single layer on the prepared baking sheet.
- In a medium-sized, heavy-bottomed saucepan, combine 1 cup of unsalted butter with 1 cup of light brown sugar over medium heat, stirring constantly until it comes to a full, rolling boil.
- Continue to cook for 3 to 5 minutes, stirring continuously until the mixture thickens and becomes a rich, deep amber color.
- Remove from heat and stir in 1 teaspoon of vanilla extract, being cautious as the mixture will bubble up.
- Quickly pour the hot caramel mixture over the arranged crackers, spreading it gently to cover all the crackers.
- Bake in the preheated oven for 8-10 minutes, until the caramel is bubbly and slightly darker around the edges.
- Remove from the oven and immediately drizzle 2 tablespoons of heavy cream over the hot caramel, spreading it gently if necessary.
- Generously sprinkle flaky sea salt over the caramel-covered crackers.
- If using chocolate, sprinkle 1 to 1 ½ cups of chocolate chips over the hot caramel, letting it sit for 3-5 minutes to melt, then spread the melted chocolate evenly.
- Allow the cracker sheet to cool at room temperature for about 30 minutes, then transfer to the refrigerator or freezer for 1-2 hours until completely firm.
- Once firm, lift the sheet off the baking sheet and break or cut into individual cracker bites.
- Prep Time: 15 mins
- Cook Time: 15 mins
- Category: Dessert
- Method: Baking
- Cuisine: American
Nutrition
- Serving Size: 1 bite
- Calories: 150
- Sugar: 10 g
- Sodium: 150 mg
- Fat: 8 g
- Saturated Fat: 5 g
- Unsaturated Fat: 2 g
- Trans Fat: 0 g
- Carbohydrates: 18 g
- Fiber: 0 g
- Protein: 1 g
- Cholesterol: 20 mg
Keywords: For best results, use unsalted butter to control the saltiness, and consider using flaky sea salt for the best flavor. You can customize with toppings like nuts or sprinkles for added texture and flavor.

Leave a Comment