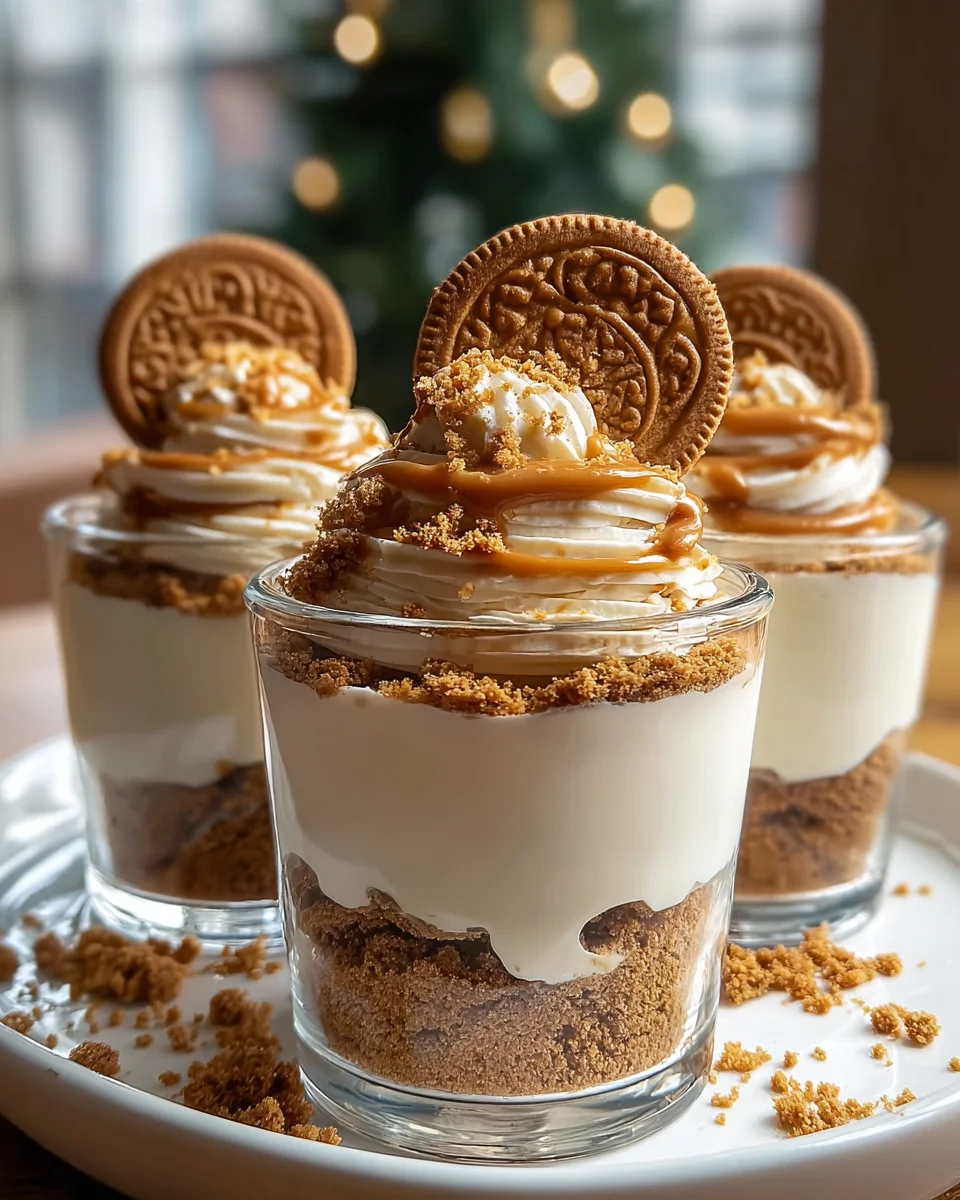
Cookie Butter Cheesecake Cups
Oh my goodness, get ready to fall head over heels for these Cookie Butter Cheesecake Cups! I’m so excited to share this recipe with you because it’s truly something special. Imagine taking the rich, spiced, and utterly irresistible flavor of cookie butter and blending it into a luscious, creamy cheesecake filling. Now, picture that divine mixture spooned over a crunchy cookie crust, all perfectly portioned into adorable individual cups. It’s like taking your favorite jar of cookie butter and transforming it into an elegant, no-bake dessert masterpiece that’s just begging to be devoured.
You are absolutely going to love these. Why? Because they’re unbelievably easy to make, require no oven, and deliver a flavor punch that will have everyone asking for the recipe. They’re perfect for impressing guests at a dinner party, bringing to a potluck, or simply treating yourself to a little slice (or cup!) of heaven after a long day. Each bite offers that perfect balance of creamy tang from the cheesecake and the comforting, caramel-like sweetness of cookie butter, all crowned with a delightful crunch. Trust me, these aren’t just dessert; they’re an experience waiting to happen!
Ingredient Notes
Creating these delightful Cookie Butter Cheesecake Cups starts with a few key ingredients, each playing an essential role in building layers of flavor and texture. I’ve found that using high-quality ingredients makes all the difference, but I’ll also share some excellent substitutions if you need them!
For the Crust:
- Speculoos Cookies: These are the star of the show for the crust, giving that distinct spiced cookie flavor that pairs perfectly with cookie butter. I like to use Biscoff cookies, but any brand of speculoos will work beautifully.
- Melted Unsalted Butter: This binds the cookie crumbs together. Unsalted butter allows you to control the overall saltiness, but salted butter can be used; just be aware it might add a tiny bit more savory note to the crust.
For the Cheesecake Filling:
- Full-Fat Cream Cheese: This is non-negotiable for a rich, creamy, and stable cheesecake. Make sure it’s softened to room temperature before mixing to ensure a smooth, lump-free filling. Low-fat cream cheese might result in a runnier texture, so I don’t recommend it for these cups.
- Cookie Butter: Again, Biscoff spread is my go-to, but any brand of smooth cookie butter will provide that signature taste. Ensure it’s at room temperature or slightly warmed (just a few seconds in the microwave) so it blends easily with the cream cheese.
- Powdered Sugar (Confectioners’ Sugar): I prefer powdered sugar over granulated sugar for no-bake cheesecakes because it dissolves seamlessly, creating a silky-smooth texture without any graininess. It also helps to stabilize the filling.
- Vanilla Extract: A good quality vanilla extract enhances all the other flavors. Pure vanilla extract is always my preference, but imitation vanilla will work if that’s what you have on hand.
- Heavy Cream: Whipping heavy cream and folding it into the mixture adds lightness and creates that perfect cheesecake texture that’s both rich and airy. Make sure it’s very cold for optimal whipping.
For the Topping (Optional, but Recommended!):
- More Cookie Butter: A drizzle of warmed cookie butter over the top is a fantastic finish.
- Whipped Cream: Homemade whipped cream (heavy cream, powdered sugar, vanilla) is always a winner, or you can use canned whipped cream for convenience.
- Extra Speculoos Crumbs: A sprinkle of crushed cookies adds textural contrast and a pretty garnish.
Step-by-Step Instructions
Making these Cookie Butter Cheesecake Cups is incredibly satisfying and surprisingly simple! There’s no baking involved for the filling, so it’s a perfect dessert for any occasion. Here’s how I put them together:
Step 1: Prepare the Cookie Crust
- First, line a 12-cup muffin pan with paper or foil liners. I find foil liners hold their shape a bit better, but paper works fine too.
- In a food processor, pulse the speculoos cookies until they form fine crumbs. If you don’t have a food processor, you can place the cookies in a zip-top bag and crush them with a rolling pin or the bottom of a heavy glass.
- Transfer the cookie crumbs to a medium bowl. Pour in the melted unsalted butter and stir with a fork until all the crumbs are moistened and evenly coated.
- Distribute the buttery crumbs evenly among the 12 prepared muffin liners, about 1-2 tablespoons per cup.
- Using the back of a spoon, or a small tart tamper, firmly press the crumbs into an even layer at the bottom of each liner. This creates a solid base for your cheesecake.
- Place the muffin pan in the refrigerator while you prepare the filling to allow the crust to firm up.
Step 2: Make the Creamy Cookie Butter Cheesecake Filling
- In a large mixing bowl, using an electric mixer (handheld or stand mixer with a paddle attachment), beat the softened full-fat cream cheese on medium speed until it’s completely smooth and creamy, with no lumps. This is crucial for a smooth filling!
- Add the cookie butter and powdered sugar to the cream cheese. Continue beating on medium speed until the mixture is well combined, smooth, and fluffy. Scrape down the sides of the bowl as needed to ensure everything is incorporated.
- Stir in the vanilla extract until just combined. Don’t overmix.
- In a separate, clean, cold bowl, whip the very cold heavy cream on high speed until stiff peaks form. Be careful not to over-whip it into butter!
- Gently fold the whipped cream into the cream cheese and cookie butter mixture using a spatula. Fold until just combined, being careful not to deflate the whipped cream. This step adds a lovely lightness to the cheesecake.
Step 3: Assemble and Chill
- Retrieve your muffin pan with the chilled crusts from the refrigerator.
- Evenly spoon the cookie butter cheesecake filling over the prepared crusts in each liner. I like to use a small cookie scoop for consistent portions.
- Gently tap the muffin pan on the counter a few times to release any air bubbles and help the filling settle evenly. You can also use the back of a spoon to smooth the tops.
- Cover the muffin pan loosely with plastic wrap.
- Refrigerate the cheesecake cups for a minimum of 4 hours, but preferably overnight. This chilling time is essential for the cheesecake to firm up properly and for the flavors to fully develop.
Step 4: Garnish and Serve
- Once the cheesecake cups are thoroughly chilled and set, carefully remove them from the muffin pan.
- Gently peel off the paper or foil liners.
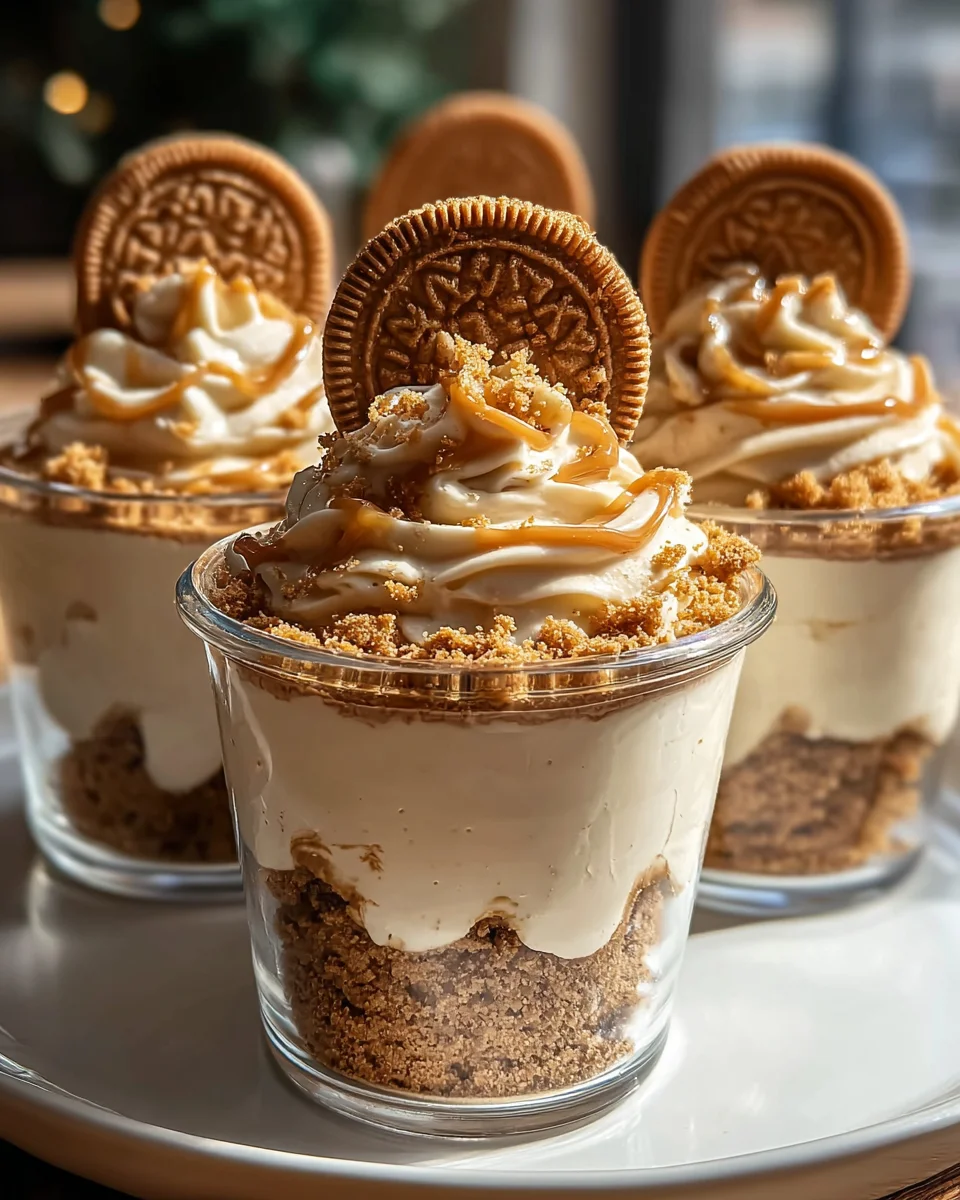
- If desired, warm a little extra cookie butter in the microwave for a few seconds until it’s drizzly, then drizzle it over the top of each cheesecake cup.
- You can also pipe a swirl of homemade or canned whipped cream on top, or sprinkle with additional crushed speculoos cookies for extra crunch and visual appeal.
- Serve immediately and enjoy your delicious Cookie Butter Cheesecake Cups!
Tips & Suggestions
I’ve made these Cookie Butter Cheesecake Cups countless times, and I’ve picked up a few tricks along the way that I think will help you achieve perfect results every time. These tips are specific to making these no-bake cups a success!
- Room Temperature Ingredients are Key: This is probably the most important tip! Make sure your full-fat cream cheese and cookie butter are completely softened to room temperature. This ensures a lump-free, super smooth, and perfectly blended filling. If your cream cheese isn’t soft enough, you’ll end up with frustrating lumps.
- Don’t Overmix the Cheesecake Filling: Once you’ve added the cookie butter and powdered sugar, beat only until just combined and smooth. Overmixing can incorporate too much air, which can make your cheesecake less dense and sometimes less stable.
- Gentle Folding of Whipped Cream: When incorporating the whipped heavy cream, use a spatula and fold gently. You want to maintain the airiness that the whipped cream provides, so avoid aggressive stirring. This lightness is part of what makes these cups so enjoyable.
- The Importance of Chilling: Seriously, don’t skimp on the chilling time! A minimum of 4 hours is necessary for the cheesecake cups to fully set. If you can chill them overnight, even better. This ensures they hold their shape beautifully when removed from the liners.
- For Easy Removal: While paper liners work, I often find foil liners are slightly easier to peel away from the chilled cheesecake cups without sticking. If you’re using paper, a light spray of non-stick cooking spray inside the liners can sometimes help, but usually, if they’re well-chilled, they pop out fine.
- Uniformity for Presentation: To get perfectly even cheesecake cups, use a small cookie scoop (about 1.5-2 tablespoons) to portion out the crust and the filling. This makes them look professionally made!
- Prevent Cracking (No-Bake Edition): While cracks are usually a concern for baked cheesecakes, over-handling or too rapid temperature changes for no-bake ones can sometimes cause minor issues. Ensure even chilling and gentle handling.
- Flavor Boost: For an extra depth of flavor, sometimes I’ll add a tiny pinch of fine sea salt to the cookie butter cheesecake filling. It helps to balance the sweetness and really makes the cookie butter flavor pop.
Storage
One of the best things about these Cookie Butter Cheesecake Cups is that they are fantastic for making ahead, and they store quite well. Here’s how I keep them fresh:
- In the Refrigerator: Store leftover Cookie Butter Cheesecake Cups in an airtight container in the refrigerator. They will stay fresh for up to 3-4 days. If you’ve topped them with whipped cream, the cream might deflate slightly over time, but the cheesecake itself will remain delicious.
- Without Toppings: If you plan on making them a day or two in advance, I recommend storing them without any whipped cream or cookie butter drizzle. You can add those fresh toppings just before serving for the best presentation and texture.
- Freezing: These cheesecake cups freeze beautifully! Once fully chilled and set, remove them from their liners. Place them in a single layer on a baking sheet and freeze for about an hour until firm. Then, transfer the frozen cups to an airtight, freezer-safe container or a heavy-duty freezer bag. They can be stored in the freezer for up to 1 month.
- Thawing Frozen Cups: To enjoy a frozen cheesecake cup, simply transfer it from the freezer to the refrigerator and let it thaw for a few hours, or you can even let it sit at room temperature for about 30-45 minutes. Once thawed, you can add your desired toppings.
Final Thoughts
And there you have it! I truly believe these Cookie Butter Cheesecake Cups are a dessert sensation you absolutely must experience. They perfectly marry the rich, creamy dreaminess of cheesecake with the unique, spiced caramel notes of cookie butter, all nestled into convenient, individual portions. It’s a no-bake wonder that’s both effortless to prepare and incredibly impressive. Whether you’re looking for a delightful treat for yourself, a simple yet elegant offering for guests, or just something wonderfully different, these Cookie Butter Cheesecake Cups promise an unforgettable burst of flavor that will leave everyone wanting more. Trust me, they’re poised to become a beloved staple in your dessert repertoire!

Irresistible Cookie Butter Cheesecake Cups
- Total Time: 30 minutes
- Yield: 12 servings
Description
These Cookie Butter Cheesecake Cups are a delightful no-bake dessert that combines the rich flavor of cookie butter with a creamy cheesecake filling. Perfectly portioned in individual cups, they are sure to impress at any gathering!
Ingredients
- Speculoos Cookies
- Melted Unsalted Butter
- Full-Fat Cream Cheese
- Cookie Butter
- Powdered Sugar (Confectioners' Sugar)
- Vanilla Extract
- Heavy Cream
- More Cookie Butter (for topping)
- Whipped Cream (for topping)
- Extra Speculoos Crumbs (for topping)
Instructions
- Step 1: Prepare the Cookie Crust
- 1. First, line a 12-cup muffin pan with paper or foil liners.
- 2. In a food processor, pulse the speculoos cookies until they form fine crumbs.
- 3. Transfer the cookie crumbs to a medium bowl. Pour in the melted unsalted butter and stir with a fork until all the crumbs are moistened and evenly coated.
- 4. Distribute the buttery crumbs evenly among the 12 prepared muffin liners, about 1-2 tablespoons per cup.
- 5. Using the back of a spoon, or a small tart tamper, firmly press the crumbs into an even layer at the bottom of each liner.
- 6. Place the muffin pan in the refrigerator while you prepare the filling to allow the crust to firm up.
- Step 2: Make the Creamy Cookie Butter Cheesecake Filling
- 1. In a large mixing bowl, using an electric mixer, beat the softened full-fat cream cheese on medium speed until it’s completely smooth and creamy.
- 2. Add the cookie butter and powdered sugar to the cream cheese. Continue beating on medium speed until the mixture is well combined, smooth, and fluffy.
- 3. Stir in the vanilla extract until just combined.
- 4. In a separate, clean, cold bowl, whip the very cold heavy cream on high speed until stiff peaks form.
- 5. Gently fold the whipped cream into the cream cheese and cookie butter mixture using a spatula until just combined.
- Step 3: Assemble and Chill
- 1. Retrieve your muffin pan with the chilled crusts from the refrigerator.
- 2. Evenly spoon the cookie butter cheesecake filling over the prepared crusts in each liner.
- 3. Gently tap the muffin pan on the counter a few times to release any air bubbles.
- 4. Cover the muffin pan loosely with plastic wrap.
- 5. Refrigerate the cheesecake cups for a minimum of 4 hours, preferably overnight.
- Step 4: Garnish and Serve
- 1. Once the cheesecake cups are thoroughly chilled and set, carefully remove them from the muffin pan.
- 2. Gently peel off the paper or foil liners.
- 3. If desired, warm a little extra cookie butter in the microwave and drizzle it over the top of each cheesecake cup.
- 4. Pipe a swirl of whipped cream on top, or sprinkle with additional crushed speculoos cookies.
- 5. Serve immediately and enjoy your delicious Cookie Butter Cheesecake Cups!
- Prep Time: 30 mins
- Cook Time: 0 mins
- Category: Dessert
- Method: No-Bake
- Cuisine: American
Nutrition
- Serving Size: 1 cup
- Calories: 250
- Sugar: 15 g
- Sodium: 200 mg
- Fat: 18 g
- Saturated Fat: 10 g
- Unsaturated Fat: 6 g
- Trans Fat: 0 g
- Carbohydrates: 22 g
- Fiber: 1 g
- Protein: 3 g
- Cholesterol: 40 mg
Keywords: Ensure your cream cheese and cookie butter are at room temperature for a smooth filling. Don't overmix the cheesecake filling to maintain its density, and remember to chill the cups for at least 4 hours for the best results.

Leave a Comment