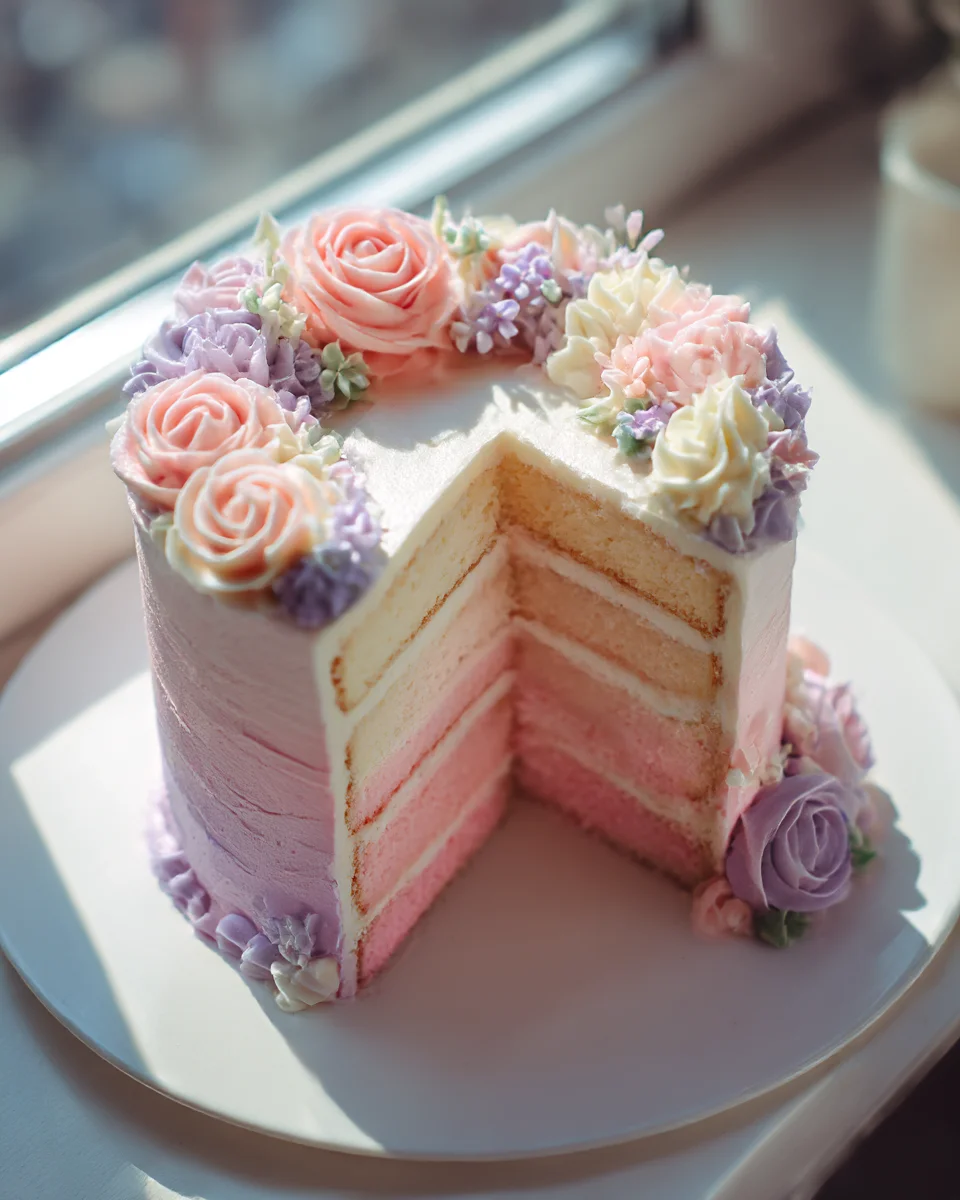
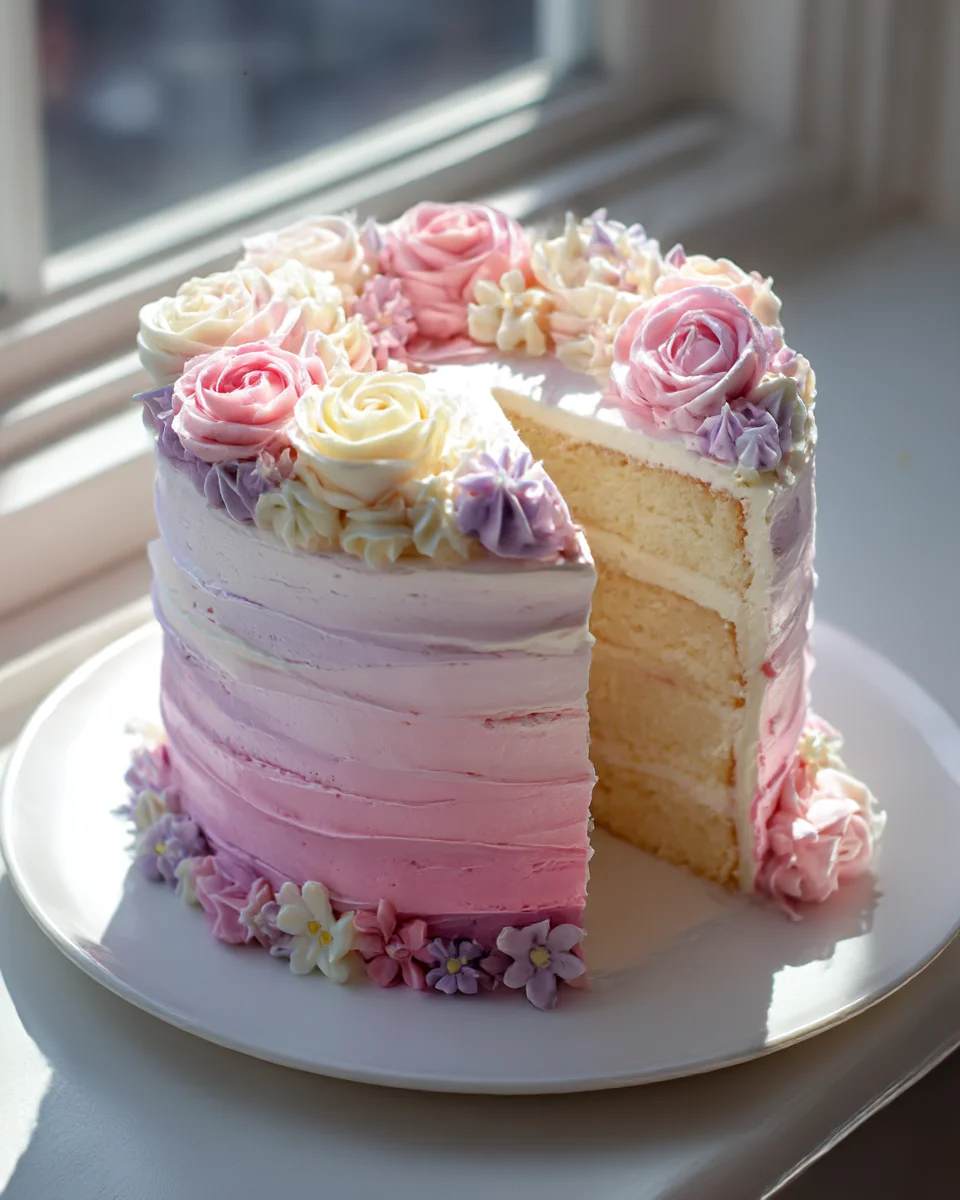
Pastel Ombre Vanilla Bean Birthday Cake With Floral Buttercream
Oh, prepare yourselves, because I am absolutely thrilled to introduce you to a cake that isn’t just a dessert, it’s an edible work of art: Pastel Ombre Vanilla Bean Birthday Cake With Floral Buttercream. I truly believe this is one of the most special cakes you’ll ever bake, and I can’t wait for you to experience the joy it brings!
What makes this particular recipe so incredibly special? Well, it’s a symphony of delightful details! We’re talking about light, tender vanilla bean sponges, each infused with those gorgeous tiny specks that promise an authentic, comforting flavor. But we don’t stop there – oh no! Each layer boasts a delicate, fading pastel hue, creating a breathtaking ombre effect that will have everyone gasping in delight when you slice into it. And then, there’s the crowning glory: a smooth, luxurious buttercream artfully piped into stunning floral designs, transforming your cake into a beautiful garden centerpiece.
I know you’re going to fall head over heels for this cake because it’s the ultimate showstopper. Imagine the smiles, the oohs and aahs, as you present something so visually stunning and utterly delicious. It’s perfect for birthdays, anniversaries, or any occasion where you want to make a truly unforgettable statement. This isn’t just a cake; it’s a celebration in itself, a testament to the joy of baking something beautiful from scratch. So, get ready to create layers of vanilla bean perfection, swathed in an incredible ombre gradient, and adorned with delicate floral buttercream that tastes as amazing as it looks!
Ingredient Notes
Creating this beautiful Pastel Ombre Vanilla Bean Birthday Cake is truly a labor of love, and starting with the right ingredients makes all the difference. I always recommend using high-quality ingredients for the best flavor and texture.
- Cake Flour: This is my secret for that incredibly tender, light crumb. It has a lower protein content than all-purpose flour, which means less gluten development and a softer cake. If you can’t find cake flour, you can make your own! For every cup of cake flour needed, measure out 1 cup of all-purpose flour, remove 2 tablespoons, and then replace those 2 tablespoons with cornstarch. Sift this mixture thoroughly before using.
- Vanilla Bean Paste or Fresh Vanilla Bean: This is where the magic happens for the “vanilla bean” aspect of our cake. Vanilla bean paste offers those gorgeous specks and a robust flavor, almost as good as scraping a fresh vanilla bean pod. If using a fresh vanilla bean, simply split it lengthwise and scrape out the fragrant seeds. Good quality pure vanilla extract can be used in a pinch, but you might miss those charming little specks.
- Unsalted Butter: For both the cake and the buttercream, unsalted butter gives you control over the salt content. Make sure it’s at room temperature for both components – this ensures proper creaming for the cake batter and a smooth, lump-free buttercream. For a dairy-free option, a good quality plant-based butter substitute can work well.
- Buttermilk: The tanginess of buttermilk reacts with the baking soda, contributing to a tender crumb and a subtle flavor depth. If you don’t have buttermilk, you can make a quick substitute: add 1 tablespoon of lemon juice or white vinegar to a liquid measuring cup, then fill it to the 1-cup mark with whole milk (or a non-dairy alternative). Let it sit for 5-10 minutes until it slightly curdles.
- Gel Food Coloring: For the stunning pastel ombre layers and the vibrant floral buttercream, gel food coloring is a must. Unlike liquid food coloring, it’s highly concentrated, so you need less of it, which won’t thin out your batter or buttercream. Choose your favorite pastel shades – I love soft pinks, blues, yellows, and lavenders for that true “pastel” feel.
- Powdered Sugar (Confectioners’ Sugar): For the buttercream, this finely milled sugar dissolves beautifully, giving you a silky-smooth frosting. Sifting it before use is crucial to avoid lumps.
- Heavy Cream or Milk (for Buttercream): Just a splash helps achieve the perfect consistency for your buttercream. Heavy cream will give a richer, slightly more stable frosting, but whole milk works wonderfully too.
- Optional Floral Flavoring (for Buttercream): While the floral aspect of this cake is primarily visual, you can add a delicate floral note to your buttercream if desired. A tiny drop of food-grade rose water or lavender extract can be beautiful, but proceed with extreme caution as these can quickly become overpowering. I usually add it to just a small portion of the buttercream, or simply keep it vanilla for broad appeal.
Step-by-Step Instructions
For the Pastel Ombre Vanilla Bean Cake:
- Prepare Pans: Preheat your oven to 350°F (175°C). Grease and flour five 6-inch round cake pans or three 8-inch round cake pans. Line the bottoms with parchment paper circles.
- Combine Dry Ingredients: In a large bowl, whisk together the cake flour, granulated sugar, baking powder, and salt.
- Combine Wet Ingredients: In a separate medium bowl, whisk together the buttermilk, eggs, vanilla bean paste (or scraped vanilla bean seeds), and vegetable oil.
- Mix Batter: Add the wet ingredients to the dry ingredients. With an electric mixer on low speed, mix until just combined and no streaks of flour remain. Be careful not to overmix!
- Divide and Color Batter: Divide the cake batter evenly into 5 (or 3, depending on your pan choice) separate bowls. Gradually add a tiny amount of a different gel food coloring to each bowl, stirring gently until you achieve your desired pastel shade. Start with the lightest shade in one bowl, then add a bit more color to the next, and so on, to create your ombre gradient.
- Bake Cakes: Pour each colored batter into its prepared pan. Bake for 20-25 minutes for 6-inch pans, or 25-30 minutes for 8-inch pans, or until a wooden skewer inserted into the center comes out clean.
- Cool: Let the cakes cool in the pans for 10-15 minutes before inverting them onto a wire rack to cool completely. This is crucial before frosting!
For the Floral Buttercream:
- Cream Butter: In a large bowl with an electric mixer (stand mixer fitted with the paddle attachment is ideal), beat the room temperature unsalted butter on medium speed for 5-7 minutes, until it’s very light, pale, and fluffy. This aerates the butter, making a wonderfully light buttercream.
- Add Powdered Sugar: Gradually add the sifted powdered sugar, one cup at a time, mixing on low speed until combined, then increasing to medium-high. Scrape down the sides of the bowl often.
- Add Vanilla & Liquid: Once all the sugar is incorporated, beat in the vanilla extract. Slowly add the heavy cream or milk, a tablespoon at a time, until the buttercream reaches your desired consistency – thick enough to hold its shape for piping, but smooth enough to spread easily.
- Color for Floral Details: Divide a small amount of buttercream into separate bowls and tint with gel food coloring to create specific colors for your floral designs (e.g., green for leaves, pinks/purples for petals). Keep the majority of the buttercream white or a very pale, neutral color for covering the cake.
Assembly:
- Level Cakes: Once completely cool, use a serrated knife or cake leveler to level any domed tops from your cake layers.
- Crumb Coat: Place the darkest ombre cake layer on your serving plate or cake stand. Spread a thin layer of white/neutral buttercream over the top. Stack the next darkest layer, repeating until all layers are stacked, ending with the lightest ombre layer on top. Apply a very thin, even layer of buttercream all over the cake (top and sides). This is your “crumb coat” which traps any loose crumbs. Chill the cake in the refrigerator for at least 30 minutes, or until the crumb coat is firm.
- Final Coat: Once the crumb coat is firm, apply a generous, even layer of the remaining white/neutral buttercream to the top and sides of the cake. Use an offset spatula or bench scraper to smooth the sides and top. Chill again for 15-20 minutes to set.
- Decorate with Floral Buttercream: Using various piping tips (e.g., petal tips for roses, star tips for hydrangeas, leaf tips for foliage) and your colored buttercreams, pipe an assortment of flowers and leaves directly onto the chilled cake. You can create a cascade, a crown, or a scattered design – let your creativity bloom!
Tips & Suggestions
- For the Perfect Ombre: When coloring your batter, start with a very small amount of gel food coloring and add more incrementally. Remember you can always add more color, but you can’t take it away! Aim for distinct but harmonious pastel shades.
- Vanilla Bean Intensity: For the most pronounced vanilla bean flavor and visual speckles, don’t skimp on the vanilla bean paste or fresh vanilla bean. It truly elevates this cake beyond a basic vanilla.
- Don’t Overmix: With cake batter, overmixing develops too much gluten, resulting in a dense, tough cake. Mix until just combined. A few small lumps of flour are better than a rubbery cake!
- Room Temperature Ingredients: This is key for both the cake and buttercream. Cold ingredients don’t emulsify properly, leading to a lumpy batter or curdled buttercream.
- Buttercream Consistency is Crucial: If your buttercream is too stiff for piping, add a tiny bit more heavy cream or milk. If it’s too soft, add more sifted powdered sugar, a tablespoon at a time, or chill it for a few minutes. For intricate piping, slightly firmer buttercream holds its shape better.
- Practice Makes Perfect (Piping): If you’re new to piping flowers, don’t be intimidated! You can practice on a piece of parchment paper or waxed paper. If you don’t like a flower, simply scrape the buttercream back into the bowl and try again.
- Chill Between Steps: Chilling the cake after the crumb coat and before the final frosting, and then again before piping flowers, helps to set the frosting, making it much easier to work with and preventing dents.
- Leveling Layers: Even if your cakes bake flat, leveling them ensures a perfectly straight and stable cake, which is essential for a tall, multi-layered design.
Storage
Once you’ve poured your heart into creating this magnificent Pastel Ombre Vanilla Bean Birthday Cake, you’ll want to ensure it stays fresh and delicious!
- At Room Temperature: If your environment is cool (below 70°F or 21°C) and not too humid, the cake can be stored at room temperature for up to 2 days. Make sure it’s covered loosely with a cake dome or plastic wrap to prevent it from drying out.
- In the Refrigerator: For longer storage, or if your kitchen is warm, refrigerate the cake. Place it in an airtight cake carrier or cover it loosely with plastic wrap. It will stay fresh for up to 5-7 days.
- Serving Refrigerated Cake: To enjoy the best texture and flavor, bring the refrigerated cake to room temperature for at least 1-2 hours before serving. This allows the buttercream to soften and the cake layers to become moist again.
- Freezing Cake Layers (Unfrosted): You can bake the cake layers ahead of time! Once completely cooled, wrap each unfrosted layer individually and tightly in plastic wrap, then again in aluminum foil. They can be frozen for up to 2 months. Thaw overnight in the refrigerator before unwrapping and frosting.
- Freezing a Frosted Cake: For best results, freeze a frosted cake after it’s been chilled. Place the cake (uncovered) in the freezer until the frosting is firm (about 1-2 hours). Then, wrap the entire cake tightly in plastic wrap, and then again in aluminum foil. It can be frozen for up to 1 month. Thaw overnight in the refrigerator, then bring to room temperature for an hour or two before serving.
Final Thoughts
So there you have it! My absolute joy in sharing the Pastel Ombre Vanilla Bean Birthday Cake With Floral Buttercream with you. This isn’t just any cake; it’s a celebration in itself, a delightful journey from its captivating pastel layers to the luxurious aroma of real vanilla bean. The true magic lies in the stunning visual appeal of the ombre effect, paired with the delicate artistry of the floral buttercream, making every slice a feast for the eyes and the palate. I truly believe that making the Pastel Ombre Vanilla Bean Birthday Cake With Floral Buttercream is an experience that brings so much warmth and happiness, perfect for creating unforgettable birthday memories or simply brightening any day with a touch of homemade elegance. Give it a try – you’ll be so glad you did!

Pastel Ombre Vanilla Bean Birthday Cake: Pastel Hues, Floral Decor
- Total Time: 1 hour
- Yield: 12 servings
Description
This stunning Pastel Ombre Vanilla Bean Birthday Cake is an edible work of art, perfect for any celebration. With light, tender vanilla bean sponges and luxurious floral buttercream, it’s sure to impress your guests!
Ingredients
- Cake Flour
- Granulated Sugar
- Baking Powder
- Salt
- Buttermilk
- Eggs
- Vanilla Bean Paste or Fresh Vanilla Bean
- Vegetable Oil
- Gel Food Coloring
- Unsalted Butter
- Powdered Sugar (Confectioners' Sugar)
- Heavy Cream or Milk (for Buttercream)
- Optional Floral Flavoring (for Buttercream)
Instructions
- Preheat your oven to 350°F (175°C). Grease and flour five 6-inch round cake pans or three 8-inch round cake pans. Line the bottoms with parchment paper circles.
- In a large bowl, whisk together the cake flour, granulated sugar, baking powder, and salt.
- In a separate medium bowl, whisk together the buttermilk, eggs, vanilla bean paste (or scraped vanilla bean seeds), and vegetable oil.
- Add the wet ingredients to the dry ingredients. With an electric mixer on low speed, mix until just combined and no streaks of flour remain. Be careful not to overmix!
- Divide the cake batter evenly into 5 (or 3, depending on your pan choice) separate bowls. Gradually add a tiny amount of a different gel food coloring to each bowl, stirring gently until you achieve your desired pastel shade.
- Pour each colored batter into its prepared pan. Bake for 20-25 minutes for 6-inch pans, or 25-30 minutes for 8-inch pans, or until a wooden skewer inserted into the center comes out clean.
- Let the cakes cool in the pans for 10-15 minutes before inverting them onto a wire rack to cool completely.
- In a large bowl with an electric mixer, beat the room temperature unsalted butter on medium speed for 5-7 minutes, until it's very light, pale, and fluffy.
- Gradually add the sifted powdered sugar, one cup at a time, mixing on low speed until combined, then increasing to medium-high.
- Once all the sugar is incorporated, beat in the vanilla extract. Slowly add the heavy cream or milk, a tablespoon at a time, until the buttercream reaches your desired consistency.
- Divide a small amount of buttercream into separate bowls and tint with gel food coloring to create specific colors for your floral designs.
- Once completely cool, use a serrated knife or cake leveler to level any domed tops from your cake layers.
- Place the darkest ombre cake layer on your serving plate or cake stand. Spread a thin layer of white/neutral buttercream over the top. Stack the next darkest layer, repeating until all layers are stacked, ending with the lightest ombre layer on top.
- Apply a very thin, even layer of buttercream all over the cake (top and sides). Chill the cake in the refrigerator for at least 30 minutes, or until the crumb coat is firm.
- Once the crumb coat is firm, apply a generous, even layer of the remaining white/neutral buttercream to the top and sides of the cake. Chill again for 15-20 minutes to set.
- Using various piping tips and your colored buttercreams, pipe an assortment of flowers and leaves directly onto the chilled cake.
- Prep Time: 30 mins
- Cook Time: 30 mins
- Category: Dessert
- Method: Baking
- Cuisine: American
Nutrition
- Serving Size: 1 slice
- Calories: 350
- Sugar: 30 g
- Sodium: 200 mg
- Fat: 15 g
- Saturated Fat: 9 g
- Unsaturated Fat: 5 g
- Trans Fat: 0 g
- Carbohydrates: 45 g
- Fiber: 1 g
- Protein: 4 g
- Cholesterol: 50 mg
Keywords: For the best flavor, use high-quality ingredients. Ensure all ingredients are at room temperature for optimal mixing and texture.
Leave a Comment